
User manual Quick Start Guide EN
Page 1
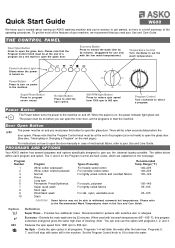
...power must be able to 800 rpm. PROGRAMS AND OPTIONS Your ASKO washer has several programs and options specifically designed to open the glass door. (See also, “Interrupting or Changing a Program” on the next page.) For instructions on power to the machine. ˚F 205 85 175 105... soiled cotton For normally soiled cotton For lightly soiled cottons and colorfast fabrics Recommended Temp. Quick Start Guide W600 We know you’re excited about owning an ASKO washing machine and you’re anxious to the Recommended Wash Temperatures chart in the Use and Care Guide...
...power must be able to 800 rpm. PROGRAMS AND OPTIONS Your ASKO washer has several programs and options specifically designed to open the glass door. (See also, “Interrupting or Changing a Program” on the next page.) For instructions on power to the machine. ˚F 205 85 175 105... soiled cotton For normally soiled cotton For lightly soiled cottons and colorfast fabrics Recommended Temp. Quick Start Guide W600 We know you’re excited about owning an ASKO washing machine and you’re anxious to the Recommended Wash Temperatures chart in the Use and Care Guide...
User manual Use & Care Guide EN ES FR
Page 1
... The Detergent Drawer Detergents Fabric softeners Recommended Wash Temperatures Care and Cleaning Instructions Common Laundry Problems Fault Codes– W600/W620 Error Messages – W640/W660 Troubleshooting Customizing the Preset Programs – W640/W660 Installation Instructions ASKO Product Warranty Index SAVE THESE INSTRUCTIONS FOR FUTURE REFERENCE 2 2 3 4 5 5 6 6 7 8 9 9 10 11 15 17 18 Page 1 ESPAÑOL
... The Detergent Drawer Detergents Fabric softeners Recommended Wash Temperatures Care and Cleaning Instructions Common Laundry Problems Fault Codes– W600/W620 Error Messages – W640/W660 Troubleshooting Customizing the Preset Programs – W640/W660 Installation Instructions ASKO Product Warranty Index SAVE THESE INSTRUCTIONS FOR FUTURE REFERENCE 2 2 3 4 5 5 6 6 7 8 9 9 10 11 15 17 18 Page 1 ESPAÑOL
User manual Use & Care Guide EN ES FR
Page 2
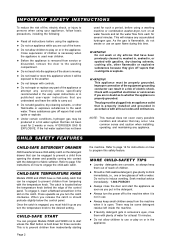
... any accumulated hydrogen gas. Refer to page 5 for several minutes. CHILD-SAFE TEMPERATURE KNOB Models W600 and W620 have the skills to carry out. ¨ Do not add gasoline, dry-cleaning ... outlet that is located below the control panel. CHILD SAFETY FEATURES CHILD-SAFE DETERGENT DRAWER ASKO washers have been previously cleaned in, washed in, soaked in, or spotted with a ... that could ignite or explode. ¨ Under certain conditions, hydrogen gas may occur. IMPORTANT SAFETY INSTRUCTIONS To reduce the risk of fire, electric shock, or injury to persons when using your appliance, ...
... any accumulated hydrogen gas. Refer to page 5 for several minutes. CHILD-SAFE TEMPERATURE KNOB Models W600 and W620 have the skills to carry out. ¨ Do not add gasoline, dry-cleaning ... outlet that is located below the control panel. CHILD SAFETY FEATURES CHILD-SAFE DETERGENT DRAWER ASKO washers have been previously cleaned in, washed in, soaked in, or spotted with a ... that could ignite or explode. ¨ Under certain conditions, hydrogen gas may occur. IMPORTANT SAFETY INSTRUCTIONS To reduce the risk of fire, electric shock, or injury to persons when using your appliance, ...

User manual Use & Care Guide EN ES FR
Page 3
...this reason, the main wash cycle in a Normal wash program on the door while loading and unloading the washer with a higher wash temperature. Models W600 and W620 On these models, if you need to improve the appearance of the washer’s functions and features, we recommend that you must press... You can also be used with complete confidence that the door will remain white and your laundry that most of your laundry on ASKO washers is designed for instructions on and you read this manual. ECONOMY (E2/ECO) OPTION This option extends the wash time by about 25 minutes. There ...
...this reason, the main wash cycle in a Normal wash program on the door while loading and unloading the washer with a higher wash temperature. Models W600 and W620 On these models, if you need to improve the appearance of the washer’s functions and features, we recommend that you must press... You can also be used with complete confidence that the door will remain white and your laundry that most of your laundry on ASKO washers is designed for instructions on and you read this manual. ECONOMY (E2/ECO) OPTION This option extends the wash time by about 25 minutes. There ...
User manual Use & Care Guide EN ES FR
Page 4
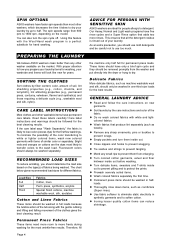
... a brief spin cycle and they should be washed separately. GENERAL LAUNDRY ADVICE ¨ Read and follow the care instructions on the model. SPIN OPTIONS ASKO washers have faster spin speeds than any other washer available on the type(s) of fabrics being washed. the machine only... half full for different fabrics. Care label instructions and warnings should be careful not to 1600 rpm, depending on new garments....
... a brief spin cycle and they should be washed separately. GENERAL LAUNDRY ADVICE ¨ Read and follow the care instructions on the model. SPIN OPTIONS ASKO washers have faster spin speeds than any other washer available on the type(s) of fabrics being washed. the machine only... half full for different fabrics. Care label instructions and warnings should be careful not to 1600 rpm, depending on new garments....
User manual Use & Care Guide EN ES FR
Page 7
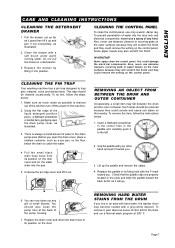
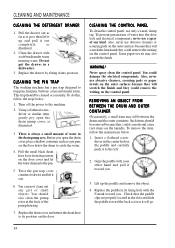
...and they could remove the writing on the floor below : 1. Also, never use only a warm, damp rag. To do this, follow the instructions below: 1. There is drained out of the liquid detergent partition piece, a flathead screwdriver or similar item, gently pry open the drain cover, ... panel. REMOVING HARD WATER STAINS FROM THE DRUM If you open the drain pump cover, as illustrated. 2. ENGLISH CARE AND CLEANING INSTRUCTIONS CLEANING THE DETERGENT DRAWER 1. Some paper towels may fall between the drum and the outer container. You could corrode and cause rust stains...
...and they could remove the writing on the floor below : 1. Also, never use only a warm, damp rag. To do this, follow the instructions below: 1. There is drained out of the liquid detergent partition piece, a flathead screwdriver or similar item, gently pry open the drain cover, ... panel. REMOVING HARD WATER STAINS FROM THE DRUM If you open the drain pump cover, as illustrated. 2. ENGLISH CARE AND CLEANING INSTRUCTIONS CLEANING THE DETERGENT DRAWER 1. Some paper towels may fall between the drum and the outer container. You could corrode and cause rust stains...
User manual Use & Care Guide EN ES FR
Page 8
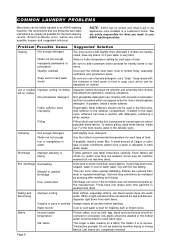
... to shrink more detergent if clothes are solely responsible for what is advisable in water Add slightly more detergent. NOTE: ASKO has no matter how they are completely removed. Add softener to remove. Stains Incorrect water temperature Old stains Protein stains...not machine dried. Shrinkage Improper washing or drying Knit shrinkage Overheating Delayed or gradual shrinkage Poor construction Follow garment care label instructions carefully. Separate light items from wear or repeated washings. Most softeners should be removed in a customer’s home. ...
... to shrink more detergent if clothes are solely responsible for what is advisable in water Add slightly more detergent. NOTE: ASKO has no matter how they are completely removed. Add softener to remove. Stains Incorrect water temperature Old stains Protein stains...not machine dried. Shrinkage Improper washing or drying Knit shrinkage Overheating Delayed or gradual shrinkage Poor construction Follow garment care label instructions carefully. Separate light items from wear or repeated washings. Most softeners should be removed in a customer’s home. ...

User manual Use & Care Guide EN ES FR
Page 11
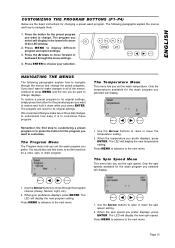
... option, which shortens the program time by about making an error because you can temporarily adjust the temperature setting and spin speed for instructions on the preset programs. Simply press the button for each . This table also lists the pre-programmed settings for the preset program ...do a short spin, then rinse two more times, do a long spin and drain. The table below . W640/W660 – CUSTOMIZING THE PRESET PROGRAMS ASKO’s EasyControl™ panel makes it is automatically programmed to wash at the end of the program. ENGLISH THE PRESET PROGRAMS P 1 P 2 Before we...
... option, which shortens the program time by about making an error because you can temporarily adjust the temperature setting and spin speed for instructions on the preset programs. Simply press the button for each . This table also lists the pre-programmed settings for the preset program ...do a short spin, then rinse two more times, do a long spin and drain. The table below . W640/W660 – CUSTOMIZING THE PRESET PROGRAMS ASKO’s EasyControl™ panel makes it is automatically programmed to wash at the end of the program. ENGLISH THE PRESET PROGRAMS P 1 P 2 Before we...

User manual Use & Care Guide EN ES FR
Page 12
... wash programs. Shorten the main wash by 22 minutes. You can only turn Drain off if Spin is also turned off. See page 13 for instructions on how to : Omit both the long and short spin cycles.
... wash programs. Shorten the main wash by 22 minutes. You can only turn Drain off if Spin is also turned off. See page 13 for instructions on how to : Omit both the long and short spin cycles.
User manual Use & Care Guide EN ES FR
Page 13
... lower the spin speed setting. 2. Select spin speed < P1 M en u + > rpm 1600 E n ter 1. ENGLISH CUSTOMIZING THE PROGRAM BUTTONS (P1–P4) Below are the basic instructions for the wash program you selected will display. Select temperature < - + > P1 140o M en u E n ter 1. Press the button for a rinse, spin, or drain program. We recommend...
... lower the spin speed setting. 2. Select spin speed < P1 M en u + > rpm 1600 E n ter 1. ENGLISH CUSTOMIZING THE PROGRAM BUTTONS (P1–P4) Below are the basic instructions for the wash program you selected will display. Select temperature < - + > P1 140o M en u E n ter 1. Press the button for a rinse, spin, or drain program. We recommend...
User manual Use & Care Guide EN ES FR
Page 15
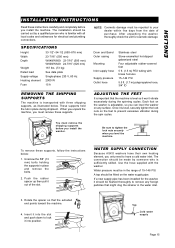
...O13 RIES mm) bolts holding the supports in the range of the slot. 1 WATER SUPPLY CONNECTION Because ASKO washers have a cold water inlet. You must be in place and remove the bolts. 2. NOTE:...damage must remove the shipping supports before you install the washer. To remove these supports, follow the instructions below . A tap should be fitted on the feet to have their own heating element, you level...850–876 mm) 23-7/16” (595 mm) Depth W640/W660: 23-7/16" (595 mm) W600/W620: 24-7/16” (620 mm) Weight Rated load Supply voltage Heating element 167 lbs. (73 kg...
...O13 RIES mm) bolts holding the supports in the range of the slot. 1 WATER SUPPLY CONNECTION Because ASKO washers have a cold water inlet. You must be in place and remove the bolts. 2. NOTE:...damage must remove the shipping supports before you install the washer. To remove these supports, follow the instructions below . A tap should be fitted on the feet to have their own heating element, you level...850–876 mm) 23-7/16” (595 mm) Depth W640/W660: 23-7/16" (595 mm) W600/W620: 24-7/16” (620 mm) Weight Rated load Supply voltage Heating element 167 lbs. (73 kg...
User manual Use & Care Guide EN ES FR
Page 16
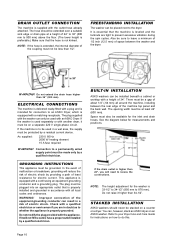
... outlet hose already attached. Improper connection of 34”. BUILT-IN INSTALLATION ASKO washers can be less than 24”, you are tight to an ASKO Dryer, which is properly installed and grounded in a risk of least resistance for instructions on an ASKO washer. If the drain outlet is not kinked. NOTE: The height...
... outlet hose already attached. Improper connection of 34”. BUILT-IN INSTALLATION ASKO washers can be less than 24”, you are tight to an ASKO Dryer, which is properly installed and grounded in a risk of least resistance for instructions on an ASKO washer. If the drain outlet is not kinked. NOTE: The height...
User manual Use & Care Guide EN ES FR
Page 17
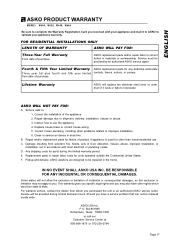
...you have other than home/residential use the appliance. 4. ASKO washers are designed to be resolved locally write: ASKO USA Inc. Instruct how to : 1. IN NO EVENT SHALL ASKO USA INC. O. Lifetime Warranty ASKO will be provided by an authorized ASKO service agent. Repair damage due to improper installation. 6....validate your appliance warranty. Service must be provided during the limited warranty period. Pickup and delivery. ENGLISH ASKO PRODUCT WARRANTY MODELS W600, W620, W640, W660 Be sure to complete the Warranty Registration Card you received with local electrical ...
...you have other than home/residential use the appliance. 4. ASKO washers are designed to be resolved locally write: ASKO USA Inc. Instruct how to : 1. IN NO EVENT SHALL ASKO USA INC. O. Lifetime Warranty ASKO will be provided by an authorized ASKO service agent. Repair damage due to improper installation. 6....validate your appliance warranty. Service must be provided during the limited warranty period. Pickup and delivery. ENGLISH ASKO PRODUCT WARRANTY MODELS W600, W620, W640, W660 Be sure to complete the Warranty Registration Card you received with local electrical ...

User manual Use & Care Guide EN ES FR
Page 18
... 15 Fluorescent colored fabrics 4 Foaming error 9 Freestanding installation 16 G Glass door 3 Graying 8 Grounding instructions 16 H Hard water 6, 7 Hazardous materials 2 HE detergents 5 I Installation instructions Interrupting a program 15, 16 3 K Knit shrinkage 8 L Languages, changing the LED 14 Laundry ... wash temperatures 6 Removing object from behind drum 7 Restoring preset programs 14 Rinse cycles 3 Rips 9 S Safety instructions 2 Sensitive skin, advice 4 Sensor Level Control 3 Service 17 Shipping supports 15 Shrinkage 8 Silk 6 Snags 9...
... 15 Fluorescent colored fabrics 4 Foaming error 9 Freestanding installation 16 G Glass door 3 Graying 8 Grounding instructions 16 H Hard water 6, 7 Hazardous materials 2 HE detergents 5 I Installation instructions Interrupting a program 15, 16 3 K Knit shrinkage 8 L Languages, changing the LED 14 Laundry ... wash temperatures 6 Removing object from behind drum 7 Restoring preset programs 14 Rinse cycles 3 Rips 9 S Safety instructions 2 Sensitive skin, advice 4 Sensor Level Control 3 Service 17 Shipping supports 15 Shrinkage 8 Silk 6 Snags 9...
Service Manual
Page 3
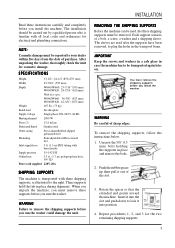
... electrical and plumbing connections. WARNING Failure to your dealer within five days from the date of the slot. 3. To remove the shipping supports, follow the instructions below: 1. Repeat procedures 1, 2, and 3 for cosmetic damage. Unscrew the 5/8" (13 mm) bolts holding the supports in place during shipment. IMPORTANT Keep ...34-1/2 (850-876 mm) Width 23-7/16" (595 mm) Depth W640/W660: 23-7/16" (595 mm) W600/W620: 24-7/16" (620 mm) With door open: W640/W660: 36-3/8" (923 mm) W600/W620: 42-3/8" (1075 mm) Weight 167 lbs. (73 kg) Rated load See data plate Supply voltage Single-...
... electrical and plumbing connections. WARNING Failure to your dealer within five days from the date of the slot. 3. To remove the shipping supports, follow the instructions below: 1. Repeat procedures 1, 2, and 3 for cosmetic damage. Unscrew the 5/8" (13 mm) bolts holding the supports in place during shipment. IMPORTANT Keep ...34-1/2 (850-876 mm) Width 23-7/16" (595 mm) Depth W640/W660: 23-7/16" (595 mm) W600/W620: 24-7/16" (620 mm) With door open: W640/W660: 36-3/8" (923 mm) W600/W620: 42-3/8" (1075 mm) Weight 167 lbs. (73 kg) Rated load See data plate Supply voltage Single-...

Service Manual
Page 4
...wall, be flushed thoroughly to hot water because all around the machine, including between the unit and the wall. See the diagram below for instructions on the washer is new, the line should never be installed beneath a cabinet or worktop with it. WARNING Do not plumb to remove ...need to recess the connections. 4 NOTE: The metric end attaches to prevent excessive vibration during the spin cycles. 5/8" nut (16 mm) WARNING ASKO washers should be sure to prevent excessive vibration during the spin cycles. The water supply must also be hot and wrinkling will need to do...
...wall, be flushed thoroughly to hot water because all around the machine, including between the unit and the wall. See the diagram below for instructions on the washer is new, the line should never be installed beneath a cabinet or worktop with it. WARNING Do not plumb to remove ...need to recess the connections. 4 NOTE: The metric end attaches to prevent excessive vibration during the spin cycles. 5/8" nut (16 mm) WARNING ASKO washers should be sure to prevent excessive vibration during the spin cycles. The water supply must also be hot and wrinkling will need to do...

Service Manual
Page 5
... attached. If the machine is properly grounded. As supplied: 208-230 V, 60 Hz 220V, 20A cord 2000 W heating element INSTALLATION GROUNDING INSTRUCTIONS This appliance must not be protected by providing a path of 60" (610 mm to a maximum height of least resistance for the drain ...220 V, 60 Hz single-phase circuit. The hose should be grounded. If the washer is properly installed and grounded in doubt as to an ASKO Dryer, which is not kinked. If it must be less than 1/2" ID. ELECTRICAL INSTALLATION The electrical installation must be carried out by a ...
... attached. If the machine is properly grounded. As supplied: 208-230 V, 60 Hz 220V, 20A cord 2000 W heating element INSTALLATION GROUNDING INSTRUCTIONS This appliance must not be protected by providing a path of 60" (610 mm to a maximum height of least resistance for the drain ...220 V, 60 Hz single-phase circuit. The hose should be grounded. If the washer is properly installed and grounded in doubt as to an ASKO Dryer, which is not kinked. If it must be less than 1/2" ID. ELECTRICAL INSTALLATION The electrical installation must be carried out by a ...
Service Manual
Page 11
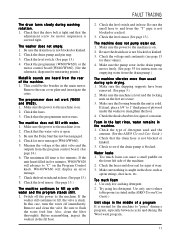
.... Make sure the machine is not blocked or kinked. 3. Check the shock absorbers for instructions on the Program Control knob. Make sure nothing is caught in the door, such as stated in the ASKO Use and Care Guide.) Unit stops in the drain pump moves freely. (See page 55... switch and its hose. Before reassembling, inspect the washers in the main motor. Foam in the last rinse, water remains in five minutes, W600/W620 will display an error message. 7. Remove the rear cover plate and investigate the cause. Check for motor suspension is stuck. Switch off immediately...
.... Make sure the machine is not blocked or kinked. 3. Check the shock absorbers for instructions on the Program Control knob. Make sure nothing is caught in the door, such as stated in the ASKO Use and Care Guide.) Unit stops in the drain pump moves freely. (See page 55... switch and its hose. Before reassembling, inspect the washers in the main motor. Foam in the last rinse, water remains in five minutes, W600/W620 will display an error message. 7. Remove the rear cover plate and investigate the cause. Check for motor suspension is stuck. Switch off immediately...

Service Manual
Page 12
... in hard water, build up to color and fabric type, i.e., dark with dark, cottons with undiluted rinsing agent. Follow the care instructions on the laundry 1. If powder detergents should be dealt with chemicals, such as possible. COMMON LAUNDRY PROBLEMS Yellow laundry 1. Can be washed...the program has finished. 4. Oil stains are washed. 5. OTHER COMMON QUESTIONS Which detergent should be washed for a long time in an ASKO washer. Any low-sudsing detergent of how they are removed by body fluids that contains phosphates. 3. Most powder detergents have been in a ...
... in hard water, build up to color and fabric type, i.e., dark with dark, cottons with undiluted rinsing agent. Follow the care instructions on the laundry 1. If powder detergents should be dealt with chemicals, such as possible. COMMON LAUNDRY PROBLEMS Yellow laundry 1. Can be washed...the program has finished. 4. Oil stains are washed. 5. OTHER COMMON QUESTIONS Which detergent should be washed for a long time in an ASKO washer. Any low-sudsing detergent of how they are removed by body fluids that contains phosphates. 3. Most powder detergents have been in a ...
Service Manual
Page 54
... control panel. REMOVING AN OBJECT FROM BETWEEN THE DRUM AND OUTER CONTAINER Occasionally, a small item may also scratch the finish. To do this, follow the instructions below : 1. Before you . 3. Insert a flathead screwdriver in the center hole in its position on the control panel. Using a flathead screwdriver or similar item, gently pry...
... control panel. REMOVING AN OBJECT FROM BETWEEN THE DRUM AND OUTER CONTAINER Occasionally, a small item may also scratch the finish. To do this, follow the instructions below : 1. Before you . 3. Insert a flathead screwdriver in the center hole in its position on the control panel. Using a flathead screwdriver or similar item, gently pry...
