User manual 8092831 Asko T754 EN
Page 2
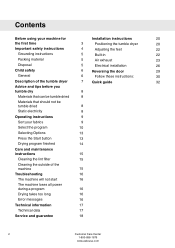
Contents Before using your machine for Installation instructions 20 the first time 3 Positioning the tumble dryer 20 Important safety instructions 4 Adjusting the feet 22 Grounding instructions 5 Built-in 22 Packing material 5 Air exhaust 23 Disposal 5 Electrical installation 26 Child safety 6 Reversing the door 29 General 6 Follow these instructions: 30 Description of the tumble dryer 7 Quick guide 32...
Contents Before using your machine for Installation instructions 20 the first time 3 Positioning the tumble dryer 20 Important safety instructions 4 Adjusting the feet 22 Grounding instructions 5 Built-in 22 Packing material 5 Air exhaust 23 Disposal 5 Electrical installation 26 Child safety 6 Reversing the door 29 General 6 Follow these instructions: 30 Description of the tumble dryer 7 Quick guide 32...
User manual 8092831 Asko T754 EN
Page 4
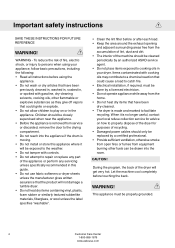
... purposes of recycling. • Damaged power cables should only be replaced by an authorized ASKO service agent. • Do not place items exposed to facilitate recycling. CAUTION! Let .... 4 Customer Care Center 1-800-898-1879 www.askousa.com WARNING! Important safety instructions SAVE THESE INSTRUCTIONS FOR FUTURE REFERENCE WARNING! WARNING - Children should be drawn into the appliance if ... is removed from service or discarded, remove the door to catch fire. • Electrical installation, if required, must be done by a licensed electrician. • Do not operate appliance...
... purposes of recycling. • Damaged power cables should only be replaced by an authorized ASKO service agent. • Do not place items exposed to facilitate recycling. CAUTION! Let .... 4 Customer Care Center 1-800-898-1879 www.askousa.com WARNING! Important safety instructions SAVE THESE INSTRUCTIONS FOR FUTURE REFERENCE WARNING! WARNING - Children should be drawn into the appliance if ... is removed from service or discarded, remove the door to catch fire. • Electrical installation, if required, must be done by a licensed electrician. • Do not operate appliance...
User manual 8092831 Asko T754 EN
Page 5
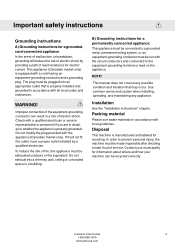
...into an appropriate outlet that may occur. NOTE! Use common sense and caution when installing, operating, and maintaining any appliance. Important safety instructions Grounding instructions A) Grounding instructions for a grounded, cord-connected appliance In the event of malfunction or breakdown, ... situation that is equipped with the circuit conductors and connected to whether the appliance is properly grounded. Installation See the "Installation instructions" chapter. Disposal This machine is manufactured and labeled for a permanently connected appliance: This appliance must ...
...into an appropriate outlet that may occur. NOTE! Use common sense and caution when installing, operating, and maintaining any appliance. Important safety instructions Grounding instructions A) Grounding instructions for a grounded, cord-connected appliance In the event of malfunction or breakdown, ... situation that is equipped with the circuit conductors and connected to whether the appliance is properly grounded. Installation See the "Installation instructions" chapter. Disposal This machine is manufactured and labeled for a permanently connected appliance: This appliance must ...
User manual 8092831 Asko T754 EN
Page 19
...• Service calls to be responsible for service or contacting ASKO Appliances Inc. Correct house plumbing, including drainage problems related to shipment, delivery, installation, misuse or abuse. 3. In no event shall ASKO Appliances Inc. This warranty gives you specific legal rights and you...appliance. 4. Instruct how to use . • Damage resulting from state to us at the number listed below. regarding a warranty issue, make a note of the appliance. 2. Before calling for any incidental or consequential damages. Service and guarantee Warranty ASKO Appliances Inc....
...• Service calls to be responsible for service or contacting ASKO Appliances Inc. Correct house plumbing, including drainage problems related to shipment, delivery, installation, misuse or abuse. 3. In no event shall ASKO Appliances Inc. This warranty gives you specific legal rights and you...appliance. 4. Instruct how to use . • Damage resulting from state to us at the number listed below. regarding a warranty issue, make a note of the appliance. 2. Before calling for any incidental or consequential damages. Service and guarantee Warranty ASKO Appliances Inc....
User manual 8092831 Asko T754 EN
Page 20
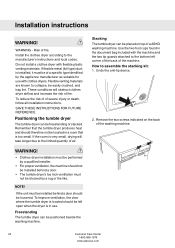
...proper ventilation, the machine should be left corner of the back of a ASKO washing machine. How to the manufacturer's instructions and local codes. Risk of severe injury or death, follow all installation instructions. NOTE! If the room is very small, drying will obstruct clothes ... assemble the stacking kit: 1. To reduce the risk of of fire. Installation instructions WARNING! Flexible venting materials are known to the bottom left open when the dryer is installed, it must be installed behind a door. • The tumble dryer's toe kick ventilation must ...
...proper ventilation, the machine should be left corner of the back of a ASKO washing machine. How to the manufacturer's instructions and local codes. Risk of severe injury or death, follow all installation instructions. NOTE! If the room is very small, drying will obstruct clothes ... assemble the stacking kit: 1. To reduce the risk of of fire. Installation instructions WARNING! Flexible venting materials are known to the bottom left open when the dryer is installed, it must be installed behind a door. • The tumble dryer's toe kick ventilation must ...
User manual 8092831 Asko T754 EN
Page 21
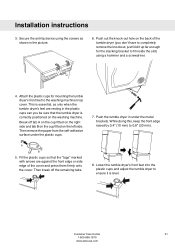
... doing this, keep the front edge raised by 0,4" (10 mm) to the washing machine's top cover. Secure the anti-tip device using a hammer and a screwdriver. 4. Installation instructions 3.
... doing this, keep the front edge raised by 0,4" (10 mm) to the washing machine's top cover. Secure the anti-tip device using a hammer and a screwdriver. 4. Installation instructions 3.
User manual 8092831 Asko T754 EN
Page 22
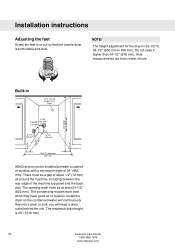
... a drain or sink, you will need a drain outlet behind the unit. Do not raise it higher than 34-1/2" (876 mm). Installation instructions Adjusting the feet Screw the feet in ASKO dryers can be installed beneath a cabinet or worktop with a minimum height of hole. The maximum drain height is 40" (1016 mm). 22 Customer Care...
... a drain or sink, you will need a drain outlet behind the unit. Do not raise it higher than 34-1/2" (876 mm). Installation instructions Adjusting the feet Screw the feet in ASKO dryers can be installed beneath a cabinet or worktop with a minimum height of hole. The maximum drain height is 40" (1016 mm). 22 Customer Care...

User manual 8092831 Asko T754 EN
Page 23
... condenser dryers. The dryer is a ½" (12mm) minimum clearance between units and cabinet or wall. Installation instructions Install in a closet ASKO's front panel controls make it possible to install the washers and dryers in the door. Asko dryers have a "T-style" Asko dryersehxahvaeuast vent that extend into the duct and catch lint. VeVnetnt TT--tutubbee RReeaarrEExxhhaauusstt Outlet Outlet...
... condenser dryers. The dryer is a ½" (12mm) minimum clearance between units and cabinet or wall. Installation instructions Install in a closet ASKO's front panel controls make it possible to install the washers and dryers in the door. Asko dryers have a "T-style" Asko dryersehxahvaeuast vent that extend into the duct and catch lint. VeVnetnt TT--tutubbee RReeaarrEExxhhaauusstt Outlet Outlet...
User manual 8092831 Asko T754 EN
Page 24
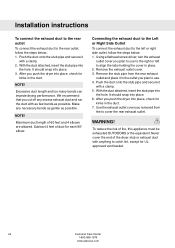
Installation instructions To connect the exhaust duct to the rear outlet To connect the exhaust duct to catch lint, except for kinks in place. 2. Push the duct ...
Installation instructions To connect the exhaust duct to the rear outlet To connect the exhaust duct to catch lint, except for kinks in place. 2. Push the duct ...
User manual 8092831 Asko T754 EN
Page 25
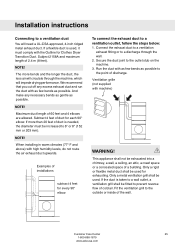
... more bends and the longer the duct, the less air will circulate through the wall. 2. Examples of installations subtract 4 feet for exhausting. Connect the exhaust duct to a ventilation exhaust fitting or to the outside or...any necessary bends as gentle as possible. Subtract 4 feet of 60 feet and 4 elbows are allowed. When installing in warm climates (77° F and above) with machine) WARNING! This appliance shall not be fitted to... of 2.4 m (8 feet). Run the duct with the Outline for each 90° elbow. Installation instructions Connecting to the point of discharge.
... more bends and the longer the duct, the less air will circulate through the wall. 2. Examples of installations subtract 4 feet for exhausting. Connect the exhaust duct to a ventilation exhaust fitting or to the outside or...any necessary bends as gentle as possible. Subtract 4 feet of 60 feet and 4 elbows are allowed. When installing in warm climates (77° F and above) with machine) WARNING! This appliance shall not be fitted to... of 2.4 m (8 feet). Run the duct with the Outline for each 90° elbow. Installation instructions Connecting to the point of discharge.
User manual 8092831 Asko T754 EN
Page 26
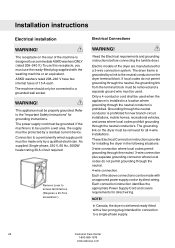
Installation instructions Electrical installation WARNING! Grounding through the neutral conductor is installed in a wet area, the supply must be used. These Electrical Connection instructions provide for installing the dryer in the following situations: 3-wire connection where local codes permit grounding through...WARNING! Refer to access terminal box. (Requires a 20-Torx screwdriver.) Electrical Connections WARNING! If the machine is to accommodate ASKO washers ONLY (rated 208-240 V.) To use this receptacle, you must use the ready-fitted plug supplied with the washing ...
Installation instructions Electrical installation WARNING! Grounding through the neutral conductor is installed in a wet area, the supply must be used. These Electrical Connection instructions provide for installing the dryer in the following situations: 3-wire connection where local codes permit grounding through...WARNING! Refer to access terminal box. (Requires a 20-Torx screwdriver.) Electrical Connections WARNING! If the machine is to accommodate ASKO washers ONLY (rated 208-240 V.) To use this receptacle, you must use the ready-fitted plug supplied with the washing ...
User manual 8092831 Asko T754 EN
Page 27
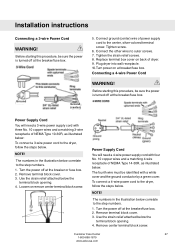
... opening . 4. Turn power on back of NEMA Type 10-30R, as illustrated below correlate to the step numbers. 1. NOTE! The numbers in the illustration below . Installation instructions Connecting a 3-wire Power Cord WARNING! Turn the power off at the breaker/fuse box. Remove terminal block cover. 3. To connect a 4-wire power cord to the...
... opening . 4. Turn power on back of NEMA Type 10-30R, as illustrated below correlate to the step numbers. 1. NOTE! The numbers in the illustration below . Installation instructions Connecting a 3-wire Power Cord WARNING! Turn the power off at the breaker/fuse box. Remove terminal block cover. 3. To connect a 4-wire power cord to the...
User manual 8092831 Asko T754 EN
Page 28
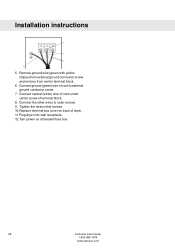
Remove ground wire (green with yellow stripes) from external ground connector screw and remove from center terminal block. 6. Tighten the strain relief screws. 10. Turn power on back of dryer. 11. Replace terminal box cover on at breaker/fuse box. 28 Customer Care Center 1-800-898-1879 www.askousa.com Plug dryer into wall receptacle. 12. Connect the other wires to external ground conductor screw. 7. Connect neutral (white) wire of cord under center screw of cord to outer screws. 9. Installation instructions 4 7 8 6 5. Connect ground (green) wire of terminal block. 8.
Remove ground wire (green with yellow stripes) from external ground connector screw and remove from center terminal block. 6. Tighten the strain relief screws. 10. Turn power on back of dryer. 11. Replace terminal box cover on at breaker/fuse box. 28 Customer Care Center 1-800-898-1879 www.askousa.com Plug dryer into wall receptacle. 12. Connect the other wires to external ground conductor screw. 7. Connect neutral (white) wire of cord under center screw of cord to outer screws. 9. Installation instructions 4 7 8 6 5. Connect ground (green) wire of terminal block. 8.
