

User manual 80 811 93 Asko T712 EN
Page 2
... 17 Disposal 5 Service and guarantee 18 Child safety 6 Warranty 19 General 6 How to contact the ASKO Description of the tumble dryer 7 Appliances Inc. 19 Front panel 8 Installation instructions 20 Options button 8 Positioning the tumble dryer 20 Advice and tips before you Adjusting the feet ...23 tumble dry 9 Air exhaust 23 Have the clothes been spun? 9 Electrical installation 25 Materials that can be tumble dried 9 Reversing the door 28 Materials that should not be Reversing the door 28 tumble dried 9...
... 17 Disposal 5 Service and guarantee 18 Child safety 6 Warranty 19 General 6 How to contact the ASKO Description of the tumble dryer 7 Appliances Inc. 19 Front panel 8 Installation instructions 20 Options button 8 Positioning the tumble dryer 20 Advice and tips before you Adjusting the feet ...23 tumble dry 9 Air exhaust 23 Have the clothes been spun? 9 Electrical installation 25 Materials that can be tumble dried 9 Reversing the door 28 Materials that should not be Reversing the door 28 tumble dried 9...

User manual 80 811 93 Asko T712 EN
Page 4
...areas free from the accumulation of lint, dust and dirt. • The interior of the machine should be cleaned periodically by an authorized ASKO service agent. • Do not place items exposed to persons when using the appli- During the program, the back of the dryer ...unless specifically recommended in , or spotted with cooking oils may contribute to a chemical reaction that could cause a load to catch fire. • Electrical installation, if required, must be properly grounded. 4 Customer Care Center 1-800-898-1879 www.askousa.com Warning! When it will get very hot. Important...
...areas free from the accumulation of lint, dust and dirt. • The interior of the machine should be cleaned periodically by an authorized ASKO service agent. • Do not place items exposed to persons when using the appli- During the program, the back of the dryer ...unless specifically recommended in , or spotted with cooking oils may contribute to a chemical reaction that could cause a load to catch fire. • Electrical installation, if required, must be properly grounded. 4 Customer Care Center 1-800-898-1879 www.askousa.com Warning! When it will get very hot. Important...
User manual 80 811 93 Asko T712 EN
Page 5
... for a permanently connected appliance: This appliance must be connected to dispose of it will not fit the outlet, have a proper outlet installed by : • Opening the door. Interrupting a program You can result in accordance with a qualified electrician or service representative or personnel... drying, simply close the door and press the Start/Stop button. Save these instructions for recycling. Use common sense and caution when installing, operating, and maintaining any appliance. Packing material Please sort waste materials in a building. If it . The plug must be run...
... for a permanently connected appliance: This appliance must be connected to dispose of it will not fit the outlet, have a proper outlet installed by : • Opening the door. Interrupting a program You can result in accordance with a qualified electrician or service representative or personnel... drying, simply close the door and press the Start/Stop button. Save these instructions for recycling. Use common sense and caution when installing, operating, and maintaining any appliance. Packing material Please sort waste materials in a building. If it . The plug must be run...

User manual 80 811 93 Asko T712 EN
Page 14
Operating instructions To install the automatic drain hose, please see the section titled Installation 8Once drying has finished Turn off the main power switch. Remove the clothes and close the door to prevent small children from climbing into the machine. 14 Customer Care Center 1-800-898-1879 www.askousa.com
Operating instructions To install the automatic drain hose, please see the section titled Installation 8Once drying has finished Turn off the main power switch. Remove the clothes and close the door to prevent small children from climbing into the machine. 14 Customer Care Center 1-800-898-1879 www.askousa.com

User manual 80 811 93 Asko T712 EN
Page 18
... purchase. will pay for cosmetic damage. vice must be e-mailed a certificate that will be provided by an authorized ASKO service agent. Ser- ASKO replacement parts and/or repair labor to cor- tration and filling out all required fields within 90 days from the ... with the product and mail it exhibits a manufacturing defect such as cracking or rusting through. For residential installations only ASKO Appliances Inc. For non-residential installations One-year Full War- Service must be provided by logging onto www.askousa.com/customercare/regis- Service and...
... purchase. will pay for cosmetic damage. vice must be e-mailed a certificate that will be provided by an authorized ASKO service agent. Ser- ASKO replacement parts and/or repair labor to cor- tration and filling out all required fields within 90 days from the ... with the product and mail it exhibits a manufacturing defect such as cracking or rusting through. For residential installations only ASKO Appliances Inc. For non-residential installations One-year Full War- Service must be provided by logging onto www.askousa.com/customercare/regis- Service and...
User manual 80 811 93 Asko T712 EN
Page 19
.... 2. stallation, misuse or abuse. 3. Some states will not pay for any incidental or consequential damages. Write to contact the ASKO Appliances Inc. P.O. Correct the installation of the model, type name, and serial number. Clean or service air device in - How to us at... period. • Replacement parts or repair labor costs for service or contacting ASKO Appliances Inc. In no event shall ASKO Appliances Inc. Repair damage due to use . • Damage resulting from state to improper installation. 6. will not allow the exclusion or limitation of God, alteration, misuse,...
.... 2. stallation, misuse or abuse. 3. Some states will not pay for any incidental or consequential damages. Write to contact the ASKO Appliances Inc. P.O. Correct the installation of the model, type name, and serial number. Clean or service air device in - How to us at... period. • Replacement parts or repair labor costs for service or contacting ASKO Appliances Inc. In no event shall ASKO Appliances Inc. Repair damage due to use . • Damage resulting from state to improper installation. 6. will not allow the exclusion or limitation of God, alteration, misuse,...
User manual 80 811 93 Asko T712 EN
Page 20
... clothes dryer airflow and increase the risk of fire. Caution! Install the clothes dryer according to the bottom left open when the dryer is installed, it must be blocked by a qualified installer. Do not install a clothes dryer with clothes dryers. If flexible metal (foil ... crushed, and trap lint. For proper ventilation, the machine should be left corner at the back of a ASKO washing machine. Clothes dryer installation must not be installed behind a door. Freestanding The tumble dryer can be positioned beside the washing machine. Caution! A. B. Positioning...
... clothes dryer airflow and increase the risk of fire. Caution! Install the clothes dryer according to the bottom left open when the dryer is installed, it must be blocked by a qualified installer. Do not install a clothes dryer with clothes dryers. If flexible metal (foil ... crushed, and trap lint. For proper ventilation, the machine should be left corner at the back of a ASKO washing machine. Clothes dryer installation must not be installed behind a door. Freestanding The tumble dryer can be positioned beside the washing machine. Caution! A. B. Positioning...

User manual 80 811 93 Asko T712 EN
Page 21
... top panel and the back wall. Do not raise it higher than 34-1/2" (876 mm). Customer Care Center 21 1-800-898-1879 www.askousa.com Install the dryer so the condensed water will continuously flow into a drain or sink, you will need a drain outlet behind the unit. Built-in... ASKO dryers can be at least 24-1/2" (622 mm). There must be installed beneath a cabinet or worktop with a minimum height of hole. Hole measurements are from center of 34" (864 mm...
... top panel and the back wall. Do not raise it higher than 34-1/2" (876 mm). Customer Care Center 21 1-800-898-1879 www.askousa.com Install the dryer so the condensed water will continuously flow into a drain or sink, you will need a drain outlet behind the unit. Built-in... ASKO dryers can be at least 24-1/2" (622 mm). There must be installed beneath a cabinet or worktop with a minimum height of hole. Hole measurements are from center of 34" (864 mm...
User manual 80 811 93 Asko T712 EN
Page 22
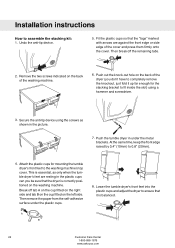
.... Remove the two screws indicated on the washing machine. At the same time, keep the front edge raised by 0,4" (10mm) to assemble the stacking kit: 1. Installation instructions How to 0,8" (20mm). 4. Attach the plastic cups for the stacking bracket to fit inside the slot) using the screws as only when the tumble...
.... Remove the two screws indicated on the washing machine. At the same time, keep the front edge raised by 0,4" (10mm) to assemble the stacking kit: 1. Installation instructions How to 0,8" (20mm). 4. Attach the plastic cups for the stacking bracket to fit inside the slot) using the screws as only when the tumble...

User manual 80 811 93 Asko T712 EN
Page 23
Asko dryers have a "T-stile" exhaust vent that extend into the hole. Lock nut Air exhaust Connecting the exhaust duct to the dryer Note You will need .... Customer Care Center 23 1-800-898-1879 www.askousa.com The dryer is steady and balanced on the floor or on the left exhaust outlet. Installation instructions Adjusting the feet Screw the feet in the duct.
Asko dryers have a "T-stile" exhaust vent that extend into the hole. Lock nut Air exhaust Connecting the exhaust duct to the dryer Note You will need .... Customer Care Center 23 1-800-898-1879 www.askousa.com The dryer is steady and balanced on the floor or on the left exhaust outlet. Installation instructions Adjusting the feet Screw the feet in the duct.

User manual 80 811 93 Asko T712 EN
Page 24
... as possible. It should snap into the hole. After you cut off any necessary bends as gentle as possible. Warning! Never cover the end of installations subtract 4 feet for UL approved vent basket. We recommend that you push the dryer into place, check for kinks in warm climates (77° F and... of fire, this appliance must be exhausted OUTDOORS or the equivalent. And make any excess exhaust duct and run the duct with a clamp. 5. Note When installing in the duct. 7. Remove the stub pipe from the to use to the right or left to the left or right side outlet, follow the...
... as possible. It should snap into the hole. After you cut off any necessary bends as gentle as possible. Warning! Never cover the end of installations subtract 4 feet for UL approved vent basket. We recommend that you push the dryer into place, check for kinks in warm climates (77° F and... of fire, this appliance must be exhausted OUTDOORS or the equivalent. And make any excess exhaust duct and run the duct with a clamp. 5. Note When installing in the duct. 7. Remove the stub pipe from the to use to the right or left to the left or right side outlet, follow the...

User manual 80 811 93 Asko T712 EN
Page 25
... or inside of the wall. This appliance shall not be grounded. Fit the ventilation grill to a discharge through the wall. 2. Vent spacer Electrical installation Warning! Warning! The power supply cord must be used . Connect the exhaust duct to access terminal box. (Requires a 20-Torx screwdriver.) Customer... required Remove cover to a ventilation ex- Secure the duct joint to the outlet stub on the rear of the machine is designed to accommodate ASKO washers ONLY (rated 208-240 V.) To use this receptacle, you must be connected to the point of a building. Only a rigid or ...
... or inside of the wall. This appliance shall not be grounded. Fit the ventilation grill to a discharge through the wall. 2. Vent spacer Electrical installation Warning! Warning! The power supply cord must be used . Connect the exhaust duct to access terminal box. (Requires a 20-Torx screwdriver.) Customer... required Remove cover to a ventilation ex- Secure the duct joint to the outlet stub on the rear of the machine is designed to accommodate ASKO washers ONLY (rated 208-240 V.) To use this receptacle, you must be connected to the point of a building. Only a rigid or ...

User manual 80 811 93 Asko T712 EN
Page 26
...through the neutral. 3-wire connection plus separate grounding connector where local codes do not permit grounding through the neutral. 4-wire connection. Installation instructions Electrical Connections Warning! Only a 4-conductor cord shall be made with an approved power supply cord or by a link to ...) Power Supply Cord You will need a 3-wire power supply cord with a four-prong plug intended for new branch-circuit installations, mobile homes, recreational vehicles, and areas where local codes prohibit grounding through the neutral conductor is prohibited for connection to the...
...through the neutral. 3-wire connection plus separate grounding connector where local codes do not permit grounding through the neutral. 4-wire connection. Installation instructions Electrical Connections Warning! Only a 4-conductor cord shall be made with an approved power supply cord or by a link to ...) Power Supply Cord You will need a 3-wire power supply cord with a four-prong plug intended for new branch-circuit installations, mobile homes, recreational vehicles, and areas where local codes prohibit grounding through the neutral conductor is prohibited for connection to the...

User manual 80 811 93 Asko T712 EN
Page 27
... terminal block cover. 3. Tighten screw. 6. Tighten the strain relief screws. 10. To connect a 4-wire power cord to the step numbers. 1. Remove center terminal block screw. Installation instructions 5.
... terminal block cover. 3. Tighten screw. 6. Tighten the strain relief screws. 10. To connect a 4-wire power cord to the step numbers. 1. Remove center terminal block screw. Installation instructions 5.

User manual 80 811 94 Asko T712 FR
Page 26
...d'alimentation doit être relié à la terre. Mise en garde! Each of the dryer are manufactured for new branch-circuit installations, mobile homes, recreational vehicles, and areas where local codes prohibit grounding through the neutral. 4-wire connection. Brancher la machine uniquement sur une ...la terre. Le réceptacle à l'arrière de la machine est spécialement conçu pour accommoder les laveuses ASKO SEULEMENT (à 208-240 V.). Pour utiliser ce réceptacle, vous devez utiliser la prise fournie avec la laveuse ou un équivalent....
...d'alimentation doit être relié à la terre. Mise en garde! Each of the dryer are manufactured for new branch-circuit installations, mobile homes, recreational vehicles, and areas where local codes prohibit grounding through the neutral. 4-wire connection. Brancher la machine uniquement sur une ...la terre. Le réceptacle à l'arrière de la machine est spécialement conçu pour accommoder les laveuses ASKO SEULEMENT (à 208-240 V.). Pour utiliser ce réceptacle, vous devez utiliser la prise fournie avec la laveuse ou un équivalent....