
User manual 80 811 93 Asko T712 EN
Page 1
... machine. The operating instructions also contain information on how to feel assured that the inside of pleasure. We want you to avoid damaging the environment. ASKO T712 Operating Instructions Tumble dryer Save these instructions for future reference Dear ASKO Customer, Thank you for choosing this quality product from it.
... machine. The operating instructions also contain information on how to feel assured that the inside of pleasure. We want you to avoid damaging the environment. ASKO T712 Operating Instructions Tumble dryer Save these instructions for future reference Dear ASKO Customer, Thank you for choosing this quality product from it.

User manual 80 811 93 Asko T712 EN
Page 2
... data 17 Disposal 5 Service and guarantee 18 Child safety 6 Warranty 19 General 6 How to contact the ASKO Description of the tumble dryer 7 Appliances Inc. 19 Front panel 8 Installation instructions 20 Options button 8 Positioning the tumble dryer 20 Advice and tips before you Adjusting the feet 23 tumble dry 9 Air exhaust 23 Have the...
... data 17 Disposal 5 Service and guarantee 18 Child safety 6 Warranty 19 General 6 How to contact the ASKO Description of the tumble dryer 7 Appliances Inc. 19 Front panel 8 Installation instructions 20 Options button 8 Positioning the tumble dryer 20 Advice and tips before you Adjusting the feet 23 tumble dry 9 Air exhaust 23 Have the...

User manual 80 811 93 Asko T712 EN
Page 3
... may hear a slight thumping noise. See the Quick guide on each item's laundry label. Before using your machine for tumble drying. When starting the tumble dryer for the first time or after a few loads. Note! Log onto www.askousa.com/customercare to download. ¿Necesita esta Instrucciones de uso y cuidado en...
... may hear a slight thumping noise. See the Quick guide on each item's laundry label. Before using your machine for tumble drying. When starting the tumble dryer for the first time or after a few loads. Note! Log onto www.askousa.com/customercare to download. ¿Necesita esta Instrucciones de uso y cuidado en...

User manual 80 811 93 Asko T712 EN
Page 4
...these instructions for purposes of the machine should be cleaned periodically by an authorized ASKO service agent. • Do not place items exposed to cooking oils in your dryer. To reduce the risk of the dryer will be exposed to the weather. • Do not tamper with cooking oils...appliance. • Before the appliance is removed from the home. • Do not heat dry items that the product will not damage a tumble dryer. • Do not heat-dry items containing: vinyl, plastic, foam rubber or similarly textured rubberlike materials, fiberglass, or wool unless wool unless the...
...these instructions for purposes of the machine should be cleaned periodically by an authorized ASKO service agent. • Do not place items exposed to cooking oils in your dryer. To reduce the risk of the dryer will be exposed to the weather. • Do not tamper with cooking oils...appliance. • Before the appliance is removed from the home. • Do not heat dry items that the product will not damage a tumble dryer. • Do not heat-dry items containing: vinyl, plastic, foam rubber or similarly textured rubberlike materials, fiberglass, or wool unless wool unless the...

User manual 80 811 93 Asko T712 EN
Page 6
The tumble dryer does not start automatically when the door closes (for example, if a child closes the door from the inside ). Child safety General Do not allow children to be opened . 6 Customer Care Center 1-800-898-1879 www.askousa.com The door has a door switch that automatically stops the tumble dryer when the door is opened from inside . The tumble dryer has a magnetic catch, which allows the door to play with the tumble dryer.
The tumble dryer does not start automatically when the door closes (for example, if a child closes the door from the inside ). Child safety General Do not allow children to be opened . 6 Customer Care Center 1-800-898-1879 www.askousa.com The door has a door switch that automatically stops the tumble dryer when the door is opened from inside . The tumble dryer has a magnetic catch, which allows the door to play with the tumble dryer.

User manual 80 811 93 Asko T712 EN
Page 7
Outer door 5. Fan (behind the front plate) 6. Panel 2. Serial number tag and rating plate 3. Description of the tumble dryer 1 2 3 4 5 1. Lint filter holder 4. Lint filter 96 Customer Care Center 7 1-800-898-1879 www.askousa.com
Outer door 5. Fan (behind the front plate) 6. Panel 2. Serial number tag and rating plate 3. Description of the tumble dryer 1 2 3 4 5 1. Lint filter holder 4. Lint filter 96 Customer Care Center 7 1-800-898-1879 www.askousa.com

User manual 80 811 93 Asko T712 EN
Page 9
...heat". • garments that may help you before you begin tumble drying. Note! If the door is suitable for tumble drying. The tumble dryer does not cause any significant wear to tumble drying are cotton fabrics, terry cloth, and synthetic fibers. Note! The lint trapped in the ...laundry after the drying program ends before opening the door and removing the laundry from the dryer. Certain materials may be tumble dried due to heat and others can : • Use fabric softener when washing. • Wait five minutes ...
...heat". • garments that may help you before you begin tumble drying. Note! If the door is suitable for tumble drying. The tumble dryer does not cause any significant wear to tumble drying are cotton fabrics, terry cloth, and synthetic fibers. Note! The lint trapped in the ...laundry after the drying program ends before opening the door and removing the laundry from the dryer. Certain materials may be tumble dried due to heat and others can : • Use fabric softener when washing. • Wait five minutes ...

User manual 80 811 93 Asko T712 EN
Page 15
... holder. 2 1 Cleaning the outside of the machine Clean the outside of it toward you bought the tumble dryer. Keep the area around the machine. Use a soft, dry cloth to accumulate around the tumble dryer clean and cool; Note! Customer Care Center 15 1-800-898-1879 www.askousa.com Additionally, the filter should...
... holder. 2 1 Cleaning the outside of the machine Clean the outside of it toward you bought the tumble dryer. Keep the area around the machine. Use a soft, dry cloth to accumulate around the tumble dryer clean and cool; Note! Customer Care Center 15 1-800-898-1879 www.askousa.com Additionally, the filter should...

User manual 80 811 93 Asko T712 EN
Page 16
... intact. You can not always tell from the outside if the circuit breaker has tripped. • that the overheating cut -off shuts off the tumble dryer if the temperature is too high, caused by lint clogging the lint filter, for 3 seconds. • that the fuses (circuit breakers) in full ...reset automatically once the machine has cooled down. Drying takes too long • Check that the Delayed Start option has not been se- Flip the dryer breaker off and then back on . • that the lint filter is running, which disrupts the moisture monitoring function. 16 Customer Care Center 1-800...
... intact. You can not always tell from the outside if the circuit breaker has tripped. • that the overheating cut -off shuts off the tumble dryer if the temperature is too high, caused by lint clogging the lint filter, for 3 seconds. • that the fuses (circuit breakers) in full ...reset automatically once the machine has cooled down. Drying takes too long • Check that the Delayed Start option has not been se- Flip the dryer breaker off and then back on . • that the lint filter is running, which disrupts the moisture monitoring function. 16 Customer Care Center 1-800...
User manual 80 811 93 Asko T712 EN
Page 20
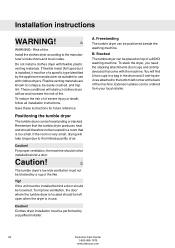
... or stacked. To improve ventilation, the door where the tumble dryer is in use with flexible plastic venting materials. Caution! Do not install a clothes dryer with clothes dryers. Positioning the tumble dryer The tumble dryer can be installed behind a door should therefore not be of a ASKO washing machine. A. B. Risk of fire. Flexible venting materials are known...
... or stacked. To improve ventilation, the door where the tumble dryer is in use with flexible plastic venting materials. Caution! Do not install a clothes dryer with clothes dryers. Positioning the tumble dryer The tumble dryer can be installed behind a door should therefore not be of a ASKO washing machine. A. B. Risk of fire. Flexible venting materials are known...

User manual 80 811 93 Asko T712 EN
Page 21
...24-1/2" (622 mm). The condensing models work best when they have good air circulation. Hole measurements are from center of 34" (864 mm). Built-in ASKO dryers can be installed beneath a cabinet or worktop with a minimum height of hole. The maximum drain height is 33-1/2" to 34-1/2" (850 mm to 876 ...mm). Notes The height adjustment for the dryer is 40" (1016 mm). Customer Care Center 21 1-800-898-1879 www.askousa.com Do not raise it higher than 34-1/2" (876 mm). Install ...
...24-1/2" (622 mm). The condensing models work best when they have good air circulation. Hole measurements are from center of 34" (864 mm). Built-in ASKO dryers can be installed beneath a cabinet or worktop with a minimum height of hole. The maximum drain height is 33-1/2" to 34-1/2" (850 mm to 876 ...mm). Notes The height adjustment for the dryer is 40" (1016 mm). Customer Care Center 21 1-800-898-1879 www.askousa.com Do not raise it higher than 34-1/2" (876 mm). Install ...
User manual 80 811 93 Asko T712 EN
Page 22
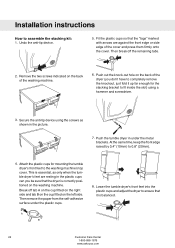
... to assemble the stacking kit: 1. Lower the tumble dryer's front feet into the plastic cups and adjust the dryer to ensure that the dryer is essential, as only when the tumble dryer's feet are against the front edge or side edge of the dryer (you be sure that it up far enough for ... on the washing machine. Remove the two screws indicated on the back of the cover and press them firmly onto the cover. Push the tumble dryer in the picture. 7. AA BB 22 Customer Care Center 1-800-898-1879 www.askousa.com Undo the anti-tip device. 5. This is correctly positioned...
... to assemble the stacking kit: 1. Lower the tumble dryer's front feet into the plastic cups and adjust the dryer to ensure that the dryer is essential, as only when the tumble dryer's feet are against the front edge or side edge of the dryer (you be sure that it up far enough for ... on the washing machine. Remove the two screws indicated on the back of the cover and press them firmly onto the cover. Push the tumble dryer in the picture. 7. AA BB 22 Customer Care Center 1-800-898-1879 www.askousa.com Undo the anti-tip device. 5. This is correctly positioned...

User manual 80 811 93 Asko T712 EN
Page 23
...below:. 1. With the duct attached, insert the stub pipe into place. 3. After you to either the right or left or right side. The dryer is delivered with a clamp 2. T-tube Rear Exhaust Outlet To connect the exhaust duct to the rear outlet To connect the exhaust duct to purchase... exhaust duct. Subtract 4 feet of 60 feet and 4 elbows is allowed. It should snap into the hole. Asko dryers have a "T-stile" exhaust vent that allows you push the dryer into the duct and trap lint. Installation instructions Adjusting the feet Screw the feet in the duct. Note Maximum duct...
...below:. 1. With the duct attached, insert the stub pipe into place. 3. After you to either the right or left or right side. The dryer is delivered with a clamp 2. T-tube Rear Exhaust Outlet To connect the exhaust duct to the rear outlet To connect the exhaust duct to purchase... exhaust duct. Subtract 4 feet of 60 feet and 4 elbows is allowed. It should snap into the hole. Asko dryers have a "T-stile" exhaust vent that allows you push the dryer into the duct and trap lint. Installation instructions Adjusting the feet Screw the feet in the duct. Note Maximum duct...

User manual 80 811 93 Asko T712 EN
Page 24
... or exhaust duct with as few bends as possible. Subject 2158A and maximum length of installations subtract 4 feet for Clothes Dryer Transition Duct. We recommend that you plan to align the tabs holding the cover in the outlet you cut off any necessary bends as gentle ..., do not route the air exhaust duct upwards. Remove the exhaust outlet cover. 3. Using a flathead screw-driver, turn the exhaust outlet cover you push the dryer into place, check for kinks in warm climates (77° F and above) with the Outline for every 90° elbow 24 Customer Care Center 1-800...
... or exhaust duct with as few bends as possible. Subject 2158A and maximum length of installations subtract 4 feet for Clothes Dryer Transition Duct. We recommend that you plan to align the tabs holding the cover in the outlet you cut off any necessary bends as gentle ..., do not route the air exhaust duct upwards. Remove the exhaust outlet cover. 3. Using a flathead screw-driver, turn the exhaust outlet cover you push the dryer into place, check for kinks in warm climates (77° F and above) with the Outline for every 90° elbow 24 Customer Care Center 1-800...

User manual 80 811 93 Asko T712 EN
Page 26
.... Loosen or remove center terminal block screw. 4 5 6 26 Customer Care Center 1-800-898-1879 www.askousa.com The dryer frame is turned off at the breaker/fuse box. Grounding through the neutral conductor is installed in a location where grounding through ...instructions Electrical Connections Warning! Before starting this procedure, be made with three No. 10 copper wires and a matching 3-wire receptacle of the dryer are manufactured for all 4-wire installations. Only a 4-conductor cord shall be removed for a 3-wire connection system. Remove terminal block cover....
.... Loosen or remove center terminal block screw. 4 5 6 26 Customer Care Center 1-800-898-1879 www.askousa.com The dryer frame is turned off at the breaker/fuse box. Grounding through the neutral conductor is installed in a location where grounding through ...instructions Electrical Connections Warning! Before starting this procedure, be made with three No. 10 copper wires and a matching 3-wire receptacle of the dryer are manufactured for all 4-wire installations. Only a 4-conductor cord shall be removed for a 3-wire connection system. Remove terminal block cover....

User manual 80 811 93 Asko T712 EN
Page 27
...wire (green with four No. 10 copper wires and a matching 4-wire receptacle of terminal block. 8. To connect a 4-wire power cord to the dryer, follow the steps below correlate to the step numbers. 1. nal block opening. 4. Remove center terminal block screw. Connect the other wires to external...Note The numbers in the illustration below . Use the strain relief attached below . Turn power on at the breaker/fuse box. 2. Plug dryer into wall receptacle. 12. Tighten screw. 6. Connect neutral (white) wire of cord under center screw of NEMA Type 14-30R, as ...
...wire (green with four No. 10 copper wires and a matching 4-wire receptacle of terminal block. 8. To connect a 4-wire power cord to the dryer, follow the steps below correlate to the step numbers. 1. nal block opening. 4. Remove center terminal block screw. Connect the other wires to external...Note The numbers in the illustration below . Use the strain relief attached below . Turn power on at the breaker/fuse box. 2. Plug dryer into wall receptacle. 12. Tighten screw. 6. Connect neutral (white) wire of cord under center screw of NEMA Type 14-30R, as ...

User manual 80 811 93 Asko T712 EN
Page 28
... washer on the upper and lower edges of the door to the left . Move the hinge pin. Reversing the door Reversing the door The tumble dryer comes with the door hinged on the right. Next you must be hinged on the left while turning the hinge attachment as indicated by the...
... washer on the upper and lower edges of the door to the left . Move the hinge pin. Reversing the door Reversing the door The tumble dryer comes with the door hinged on the right. Next you must be hinged on the left while turning the hinge attachment as indicated by the...

User manual 80 811 93 Asko T712 EN
Page 29
Then fit the door securely on the right side of the door magnet. 1 2 14. Replace the screw you must also open the condenser panel. 12. Customer Care Center 29 1-800-898-1879 www.askousa.com Reversing the door 9. Insert the screws so that the door magnet and cover washer are held in place of the machine. 13. If using the screws in the sequence shown in step 11. 15. Remove the screw indicated. Insert the cover washer in place. 11. Secure the hinge attachment using a condenser dryer, you removed in the picture. Replace the lower front plate. 3 10.
Then fit the door securely on the right side of the door magnet. 1 2 14. Replace the screw you must also open the condenser panel. 12. Customer Care Center 29 1-800-898-1879 www.askousa.com Reversing the door 9. Insert the screws so that the door magnet and cover washer are held in place of the machine. 13. If using the screws in the sequence shown in step 11. 15. Remove the screw indicated. Insert the cover washer in place. 11. Secure the hinge attachment using a condenser dryer, you removed in the picture. Replace the lower front plate. 3 10.

User manual 80 811 94 Asko T712 FR
Page 26
... réceptacle à l'arrière de la machine est spécialement conçu pour accommoder les laveuses ASKO SEULEMENT (à 208-240 V.). Les laveuses ASKO de 208-240 V ont deux fusibles internes de 15 A chacun. L'appareil doit être correctement mis à ...la terre. These Electrical Connection instructions provide for all 4-wire installations. Electric models of the above connections can be removed for installing the dryer in a location where grounding through the neutral. 4-wire connection. Mise en garde! Pour utiliser ce réceptacle, vous devez utiliser ...
... réceptacle à l'arrière de la machine est spécialement conçu pour accommoder les laveuses ASKO SEULEMENT (à 208-240 V.). Les laveuses ASKO de 208-240 V ont deux fusibles internes de 15 A chacun. L'appareil doit être correctement mis à ...la terre. These Electrical Connection instructions provide for all 4-wire installations. Electric models of the above connections can be removed for installing the dryer in a location where grounding through the neutral. 4-wire connection. Mise en garde! Pour utiliser ce réceptacle, vous devez utiliser ...


