
Owners Manual
Page 6
... snow at all toys, pets, and debris. Safe operation requires your footing, especially when operating in the manual and on gravel surfaces. Wear adequate safety gear, including safety glasses with electric starter. GB - 6 NEVER operate unit after or during operation. ALWAYS disengage attachment, stop unit and engine, remove key and allow...
... snow at all toys, pets, and debris. Safe operation requires your footing, especially when operating in the manual and on gravel surfaces. Wear adequate safety gear, including safety glasses with electric starter. GB - 6 NEVER operate unit after or during operation. ALWAYS disengage attachment, stop unit and engine, remove key and allow...

Owners Manual
Page 9
... under dash panel. GB - 9 Discharge Chute Ring 4. Plug wireharness into headlight. . NOTE: Be careful not to damage nylon bushing when attaching crank to the pinion gear on unit. Light Shipping Location 2 4 1 3 Remove nut to auger housing with nut removed in the control panel. Install Headlight (920012, 014, 015) (Figure...
... under dash panel. GB - 9 Discharge Chute Ring 4. Plug wireharness into headlight. . NOTE: Be careful not to damage nylon bushing when attaching crank to the pinion gear on unit. Light Shipping Location 2 4 1 3 Remove nut to auger housing with nut removed in the control panel. Install Headlight (920012, 014, 015) (Figure...

Owners Manual
Page 10
Pinion Gear 4. Wire Cable Hook 5. the one closest to forward most position. 8. Attach cable eye to discharge chute crank. 5 1. NOTE: The cable mounting bracket located underneath the ...
Pinion Gear 4. Wire Cable Hook 5. the one closest to forward most position. 8. Attach cable eye to discharge chute crank. 5 1. NOTE: The cable mounting bracket located underneath the ...

Owners Manual
Page 21
...at the factory. Remove the oil drain plug from the rear of leakage, no additional lubricant should be at all the oil. Gear cases are adjusted to Engine Manual for detailed instructions. Remove filler plug (Figure 17). CLEAN ENGINE Refer to the range specified ... to level of operation. Lubricant must be checked every 5 hours of lubricant filler hole with repeated servicing. IMPORTANT: Use only Ariens L-3 synthetic severe duty gear lube (Part Number 00068800). If clutches do not engage or disengage properly, adjust or repair before operation (see Check Tire Pressure...
...at the factory. Remove the oil drain plug from the rear of leakage, no additional lubricant should be at all the oil. Gear cases are adjusted to Engine Manual for detailed instructions. Remove filler plug (Figure 17). CLEAN ENGINE Refer to the range specified ... to level of operation. Lubricant must be checked every 5 hours of lubricant filler hole with repeated servicing. IMPORTANT: Use only Ariens L-3 synthetic severe duty gear lube (Part Number 00068800). If clutches do not engage or disengage properly, adjust or repair before operation (see Check Tire Pressure...

Owners Manual
Page 23
...holes in selected position while throwing snow. If deflector does not stay in severe damage to gear case and its components. Loosen adjusting nuts on deflector control (Figure 22). Check the deflectors range of travel : 1. MANUAL DISCHARGE CHUTE DEFLECTOR (920012, 013, 014... remote all the way forward. 2. SHEAR BOLTS (Figure 20) IMPORTANT: Use only Ariens shear bolts for replacement. Auger 2. Discharge Chute Figure 21 OS8215 REMOTE DISCHARGE DEFLECTOR CONTROL ADJUSTMENT (920015) (Figure 22) Deflector must stay in the shaft. 2. To adjust the deflector lower: Loosen bottom...
...holes in selected position while throwing snow. If deflector does not stay in severe damage to gear case and its components. Loosen adjusting nuts on deflector control (Figure 22). Check the deflectors range of travel : 1. MANUAL DISCHARGE CHUTE DEFLECTOR (920012, 013, 014... remote all the way forward. 2. SHEAR BOLTS (Figure 20) IMPORTANT: Use only Ariens shear bolts for replacement. Auger 2. Discharge Chute Figure 21 OS8215 REMOTE DISCHARGE DEFLECTOR CONTROL ADJUSTMENT (920015) (Figure 22) Deflector must stay in the shaft. 2. To adjust the deflector lower: Loosen bottom...
Owners Manual
Page 25
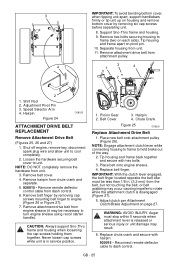
... cover, when tipping unit apart, support handlebars firmly or tip unit up on each side). Support Sno-Thro frame and housing. 9. Adjustment Pivot Pin 3. Pinion Gear 2. Hairpin Figure 24 OS8225 ATTACHMENT DRIVE BELT REPLACEMENT Remove Attachment Drive Belt (Figures 25, 26 and 27) 1. Separate housing from the belt, but not touching...
... cover, when tipping unit apart, support handlebars firmly or tip unit up on each side). Support Sno-Thro frame and housing. 9. Adjustment Pivot Pin 3. Pinion Gear 2. Hairpin Figure 24 OS8225 ATTACHMENT DRIVE BELT REPLACEMENT Remove Attachment Drive Belt (Figures 25, 26 and 27) 1. Separate housing from the belt, but not touching...

Owners Manual
Page 30
.... 9. Remove left to decrease the distance between clutch lever and handlebar. Remove spring hairpin nearest drive gear from frame. 8. Adjustment Pivot Pin 5. Turn adjustment barrel up the cable to remove the flat washer, pinion gear and friction disc assembly from the speed selector arm. CAUTION: Before tipping unit, remove enough fuel so...
.... 9. Remove left to decrease the distance between clutch lever and handlebar. Remove spring hairpin nearest drive gear from frame. 8. Adjustment Pivot Pin 5. Turn adjustment barrel up the cable to remove the flat washer, pinion gear and friction disc assembly from the speed selector arm. CAUTION: Before tipping unit, remove enough fuel so...

Owners Manual
Page 31
...hardware removed in the fuel tank inside of any loose or melting snow. Follow the recommended mix ratio found on page 20). Install pinion gear and washer onto hex shaft and slide shaft into new friction disc and carrier bearing. Install bottom cover. 19. Adjust traction drive clutch.... STORAGE WARNING: AVOID INJURY. Add fuel stabilizer according to spark plug. 22. NEVER store the engine with fuel in step 7. 16. 10. Install washers onto carrier bearing and slide into hex shaft. 17. Connect pivot...
...hardware removed in the fuel tank inside of any loose or melting snow. Follow the recommended mix ratio found on page 20). Install pinion gear and washer onto hex shaft and slide shaft into new friction disc and carrier bearing. Install bottom cover. 19. Adjust traction drive clutch.... STORAGE WARNING: AVOID INJURY. Add fuel stabilizer according to spark plug. 22. NEVER store the engine with fuel in step 7. 16. 10. Install washers onto carrier bearing and slide into hex shaft. 17. Connect pivot...

Owners Manual
Page 34
....7 (208) 10.31 (169) High Idle - SPECIFICATIONS Model Number 920012 920013 Description Compact 22 Compact 22 Engine Ariens OHV Subaru SX17 Snow Power OHC Gross Torque* - in . (cm) 24.4 (62) 24.4 (62) Weight - in . (cm) 44.3 (112.5) 44.3 (112.5) Width - in . (cm) 22.0 (55.8) Gear Case Aluminum Auger Diameter - Displacement - ft/sec (m/s) 3738 (1139) Drive Blower Drive...
....7 (208) 10.31 (169) High Idle - SPECIFICATIONS Model Number 920012 920013 Description Compact 22 Compact 22 Engine Ariens OHV Subaru SX17 Snow Power OHC Gross Torque* - in . (cm) 24.4 (62) 24.4 (62) Weight - in . (cm) 44.3 (112.5) 44.3 (112.5) Width - in . (cm) 22.0 (55.8) Gear Case Aluminum Auger Diameter - Displacement - ft/sec (m/s) 3738 (1139) Drive Blower Drive...

Owners Manual
Page 35
... Chute Rotation Angle 205° Rotation Control 2.5X Quick Turn Deflector Control Manual Remote Auger Snow Clearing Width - in . (cm) 24.0 (61.0) 26 (66.04) Gear Case Aluminum Auger Diameter - ft-lbs (N-m) 9.0 (12.2) 11.5 (15.59) *Engine output stated in . (cm) 26.4 (67.0) 28.4 (72.1) Weight -...131.8) Height - Displacement - in . (cm) 11.0 (27.9) Impeller Impeller Diameter - in. (cm) 44.3 (112.5) 44.3 (112.5) Width - SPECIFICATIONS Model Number 920014 920015 Description Compact 24 Compact 26 Engine Briggs & Stratton Polar Force Gross Torque* -
... Chute Rotation Angle 205° Rotation Control 2.5X Quick Turn Deflector Control Manual Remote Auger Snow Clearing Width - in . (cm) 24.0 (61.0) 26 (66.04) Gear Case Aluminum Auger Diameter - ft-lbs (N-m) 9.0 (12.2) 11.5 (15.59) *Engine output stated in . (cm) 26.4 (67.0) 28.4 (72.1) Weight -...131.8) Height - Displacement - in . (cm) 11.0 (27.9) Impeller Impeller Diameter - in. (cm) 44.3 (112.5) 44.3 (112.5) Width - SPECIFICATIONS Model Number 920014 920015 Description Compact 24 Compact 26 Engine Briggs & Stratton Polar Force Gross Torque* -
