
Use and Care
Page 1
Litho U.S.A. A/04/03 Part No. UMK5500-0303A ©2003 Maytag Appliances Sales Co. RANGE HOOD Model Number: Manufacturer Number: Size: UXT5230AD* MK5500 30" & 36" UXT5236AD* USER GUIDE TABLE OF CONTENTS Safety Instructions 1 Controls & Features 2 Maintenance 3-6 Warranty 7 Form No.
Litho U.S.A. A/04/03 Part No. UMK5500-0303A ©2003 Maytag Appliances Sales Co. RANGE HOOD Model Number: Manufacturer Number: Size: UXT5230AD* MK5500 30" & 36" UXT5236AD* USER GUIDE TABLE OF CONTENTS Safety Instructions 1 Controls & Features 2 Maintenance 3-6 Warranty 7 Form No.

Use and Care
Page 5
Periodically, clean out residue in the residue cup located inside the range hood, behind the perforated diffuser panels. Dry residue cup and re-install before using hood. plastic residue cup Spray degreasing detergent and leave to soak if heavily soiled. MAINTENANCE 4 CLEANING Residue Cup: Residue and grease from cooking will collect in cup. Clean by hand or in a dishwasher.
Periodically, clean out residue in the residue cup located inside the range hood, behind the perforated diffuser panels. Dry residue cup and re-install before using hood. plastic residue cup Spray degreasing detergent and leave to soak if heavily soiled. MAINTENANCE 4 CLEANING Residue Cup: Residue and grease from cooking will collect in cup. Clean by hand or in a dishwasher.

Use and Care
Page 6
Nevertheless, grease from cooking can also dry and adhere in the range hood's internal housing. Self Clean: Turn blower on 'spray', squirt the grease cutting detergent through the safety grill,directly onto blower blades 10-... speed: CLEANING AND MAINTENANCE 5 SELF CLEAN FEATURE Using Self Cleaning: WARNING: Use only non-corrosive & non-abrasive grease cutting detergents. Models UXT5230AD* & UXT5236AD* hoods are recommended. Detergent: Non-corrosive, non-abrasive grease cutting spray detergents are designed with water to rinse out detergent) set to complete for cleaning.
Nevertheless, grease from cooking can also dry and adhere in the range hood's internal housing. Self Clean: Turn blower on 'spray', squirt the grease cutting detergent through the safety grill,directly onto blower blades 10-... speed: CLEANING AND MAINTENANCE 5 SELF CLEAN FEATURE Using Self Cleaning: WARNING: Use only non-corrosive & non-abrasive grease cutting detergents. Models UXT5230AD* & UXT5236AD* hoods are recommended. Detergent: Non-corrosive, non-abrasive grease cutting spray detergents are designed with water to rinse out detergent) set to complete for cleaning.
Dimension Guide
Page 1
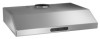
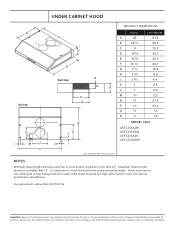
... Important: Because of product may vary from picture NOTES: Minimum mount height between range top to hood bottom should be no less than 32". Maximum mount height should be no higher than...CABINET HOOD D Top View G H LM F A PRODUCT DIMENSIONS INCHES CENTIMETERS A A 36 91.4 B 22 1/4 56.5 C 6 15.2 C D 15 5/8 39.7 E 10 1/4 26.0 F 10 1/2 26.7 B G 7 1/4 18.4 Back View H 3 3/8 8.6 Q J 1 3/4 4.4 R K H 1 2.5 L 1 2.5 M 7/8 2.2 P N N 11 27.9 P 10 25.4 Q 1/2 1.3 R 3 7.6 B JE K MODEL SKUs UXT5236ADB UXT5236ADQ UXT5236ADS UXT5236ADW...
... Important: Because of product may vary from picture NOTES: Minimum mount height between range top to hood bottom should be no less than 32". Maximum mount height should be no higher than...CABINET HOOD D Top View G H LM F A PRODUCT DIMENSIONS INCHES CENTIMETERS A A 36 91.4 B 22 1/4 56.5 C 6 15.2 C D 15 5/8 39.7 E 10 1/4 26.0 F 10 1/2 26.7 B G 7 1/4 18.4 Back View H 3 3/8 8.6 Q J 1 3/4 4.4 R K H 1 2.5 L 1 2.5 M 7/8 2.2 P N N 11 27.9 P 10 25.4 Q 1/2 1.3 R 3 7.6 B JE K MODEL SKUs UXT5236ADB UXT5236ADQ UXT5236ADS UXT5236ADW...

Installation Instruction
Page 1
IMK5558-0303A ©2003 Maytag Appliances Sales Co. RANGE HOOD Model Number: Manufacturer Number: Size: UXT5230AD* UXT5236AD* MK5500 30" & 36" UXT5430AD* UXT5436AD* MK5800 30" & 36" INSTALLATION GUIDE TABLE OF CONTENTS Safety Instructions 1 Mounting Heights 2 Ducting 3-7-9 Specifications 4 Installation 5-6 Form No. Litho U.S.A. A/04/03 Part No.
IMK5558-0303A ©2003 Maytag Appliances Sales Co. RANGE HOOD Model Number: Manufacturer Number: Size: UXT5230AD* UXT5236AD* MK5500 30" & 36" UXT5430AD* UXT5436AD* MK5800 30" & 36" INSTALLATION GUIDE TABLE OF CONTENTS Safety Instructions 1 Mounting Heights 2 Ducting 3-7-9 Specifications 4 Installation 5-6 Form No. Litho U.S.A. A/04/03 Part No.

Installation Instruction
Page 3
... will lose performance and efficiency. If turns or transitions are required: Install as far away from opening and as far apart, between range top to maintain maximum air flow efficiency. Minimum Duct Size: Round: 6" minimum Rectangular: 3-1/4"x10" Duct Run Calculation: Maximum run ...6" or 3-1/4" x 10" duct 100 FT ALWAYS, when possible, reduce the number of 24" hood above range height. ** Maximum clearance 32" hood above range. *Minimum clearance of transitions and turns. It is used , 31' available for straight duct runs. If available, also refer...
... will lose performance and efficiency. If turns or transitions are required: Install as far away from opening and as far apart, between range top to maintain maximum air flow efficiency. Minimum Duct Size: Round: 6" minimum Rectangular: 3-1/4"x10" Duct Run Calculation: Maximum run ...6" or 3-1/4" x 10" duct 100 FT ALWAYS, when possible, reduce the number of 24" hood above range height. ** Maximum clearance 32" hood above range. *Minimum clearance of transitions and turns. It is used , 31' available for straight duct runs. If available, also refer...

Installation Instruction
Page 7
...4. make sure the duct opening is mounted under a kitchen cabinet unit. 2. Hang hood onto screws through key holes, and tighten. 9. Install duct work and duct-tape. 10. This range hood is large enough to apply duct tape. 6. Drill/cut out the required openings for... a pencil. 5. Reinstall the difuser panels. 11. Install electrical. 8. For ductless conversion, no ducting is required. 3. Temporarily position the range hood in the desired mounting location. Fasten mounting screws onto cabinet as marked, do not tighten, leaving half length of unit. INSTALLATION MOUNTING THE ...
...4. make sure the duct opening is mounted under a kitchen cabinet unit. 2. Hang hood onto screws through key holes, and tighten. 9. Install duct work and duct-tape. 10. This range hood is large enough to apply duct tape. 6. Drill/cut out the required openings for... a pencil. 5. Reinstall the difuser panels. 11. Install electrical. 8. For ductless conversion, no ducting is required. 3. Temporarily position the range hood in the desired mounting location. Fasten mounting screws onto cabinet as marked, do not tighten, leaving half length of unit. INSTALLATION MOUNTING THE ...

Installation Instruction
Page 8
... Horizontal rear discharge 6" round 3 1/4"x10" 3 1/4"x10" Convertible Accesories Round to rectangular transition adaptor Rectangular to either of the above discharge methods. INSTALLATION 7 CONVERTIBLE OPTIONS This range hood is equipped with the option of transition piece with remaining screws. Additional accessories are provided to convert to round transition adaptor (pre-mounted) Gasket (pre...
... Horizontal rear discharge 6" round 3 1/4"x10" 3 1/4"x10" Convertible Accesories Round to rectangular transition adaptor Rectangular to either of the above discharge methods. INSTALLATION 7 CONVERTIBLE OPTIONS This range hood is equipped with the option of transition piece with remaining screws. Additional accessories are provided to convert to round transition adaptor (pre-mounted) Gasket (pre...

Installation Instruction
Page 9
At rear of transition adaptor. 5. Mount starting collar (provided) at opening with gasket as shown. 4. Leave attached gasket in its original place. 3. Mount rectangular cap (previously removed) on top of range hood, remove all screws on premounted rear rectangular cap and remove cap. 2. Mount rectangular transition piece at rear discharge opening with gasket. Remove top pre-mounted transition piece. INSTALLATION 8 CONVERTIBLE OPTIONS 3 1/4"x10" Rear Discharge 1.
At rear of transition adaptor. 5. Mount starting collar (provided) at opening with gasket as shown. 4. Leave attached gasket in its original place. 3. Mount rectangular cap (previously removed) on top of range hood, remove all screws on premounted rear rectangular cap and remove cap. 2. Mount rectangular transition piece at rear discharge opening with gasket. Remove top pre-mounted transition piece. INSTALLATION 8 CONVERTIBLE OPTIONS 3 1/4"x10" Rear Discharge 1.

Installation Instruction
Page 10
... is intended for re-circulation. Filters in pkg. Remove the diffuser panels on the average of the range hood. 3. Re-install diffuser panels. 6. Only when the exhaust option is not possible to be installed prior to converting the... Clip carbon filter onto bracket of daily cooking time). 7. of diffuser panels. 5. UXT5230AD* UXT5236AD* UXT5430AD* UXT5436AD* HCFLTUXT30 2 HCFLTUXT36 3 HCFLTUXT30 2 HCFLTUXT36 3 2. When converted, the hood functions as follow: Hood Model: Part No. Fumes and exhaust from cooking are intended to capture residue from cooking for ...
... is intended for re-circulation. Filters in pkg. Remove the diffuser panels on the average of the range hood. 3. Re-install diffuser panels. 6. Only when the exhaust option is not possible to be installed prior to converting the... Clip carbon filter onto bracket of daily cooking time). 7. of diffuser panels. 5. UXT5230AD* UXT5236AD* UXT5430AD* UXT5436AD* HCFLTUXT30 2 HCFLTUXT36 3 HCFLTUXT30 2 HCFLTUXT36 3 2. When converted, the hood functions as follow: Hood Model: Part No. Fumes and exhaust from cooking are intended to capture residue from cooking for ...

