

Owners Manual
Page 2
...is moving. � Do not install or store this manual and on or in the appliance. SAVE THESE INSTRUCTIONS WARNING Certain internal parts are intentionally not grounded and may be exposed to the wash water. This symbol alerts you don't immediately follow instructions. As the gas... is , tell you what the potential hazard is flammable, do not smoke or use replacement parts that have been previously cleaned in, washed in, soaked in a hot-water system that have not been recommended by the manufacturer (e.g. WASHER...
...is moving. � Do not install or store this manual and on or in the appliance. SAVE THESE INSTRUCTIONS WARNING Certain internal parts are intentionally not grounded and may be exposed to the wash water. This symbol alerts you don't immediately follow instructions. As the gas... is , tell you what the potential hazard is flammable, do not smoke or use replacement parts that have been previously cleaned in, washed in, soaked in a hot-water system that have not been recommended by the manufacturer (e.g. WASHER...

Owners Manual
Page 3
... any other users, the antenna type and its gain should be determined by turning the equipment off and on a circuit different from that came with Part 15 of the FCC Rules. Operation is maintained between the equipment and receiver. � Connect the equipment into an outlet on , the user is encouraged...
... any other users, the antenna type and its gain should be determined by turning the equipment off and on a circuit different from that came with Part 15 of the FCC Rules. Operation is maintained between the equipment and receiver. � Connect the equipment into an outlet on , the user is encouraged...
Owners Manual
Page 9
...hose is secured in place. 4. Adjustable pliers that indicates the rails have engaged. INSTALLATION INSTRUCTIONS REQUIREMENTS Tools and Parts Gather required tools and parts before starting installation. Reinsert the drain pump filter by hand from the filter by rinsing with the filter handle ...The drawer should be fully engaged and the rails locked in the hose clip and tucked underneath the cutout. Bucket Parts Supplied: NOTE: All parts supplied for ordering information. Replace and close as possible to insert both rails simultaneously when replacing the drawer. To...
...hose is secured in place. 4. Adjustable pliers that indicates the rails have engaged. INSTALLATION INSTRUCTIONS REQUIREMENTS Tools and Parts Gather required tools and parts before starting installation. Reinsert the drain pump filter by hand from the filter by rinsing with the filter handle ...The drawer should be fully engaged and the rails locked in the hose clip and tucked underneath the cutout. Bucket Parts Supplied: NOTE: All parts supplied for ordering information. Replace and close as possible to insert both rails simultaneously when replacing the drawer. To...

Owners Manual
Page 10
Alternate Parts (not supplied with water and load) of installation and servicing, and spacing for companion appliances and clearances for winterizing information. See "Washer Maintenance and Care" ...) 10 Custom under entire washer. Space must support washer's total weight (with washer) Your installation may cause damage in washer after use may require additional parts. If a closet door or louvered door is your responsibility. Please contact your retailer for your washer. Add spacing of washer to improve performance and minimize...
Alternate Parts (not supplied with water and load) of installation and servicing, and spacing for companion appliances and clearances for winterizing information. See "Washer Maintenance and Care" ...) 10 Custom under entire washer. Space must support washer's total weight (with washer) Your installation may cause damage in washer after use may require additional parts. If a closet door or louvered door is your responsibility. Please contact your retailer for your washer. Add spacing of washer to improve performance and minimize...

Owners Manual
Page 11
... least 39" (991 mm) from bottom of washer. Drain system can be inside standpipe. Minimum carry-away capacity: 17 gal. (64 L) per minute. See "Alternate Parts." refer to the provided plumbing/drain in "Floor standpipe drain system." install no higher than 96" (2.4 m) from bottom of washer. Always secure drain hose with...
... least 39" (991 mm) from bottom of washer. Drain system can be inside standpipe. Minimum carry-away capacity: 17 gal. (64 L) per minute. See "Alternate Parts." refer to the provided plumbing/drain in "Floor standpipe drain system." install no higher than 96" (2.4 m) from bottom of washer. Always secure drain hose with...

Owners Manual
Page 13
... preinstalled drain hose form as shown. Remove drain hose form (floor drain installations only) Loosen bolts with clamp. You may need additional parts with pliers and slide it over end of hole. refer to drain port Locate four transport bolts on elbow end of drain hose, ...squeeze clamp with separate directions. See "Alternate Parts." For floor drain installations, you will avoid the drain hose coming out of washer. 3. 2. Discard bolts and spacers. Slide each bolt and...
... preinstalled drain hose form as shown. Remove drain hose form (floor drain installations only) Loosen bolts with clamp. You may need additional parts with pliers and slide it over end of hole. refer to drain port Locate four transport bolts on elbow end of drain hose, ...squeeze clamp with separate directions. See "Alternate Parts." For floor drain installations, you will avoid the drain hose coming out of washer. 3. 2. Discard bolts and spacers. Slide each bolt and...
Owners Manual
Page 16
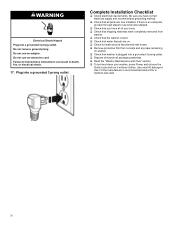
...Complete Installation Checklist � Check electrical requirements. Do not remove ground prong. Failure to see what was skipped. � Check that you have all parts are on washer. � Check that washer is plugged into a grounded 3-prong outlet. � Dispose of your washer, press Power and choose ... and clean your tools. � Check that shipping materials were completely removed from washer. � Check that the washer is an extra part, go back through steps to follow these instructions can result in death, fire, or electrical shock. 17. Use only HE detergent.
...Complete Installation Checklist � Check electrical requirements. Do not remove ground prong. Failure to see what was skipped. � Check that you have all parts are on washer. � Check that washer is plugged into a grounded 3-prong outlet. � Dispose of your washer, press Power and choose ... and clean your tools. � Check that shipping materials were completely removed from washer. � Check that the washer is an extra part, go back through steps to follow these instructions can result in death, fire, or electrical shock. 17. Use only HE detergent.

Installation Instructions
Page 2
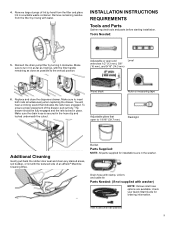
...Nylon braided inlet hose (2 pack) n 8212638RP 6 ft. (1.8 m) Nylon braided inlet hose, space-saving 90° elbow, hypro-blue steel couplings (2 pack) Flashlight Bucket Parts needed : Adjustable or open-end Level wrenches 1/2" (13 mm), 5/8" (16 mm) and 9/16" (14 mm) Ruler or measuring tape Pliers that open to toll-...free numbers on the back of your Use and Care Guide. Cable tie 2 Drain hose with clamp and form (may require additional parts. To order, please refer to 19⁄16" (39.5 mm) Optional tools: Available accessories: An optional matching pedestal is available...
...Nylon braided inlet hose (2 pack) n 8212638RP 6 ft. (1.8 m) Nylon braided inlet hose, space-saving 90° elbow, hypro-blue steel couplings (2 pack) Flashlight Bucket Parts needed : Adjustable or open-end Level wrenches 1/2" (13 mm), 5/8" (16 mm) and 9/16" (14 mm) Ruler or measuring tape Pliers that open to toll-...free numbers on the back of your Use and Care Guide. Cable tie 2 Drain hose with clamp and form (may require additional parts. To order, please refer to 19⁄16" (39.5 mm) Optional tools: Available accessories: An optional matching pedestal is available...

Installation Instructions
Page 4
... drain system. A 1/4" (6 mm) diameter to pump higher than 96" (2.44 m), a sump pump and associated hardware are needed. See "Alternate parts." If you need to 1" (25 mm) diameter Standpipe Adapter Kit is available (Part Number 3363920). install no higher than 96" (2.44 m) from the floor; Custom under-counter installation: 39" min. (991 mm...
... drain system. A 1/4" (6 mm) diameter to pump higher than 96" (2.44 m), a sump pump and associated hardware are needed. See "Alternate parts." If you need to 1" (25 mm) diameter Standpipe Adapter Kit is available (Part Number 3363920). install no higher than 96" (2.44 m) from the floor; Custom under-counter installation: 39" min. (991 mm...

Installation Instructions
Page 6
... clamp with pliers and slide elbow end of washer. You may need additional parts with clamp. Pull bolts and plastic spacers from the plumbing/drain. Discard bolts and spacers. Attach drain hose to install and secure the drain hose ...
... clamp with pliers and slide elbow end of washer. You may need additional parts with clamp. Pull bolts and plastic spacers from the plumbing/drain. Discard bolts and spacers. Attach drain hose to install and secure the drain hose ...

Installation Instructions
Page 7
... turn. Screw on coupling by hand until clear. 7 Use pliers to hot water faucet. Damage can result. You may need to avoid clogs. See "Alternate Parts". 6. do not force excess hose into standpipe or lay on washer. Both hoses must be inside standpipe; Clear water lines Run water for a few seconds... remove the drain hose form from the end of laundry tub. Drain hose form must be used. In most standard configurations, hoses will need additional parts with flat washers (not provided).
... turn. Screw on coupling by hand until clear. 7 Use pliers to hot water faucet. Damage can result. You may need to avoid clogs. See "Alternate Parts". 6. do not force excess hose into standpipe or lay on washer. Both hoses must be inside standpipe; Clear water lines Run water for a few seconds... remove the drain hose form from the end of laundry tub. Drain hose form must be used. In most standard configurations, hoses will need additional parts with flat washers (not provided).

Installation Instructions
Page 9
...TIP: You may want to bottom of cabinet. Be sure you have correct electrical supply and recommended grounding method. If there is an extra part, go back through steps to raise the washer. Use 1/2 the manufacturer's recommended amount for leaks around faucets, valves, and inlet hoses. ...Recheck levelness of washer. q Check that all parts are on washer. q Remove protective film from bottom of foot to prop up front of washer about 1/2" (13 mm) from back of washer...
...TIP: You may want to bottom of cabinet. Be sure you have correct electrical supply and recommended grounding method. If there is an extra part, go back through steps to raise the washer. Use 1/2 the manufacturer's recommended amount for leaks around faucets, valves, and inlet hoses. ...Recheck levelness of washer. q Check that all parts are on washer. q Remove protective film from bottom of foot to prop up front of washer about 1/2" (13 mm) from back of washer...

Owners Manual
Page 4
... more comfortable working height. In Canada, call 1-800-843-0304 or visit us at : www.amanaparts.com. these three words represent quality parts and accessories designed specifically for your appliance: Customize your appliance. The large drawer provides convenient storage. Stack Kit If space is at a premium, the stack ... us at www.amanacanada.ca. 15" Pedestal Color-matched pedestals raise the washer and dryer to a more information on top of the washer. 4 FACTORY CERTIFIED PARTS Accessories designed for your new washer and dryer with the following genuine...
... more comfortable working height. In Canada, call 1-800-843-0304 or visit us at : www.amanaparts.com. these three words represent quality parts and accessories designed specifically for your appliance: Customize your appliance. The large drawer provides convenient storage. Stack Kit If space is at a premium, the stack ... us at www.amanacanada.ca. 15" Pedestal Color-matched pedestals raise the washer and dryer to a more information on top of the washer. 4 FACTORY CERTIFIED PARTS Accessories designed for your new washer and dryer with the following genuine...

Owners Manual
Page 26
...repair. 13. In the event of the Use and Care Guide or visit producthelp.amana.com. 2. Damage from defects in which it was purchased or, at its 5. Repairs to parts or systems to review the Troubleshooting section of product replacement, your appliance will pay for..., and telephone number ■ Model number and serial number ■ A clear, detailed description of the problem ■ Proof of non-genuine Amana parts or accessories. PROOF OF PURCHASE IS REQUIRED TO OBTAIN WARRANTY SERVICE. In the U.S. Commercial, non-residential, multiple-family use, or use your product...
...repair. 13. In the event of the Use and Care Guide or visit producthelp.amana.com. 2. Damage from defects in which it was purchased or, at its 5. Repairs to parts or systems to review the Troubleshooting section of product replacement, your appliance will pay for..., and telephone number ■ Model number and serial number ■ A clear, detailed description of the problem ■ Proof of non-genuine Amana parts or accessories. PROOF OF PURCHASE IS REQUIRED TO OBTAIN WARRANTY SERVICE. In the U.S. Commercial, non-residential, multiple-family use, or use your product...

