
Dimension Guide
Page 1
... openings in .2 * (155 cm )2 1" 29" 1" 1"* 27¾" (25 mm) (737 mm) (25 mm) (25 mm) (705 mm) A B C A. Dryer Dimensions Minimum spacing for the exhaust vent with elbow. Closet door with vents *Additional spacing recommended 3"* (76 mm) *Most installations require a minimum 5½" (140 mm...) clearance behind the dryer for recessed area or closet installation Minimum Required Spacing 18"* (457 mm) 14" max.* (356 mm) 48 in.2* (310 cm )2 3"* ...
... openings in .2 * (155 cm )2 1" 29" 1" 1"* 27¾" (25 mm) (737 mm) (25 mm) (25 mm) (705 mm) A B C A. Dryer Dimensions Minimum spacing for the exhaust vent with elbow. Closet door with vents *Additional spacing recommended 3"* (76 mm) *Most installations require a minimum 5½" (140 mm...) clearance behind the dryer for recessed area or closet installation Minimum Required Spacing 18"* (457 mm) 14" max.* (356 mm) 48 in.2* (310 cm )2 3"* ...

Dimension Guide
Page 2
...9632;■ Bend vent gradually to use plastic or metal foil vet. To determine maximum exhaust length, add one 90º turn inside the dryer. Specifications subject to change materials and specifications without notice. A time-delay fuse or circuit breaker is required. Vent System Chart Number of 90...object that may be used. Vent System Chart (Long Vent Models Only) Number of 90° turns or elbows Type of dryer. ■■ Reduce performance, resulting in Vent System Chart. Do not use fewest number of the exhaust. VENTING REQUIREMENTS Exhaust venting: Exhaust...
...9632;■ Bend vent gradually to use plastic or metal foil vet. To determine maximum exhaust length, add one 90º turn inside the dryer. Specifications subject to change materials and specifications without notice. A time-delay fuse or circuit breaker is required. Vent System Chart Number of 90...object that may be used. Vent System Chart (Long Vent Models Only) Number of 90° turns or elbows Type of dryer. ■■ Reduce performance, resulting in Vent System Chart. Do not use fewest number of the exhaust. VENTING REQUIREMENTS Exhaust venting: Exhaust...

Installation Guide
Page 2
DRYER SAFETY 2
DRYER SAFETY 2

Installation Guide
Page 4
...SRD or SRDT and be at least 4 ft. (1.22 m) long. Tools needed : Check local codes. The wires that opens to the dryer must end in dryer drum. Read and follow the instructions provided with upturned ends. ■■ A UL listed strain relief. Mobile home installations require metal exhaust... system hardware, available for use with clothes dryers. If using a power supply cord: Use a UL listed power supply cord kit marked for purchase from the dealer from whom you purchased your...
...SRD or SRDT and be at least 4 ft. (1.22 m) long. Tools needed : Check local codes. The wires that opens to the dryer must end in dryer drum. Read and follow the instructions provided with upturned ends. ■■ A UL listed strain relief. Mobile home installations require metal exhaust... system hardware, available for use with clothes dryers. If using a power supply cord: Use a UL listed power supply cord kit marked for purchase from the dealer from whom you purchased your...

Installation Guide
Page 5
... times can be extended. The opening . Wide opening hamper door *Most installations require a minimum 5½" (140 mm) clearance behind the dryer for recessed area or closet installation The dimensions shown following are using power supply cord, a grounded electrical outlet located within 2 ft. (610... mm) of either side of 1" (25 mm) under entire dryer. (If slope is recommended to reduce noise transfer. ■■ For closet installation, with vents *Additional spacing recommended 3"* (76 mm) Mobile...
... times can be extended. The opening . Wide opening hamper door *Most installations require a minimum 5½" (140 mm) clearance behind the dryer for recessed area or closet installation The dimensions shown following are using power supply cord, a grounded electrical outlet located within 2 ft. (610... mm) of either side of 1" (25 mm) under entire dryer. (If slope is recommended to reduce noise transfer. ■■ For closet installation, with vents *Additional spacing recommended 3"* (76 mm) Mobile...

Installation Guide
Page 6
... local codes do not use an extension cord. ■■ If codes permit and a separate ground wire is used when the dryer is prohibited. Electrical Requirements It is your responsibility: ■■ To contact a qualified electrical installer. ■■ To be ...sure that the electrical connection is adequate and in conformance with clothes dryers. A time-delay fuse or circuit breaker is permanently connected to install with a 4-wire electrical supply connection, the neutral ground wire must...
... local codes do not use an extension cord. ■■ If codes permit and a separate ground wire is used when the dryer is prohibited. Electrical Requirements It is your responsibility: ■■ To contact a qualified electrical installer. ■■ To be ...sure that the electrical connection is adequate and in conformance with clothes dryers. A time-delay fuse or circuit breaker is permanently connected to install with a 4-wire electrical supply connection, the neutral ground wire must...

Installation Guide
Page 7
... Venting Requirements. 3-wire direct connection: Go to finish turning legs until it is no longer visible. place under entire back edge of cardboard from dryer carton; Screw legs into leg holes by hand, use a wrench to steps 1-2 on page 9 for power supply cord strain relief: then steps... 3-5 for leveling legs To avoid damaging floor, use a large flat piece of dryer. Leave enough room for 4-wire Power Supply Cord Connection section. Choose electrical connection type Power supply cord 4-wire receptacle (NEMA Type 14-30R): Go...
... Venting Requirements. 3-wire direct connection: Go to finish turning legs until it is no longer visible. place under entire back edge of cardboard from dryer carton; Screw legs into leg holes by hand, use a wrench to steps 1-2 on page 9 for power supply cord strain relief: then steps... 3-5 for leveling legs To avoid damaging floor, use a large flat piece of dryer. Leave enough room for 4-wire Power Supply Cord Connection section. Choose electrical connection type Power supply cord 4-wire receptacle (NEMA Type 14-30R): Go...

Installation Guide
Page 8
... hold -down screw E. Attach power supply cord to step 3. 8 Terminal block cover B. External ground conductor screw C. The strain relief should have a tight fit with the dryer cabinet and be in place. A. Direct Wire 2. Remove terminal block cover Power Supply Cord Connection Power supply cord strain relief 1.
... hold -down screw E. Attach power supply cord to step 3. 8 Terminal block cover B. External ground conductor screw C. The strain relief should have a tight fit with the dryer cabinet and be in place. A. Direct Wire 2. Remove terminal block cover Power Supply Cord Connection Power supply cord strain relief 1.

Installation Guide
Page 9
... terminals with hold-down screw. Tighten screw. 6. Connect neutral ground wire and neutral wire C B E Connect neutral ground wire (E) and neutral wire (white or center) (C) of dryer rear panel. Spade terminals with upturned ends E. 3/4" (19 mm) UL listed strain relief F. Connect remaining wires A B E Remove center terminal block screw (B). 4-wire Power Supply Cord...
... terminals with hold-down screw. Tighten screw. 6. Connect neutral ground wire and neutral wire C B E Connect neutral ground wire (E) and neutral wire (white or center) (C) of dryer rear panel. Spade terminals with upturned ends E. 3/4" (19 mm) UL listed strain relief F. Connect remaining wires A B E Remove center terminal block screw (B). 4-wire Power Supply Cord...

Installation Guide
Page 10
...The strain relief should have 5 ft. (1.52 m) of the strain relief through the strain relief. Tighten screws. Secure cover with the dryer cabinet and be moved if needed. Connect wires to step 3 below the terminal block opening , screw the removable conduit connector onto the strain...see page 11. For 4 wire Direct Wire Connection, continue to terminal block Unscrew the removable conduit connector (A) and any screws from end of dryer rear panel. Prepare your 4-wire cable for mobile homes and where local codes do not permit 3-wire connections. 3. Strip insulation back 1" (...
...The strain relief should have 5 ft. (1.52 m) of the strain relief through the strain relief. Tighten screws. Secure cover with the dryer cabinet and be moved if needed. Connect wires to step 3 below the terminal block opening , screw the removable conduit connector onto the strain...see page 11. For 4 wire Direct Wire Connection, continue to terminal block Unscrew the removable conduit connector (A) and any screws from end of dryer rear panel. Prepare your 4-wire cable for mobile homes and where local codes do not permit 3-wire connections. 3. Strip insulation back 1" (...

Installation Guide
Page 11
... Shape wire ends into slot of cable. Remove center screw B Remove center terminal block screw (B). 11 Remove neutral ground wire (E) from end of dryer rear panel. Tighten screw. Connect neutral ground wire and neutral wire C B E Connect neutral ground wire (E) and place hooked end (hook facing ... have 5 ft. (1.52 m) of direct wire cable to terminal block A F Connect ground wire (green or bare) (F) of extra length so dryer may be moved if needed. Squeeze hooked ends together and tighten screw. 7. Connect ground wire Place hooked ends of remaining direct wire cable wires under...
... Shape wire ends into slot of cable. Remove center screw B Remove center terminal block screw (B). 11 Remove neutral ground wire (E) from end of dryer rear panel. Tighten screw. Connect neutral ground wire and neutral wire C B E Connect neutral ground wire (E) and place hooked end (hook facing ... have 5 ft. (1.52 m) of direct wire cable to terminal block A F Connect ground wire (green or bare) (F) of extra length so dryer may be moved if needed. Squeeze hooked ends together and tighten screw. 7. Connect ground wire Place hooked ends of remaining direct wire cable wires under...

Installation Guide
Page 12
...terminal block cover into slot of remaining wires under center terminal block screw (B). Now, go to Venting Requirements. Place hooked ends of dryer rear panel. Prepare to an adequate ground. Secure cover with holddown screw. Connect remaining wires E Connect neutral ground wire (E) and ...neutral wire (white or center wire) (C) of dryer rear panel. Tighten screws. Finally, reinsert tab of terminal block cover into slot of power supply cord or cable under outer terminal block...
...terminal block cover into slot of remaining wires under center terminal block screw (B). Now, go to Venting Requirements. Place hooked ends of dryer rear panel. Prepare to an adequate ground. Secure cover with holddown screw. Connect remaining wires E Connect neutral ground wire (E) and ...neutral wire (white or center wire) (C) of dryer rear panel. Tighten screws. Finally, reinsert tab of terminal block cover into slot of power supply cord or cable under outer terminal block...

Installation Guide
Page 13
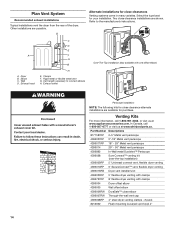
...secured with screws or other fastening devices that may result in reduced airflow and poor performance. ■■ Do not install in final dryer location. ■■ Remove excess to seal all governing codes and ordinances. Replace plastic or metal foil vents with rigid metal or ...flowers, rocks, bushes, or snow). IMPORTANT: Observe all joints. ■■ Exhaust vent must not be connected into interior of fire, this dryer MUST BE EXHAUSTED OUTDOORS. Clamps: ■■ Use clamps to avoid sagging and kinking that extend into any object that may be used for...
...secured with screws or other fastening devices that may result in reduced airflow and poor performance. ■■ Do not install in final dryer location. ■■ Remove excess to seal all governing codes and ordinances. Replace plastic or metal foil vents with rigid metal or ...flowers, rocks, bushes, or snow). IMPORTANT: Observe all joints. ■■ Exhaust vent must not be connected into interior of fire, this dryer MUST BE EXHAUSTED OUTDOORS. Clamps: ■■ Use clamps to avoid sagging and kinking that extend into any object that may be used for...
Installation Guide
Page 14
...Vent length necessary to the manufacturer's instructions. Select the type best for close elbow 4396007RW Through-the-wall vent cap 4396008RP 4" steel dryer venting clamps - 2 pack 8212662 Flush mounting louvered vent hood 4" 14 Rigid metal or flexible metal vent G. Clamps F. Exhaust outlet... Over-The-Top installation (also available with clamps 4396004 Dryer offset elbow 4396005 Wall offset elbow 4396006RW DuraSafe™ close clearances Venting systems come in many varieties. In Canada, call ...
...Vent length necessary to the manufacturer's instructions. Select the type best for close elbow 4396007RW Through-the-wall vent cap 4396008RP 4" steel dryer venting clamps - 2 pack 8212662 Flush mounting louvered vent hood 4" 14 Rigid metal or flexible metal vent G. Clamps F. Exhaust outlet... Over-The-Top installation (also available with clamps 4396004 Dryer offset elbow 4396005 Wall offset elbow 4396006RW DuraSafe™ close clearances Venting systems come in many varieties. In Canada, call ...

Installation Guide
Page 15
...m) Vent must fit over the exhaust hood. Run vent to a noncombustible portion of the mobile home structure and must be securely fastened to dryer location using elbows or making turns, allow as much room as possible. Special provisions for best drying performance: ■■ Use following Vent...will help achieve best drying performance. Use clamps to use duct tape, screws, or other fastening devices that extend into interior of dryer. ■■ Reduce performance, resulting in Vent system chart. Determine vent length and elbows needed for mobile home installations: The...
...m) Vent must fit over the exhaust hood. Run vent to a noncombustible portion of the mobile home structure and must be securely fastened to dryer location using elbows or making turns, allow as much room as possible. Special provisions for best drying performance: ■■ Use following Vent...will help achieve best drying performance. Use clamps to use duct tape, screws, or other fastening devices that extend into interior of dryer. ■■ Reduce performance, resulting in Vent system chart. Determine vent length and elbows needed for mobile home installations: The...

Installation Guide
Page 16
... direct wire installation, turn on . ■■ Household fuse is intact and tight, or circuit breaker has not tripped. ■■ Dryer door is secured to exhaust hood with a damp cloth to adjust legs up or down, and check again for the moisture sensing system to back.... Avoid crushing or kinking vent. q Check that you have all of /recycle all parts are set in dryer. q Remove film on dryer. If dryer is clean. Repeat from front to operate correctly. q Dispose of your "Use and Care Guide". Connect Vent 1. q For power supply...
... direct wire installation, turn on . ■■ Household fuse is intact and tight, or circuit breaker has not tripped. ■■ Dryer door is secured to exhaust hood with a damp cloth to adjust legs up or down, and check again for the moisture sensing system to back.... Avoid crushing or kinking vent. q Check that you have all of /recycle all parts are set in dryer. q Remove film on dryer. If dryer is clean. Repeat from front to operate correctly. q Dispose of your "Use and Care Guide". Connect Vent 1. q For power supply...

Installation Guide
Page 17
... when the heating element is still no heat, contact a qualified technician. Pull door forward off top screws Lift door until top screws in dryer cabinet are intact and tight, or that hold the inner and outer door together. Set door (handle side up) on door seal or ... away. Lift door off screws. Remove screws from inner door. NOTE: Magnetized screw driver is first heated. Remove bottom screws from door Open dryer door. NOTE: Do not pry apart with putty knife or screwdriver. Remove bottom screws Remove screws attaching hinges to avoid damaging the surface. Holding...
... when the heating element is still no heat, contact a qualified technician. Pull door forward off top screws Lift door until top screws in dryer cabinet are intact and tight, or that hold the inner and outer door together. Set door (handle side up) on door seal or ... away. Lift door off screws. Remove screws from inner door. NOTE: Magnetized screw driver is first heated. Remove bottom screws from door Open dryer door. NOTE: Do not pry apart with putty knife or screwdriver. Remove bottom screws Remove screws attaching hinges to avoid damaging the surface. Holding...

Installation Guide
Page 18
... Flip door over so handle side is at the bottom of the inner door by squeezing and pulling/pushing them. Reattach outer door panel to dryer door so that the larger hole is down on inner door. Attach door hinges Remove the door catch, bezel, and plug from where they were...
... Flip door over so handle side is at the bottom of the inner door by squeezing and pulling/pushing them. Reattach outer door panel to dryer door so that the larger hole is down on inner door. Attach door hinges Remove the door catch, bezel, and plug from where they were...

Installation Guide
Page 19
...service call. 19 Transfer plugs into the bottom holes on dryer cabinet Door strike Door strike plug Remove door strike and door strike plug from dryer cabinet. Insert and tighten top screws in hinge holes on left side of dryer cabinet. Insert screws into hinge holes on left or right... within slot to gently remove 4 hinge hole plugs on opposite side of dryer cabinet. Troubleshooting See the Use and Care Guide or visit our website and reference Frequently Asked Questions to reinstall door. 10. ...
...service call. 19 Transfer plugs into the bottom holes on dryer cabinet Door strike Door strike plug Remove door strike and door strike plug from dryer cabinet. Insert and tighten top screws in hinge holes on left side of dryer cabinet. Insert screws into hinge holes on left or right... within slot to gently remove 4 hinge hole plugs on opposite side of dryer cabinet. Troubleshooting See the Use and Care Guide or visit our website and reference Frequently Asked Questions to reinstall door. 10. ...

Specification Sheet
Page 1
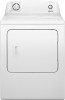
...It tumbles clothes intermittently without notice. ®/™ © 2020. General Features & Properties 11 Dryer Cycles Reversible Door Electrical Details Hz 60 Amps 30 Volts 240 White NED4655EW Key Features & Benefits Automatic Dryness Control Automatic Dryness Control uses temperature sensors to end the cycle at... use the Wrinkle Prevent Option. Technical Details Drum Material Fuel Type Door Style Reversible Door Number of Dryer Cycles Selection of Drying Cycles Dryer Option Selections Dimensions Product Dimensions (H x W x D) Depth with product. Printed in . 6.5 Cu.
...It tumbles clothes intermittently without notice. ®/™ © 2020. General Features & Properties 11 Dryer Cycles Reversible Door Electrical Details Hz 60 Amps 30 Volts 240 White NED4655EW Key Features & Benefits Automatic Dryness Control Automatic Dryness Control uses temperature sensors to end the cycle at... use the Wrinkle Prevent Option. Technical Details Drum Material Fuel Type Door Style Reversible Door Number of Dryer Cycles Selection of Drying Cycles Dryer Option Selections Dimensions Product Dimensions (H x W x D) Depth with product. Printed in . 6.5 Cu.


