Use and Care
Page 2
We have provided many important safety messages in this manual and on your appliance. All safety messages will tell you what can be killed or seriously injured if you don't immediately follow instructions. All safety ...
We have provided many important safety messages in this manual and on your appliance. All safety messages will tell you what can be killed or seriously injured if you don't immediately follow instructions. All safety ...

Use and Care
Page 3
... gas supplier, call your gas supplier. For more information, contact your gas supplier from a neighbor's phone. WARNING: If the information in the vicinity of this manual is detected, follow the "What to some of the substances listed, including benzene, formaldehyde, carbon monoxide, toluene, and soot. 3 This appliance can cause low-level...
... gas supplier, call your gas supplier. For more information, contact your gas supplier from a neighbor's phone. WARNING: If the information in the vicinity of this manual is detected, follow the "What to some of the substances listed, including benzene, formaldehyde, carbon monoxide, toluene, and soot. 3 This appliance can cause low-level...

Use and Care
Page 5
Surface burner locator B. Failure to follow these instructions can be lit manually. Before setting a control knob, place filled cookware on the grate. Push in death or fire. The clicking will produce a flame. 2. SETTING RECOMMENDED USE LITE ■.... Hold a lit match near a burner and turn knob counterclockwise to LITE. To Set Burner Temperature: 1. All four surface burners will click. COOKTOP USE This manual covers several different models. The locations and appearances of the features shown here may have some or all controls when not cooking. Right rear burner...
Surface burner locator B. Failure to follow these instructions can be lit manually. Before setting a control knob, place filled cookware on the grate. Push in death or fire. The clicking will produce a flame. 2. SETTING RECOMMENDED USE LITE ■.... Hold a lit match near a burner and turn knob counterclockwise to LITE. To Set Burner Temperature: 1. All four surface burners will click. COOKTOP USE This manual covers several different models. The locations and appearances of the features shown here may have some or all controls when not cooking. Right rear burner...

Use and Care
Page 10
... your fingers on the front of the door and your thumbs on the range. Open the door completely and remove the hinge pins. Press the manual oven light switch (on the inside surface. 2. Then, follow these instructions. Pull door straight up, then toward range. Grasp the door on the sides with...
... your fingers on the front of the door and your thumbs on the range. Open the door completely and remove the hinge pins. Press the manual oven light switch (on the inside surface. 2. Then, follow these instructions. Pull door straight up, then toward range. Grasp the door on the sides with...
Installation Instruction
Page 7
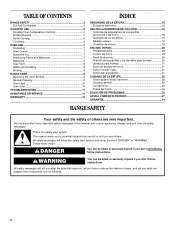
... a shutoff valve: The supply line must be equipped with this range must be disconnected from the gas supply piping system by closing its individual manual shutoff valve must be in -line connection to the gas supply line. ■ A 1⁄2" (1.3 cm) male pipe thread is for ...range to the range. It should be at least 1" water column pressure above 1⁄2 psi gauge (14" WCP) The range and its individual manual shutoff valve during any pressure testing of E.I .D., flexible metal appliance connector may be as follows for proper operation: Natural Gas: Minimum pressure: 5" ...
... a shutoff valve: The supply line must be equipped with this range must be disconnected from the gas supply piping system by closing its individual manual shutoff valve must be in -line connection to the gas supply line. ■ A 1⁄2" (1.3 cm) male pipe thread is for ...range to the range. It should be at least 1" water column pressure above 1⁄2 psi gauge (14" WCP) The range and its individual manual shutoff valve during any pressure testing of E.I .D., flexible metal appliance connector may be as follows for proper operation: Natural Gas: Minimum pressure: 5" ...

Installation Instruction
Page 9
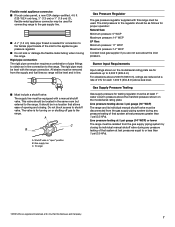
B A A. Front leveling leg 10. A minimum of 1" (2.5 cm). Make Gas Connection 12. Range foot 3. Pressure regulator connection fitting B. 90˚ elbow C. Black iron pipe D. Manual shutoff valve G. 1⁄2" to the correct height. If range is not level, pull range forward until range is adequate as long as it conforms to ...
B A A. Front leveling leg 10. A minimum of 1" (2.5 cm). Make Gas Connection 12. Range foot 3. Pressure regulator connection fitting B. 90˚ elbow C. Black iron pipe D. Manual shutoff valve G. 1⁄2" to the correct height. If range is not level, pull range forward until range is adequate as long as it conforms to ...

Installation Instruction
Page 10
...be a minimum, steady blue flame. The flame size should be 1⁄4" to 3⁄8" (0.64 cm to 3⁄4" gas pipe Complete Connection 1. Manual shutoff valve H. 1⁄2" to 0.95 cm) high. 10 Electrical Shock Hazard Plug into a grounded 3 prong outlet. Do not use an extension cord.... Check Operation A A. Gas Pressure Regulator Front View Front Side View Shutoff valve "ON" Position 3. Open the manual shutoff valve in the broiler. Electronic Ignition System Cooktop and oven burners use electronic igniters in the "ON" position. This sparking continues ...
...be a minimum, steady blue flame. The flame size should be 1⁄4" to 3⁄8" (0.64 cm to 3⁄4" gas pipe Complete Connection 1. Manual shutoff valve H. 1⁄2" to 0.95 cm) high. 10 Electrical Shock Hazard Plug into a grounded 3 prong outlet. Do not use an extension cord.... Check Operation A A. Gas Pressure Regulator Front View Front Side View Shutoff valve "ON" Position 3. Open the manual shutoff valve in the broiler. Electronic Ignition System Cooktop and oven burners use electronic igniters in the "ON" position. This sparking continues ...
Installation Instruction
Page 12
Reinstall the cap. A. Turn the cap over so that the manual shutoff valve is in the closed " position B. Gas supply line C. Unplug or disconnect power. 3. NOTE: Do not remove the spring beneath the cap. 4. Cap To ...
Reinstall the cap. A. Turn the cap over so that the manual shutoff valve is in the closed " position B. Gas supply line C. Unplug or disconnect power. 3. NOTE: Do not remove the spring beneath the cap. 4. Cap To ...

Installation Instruction
Page 13
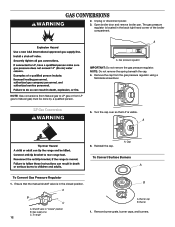
... oven burner spud in the parts bag for proper burner ignition, operation, and burner flame adjustments. Reinstall burners, burner caps and burner grates. Turn the manual shutoff valve in the gas supply line to "OFF." 5. Open oven door and remove oven racks, oven tray, flame spreader and set aside. 2. Install the...
... oven burner spud in the parts bag for proper burner ignition, operation, and burner flame adjustments. Reinstall burners, burner caps and burner grates. Turn the manual shutoff valve in the gas supply line to "OFF." 5. Open oven door and remove oven racks, oven tray, flame spreader and set aside. 2. Install the...
Installation Instruction
Page 14
... LP gas to LP gas or from the gas pressure regulator using a flat- Unplug or disconnect power. 14 B A. Turn the cap over so that the manual shutoff valve is in the back right hand corner of the broiler compartment. Ensure that N or NAT is located in the closed " position B. Locate the...
... LP gas to LP gas or from the gas pressure regulator using a flat- Unplug or disconnect power. 14 B A. Turn the cap over so that the manual shutoff valve is in the back right hand corner of the broiler compartment. Ensure that N or NAT is located in the closed " position B. Locate the...

Installation Instruction
Page 15
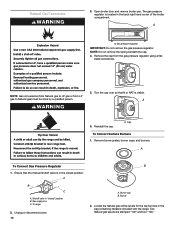
... door and press the "OFF" pad. 5. Remove the LP gas orifice spuds using a 7 mm combination wrench. The orifice spud is very important. A 51 A. Turn the manual shutoff valve in literature package supplied with "51" IMPORTANT: Do not over tighten. 6. The small inner cone should have yellow tips. 4. Natural gas flames do...
... door and press the "OFF" pad. 5. Remove the LP gas orifice spuds using a 7 mm combination wrench. The orifice spud is very important. A 51 A. Turn the manual shutoff valve in literature package supplied with "51" IMPORTANT: Do not over tighten. 6. The small inner cone should have yellow tips. 4. Natural gas flames do...
