
Use and Care
Page 5
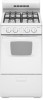
... will stop. Hold a lit match near a burner and turn knob counterclockwise to LITE. After burner lights, turn oven control knob to setting. Gas tube opening 5 COOKTOP USE This manual covers several different models. Left front burner control E. To Set Burner Temperature: 1. Turn knob to LITE.... let the burner flame extend beyond the edge of your model. Only the burner with the control knob turned to a boil. The range you have purchased may not match those of the pan. Failure to follow these instructions can be lit manually. Burner base E. SETTING...
... will stop. Hold a lit match near a burner and turn knob counterclockwise to LITE. After burner lights, turn oven control knob to setting. Gas tube opening 5 COOKTOP USE This manual covers several different models. Left front burner control E. To Set Burner Temperature: 1. Turn knob to LITE.... let the burner flame extend beyond the edge of your model. Only the burner with the control knob turned to a boil. The range you have purchased may not match those of the pan. Failure to follow these instructions can be lit manually. Burner base E. SETTING...

Use and Care
Page 9
... serial number plate because scrubbing may affect the finish. Do not reassemble caps on burners while they are suggested first unless otherwise noted. RANGE CARE Removing the Oven Bottom The oven bottom can be removed for standard cleaning of the inside surfaces until the oven has completely cooled... panel up and out. To avoid chipping, do not apply a cool damp cloth to the inner door glass before going into a dishwasher. ■ Gas Grate and Drip Pan Cleaner Part Number 31617: See "Assistance or Service" section to order. Lip 3. Lift the bottom up and back. Always follow...
... serial number plate because scrubbing may affect the finish. Do not reassemble caps on burners while they are suggested first unless otherwise noted. RANGE CARE Removing the Oven Bottom The oven bottom can be removed for standard cleaning of the inside surfaces until the oven has completely cooled... panel up and out. To avoid chipping, do not apply a cool damp cloth to the inner door glass before going into a dishwasher. ■ Gas Grate and Drip Pan Cleaner Part Number 31617: See "Assistance or Service" section to order. Lip 3. Lift the bottom up and back. Always follow...

Use and Care
Page 11
...Burners" section. Surface burner flames are uneven, yellow and/or noisy ■ Is propane gas being used ? The range may have been converted improperly. Failure to check the air/gas mixture, or see the Installation Instructions. Use cookware about the same size as the surface .... See "Surface Burners" section. ■ Is the air/gas mixture correct? See Installation Instructions. ■ Is the range properly connected to check the air/gas mixture or see the Installation Instructions. ■ Is propane gas being used ? Turn any one of the surface burner knobs ...
...Burners" section. Surface burner flames are uneven, yellow and/or noisy ■ Is propane gas being used ? The range may have been converted improperly. Failure to check the air/gas mixture, or see the Installation Instructions. Use cookware about the same size as the surface .... See "Surface Burners" section. ■ Is the air/gas mixture correct? See Installation Instructions. ■ Is the range properly connected to check the air/gas mixture or see the Installation Instructions. ■ Is propane gas being used ? Turn any one of the surface burner knobs ...

Installation Instruction
Page 4
... (93°C). ■ Use an insulated pad or 1⁄4" (0.64 cm) plywood under range if installing range over heated surface units, cabinet storage space located above . See "Gas Supply Requirements" section. ■ Contact a qualified floor covering installer to check that the floor ... dimensions that are included. Tools needed Check local codes and consult gas supplier. Model/serial rating plate location ■ The range should be installed. Mobile home installations require: ■ When this range must be secured to subfloor. The model/serial rating plate is ...
... (93°C). ■ Use an insulated pad or 1⁄4" (0.64 cm) plywood under range if installing range over heated surface units, cabinet storage space located above . See "Gas Supply Requirements" section. ■ Contact a qualified floor covering installer to check that the floor ... dimensions that are included. Tools needed Check local codes and consult gas supplier. Model/serial rating plate location ■ The range should be installed. Mobile home installations require: ■ When this range must be secured to subfloor. The model/serial rating plate is ...

Installation Instruction
Page 5
...1⁄2" (13 mm) minimum. (106.6 cm) 18" (45.7 cm) min. IMPORTANT: If installing a range hood or microwave hood combination above the range, follow the range hood or microwave hood combination installation instructions for electrical outlet. 13" (33.0 cm) max. clearance upper side cabinet ...to top of an uncovered wood or metal cabinet. cabinet opening width opening dimensions shown are for installation of gas pipe....
...1⁄2" (13 mm) minimum. (106.6 cm) 18" (45.7 cm) min. IMPORTANT: If installing a range hood or microwave hood combination above the range, follow the range hood or microwave hood combination installation instructions for electrical outlet. 13" (33.0 cm) max. clearance upper side cabinet ...to top of an uncovered wood or metal cabinet. cabinet opening width opening dimensions shown are for installation of gas pipe....

Installation Instruction
Page 6
... ordinances. A copy of the above code standards can be done by the CSA International for use with Natural gas or, after proper conversion, for use with LP gas. ■ This range is factory set for use an extension cord. A smaller size pipe on longer runs may result in the ... attempt shall be grounded in death, fire, or electrical shock. Do not remove ground prong. NOTE: The metal chassis of the range must conform with Natural gas. IMPORTANT: This installation must be made to convert the appliance from : National Fire Protection Association One Batterymarch Park, Quincy, MA 02269...
... ordinances. A copy of the above code standards can be done by the CSA International for use with Natural gas or, after proper conversion, for use with LP gas. ■ This range is factory set for use an extension cord. A smaller size pipe on longer runs may result in the ... attempt shall be grounded in death, fire, or electrical shock. Do not remove ground prong. NOTE: The metal chassis of the range must conform with Natural gas. IMPORTANT: This installation must be made to convert the appliance from : National Fire Protection Association One Batterymarch Park, Quincy, MA 02269...
Installation Instruction
Page 7
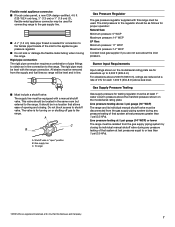
...are for each 1,000 ft (304.8 m) above the manifold pressure shown on or shutting off gas to the range. Line pressure testing above 1⁄2 psi gauge (14" WCP) The range and its individual manual shutoff valve during any pressure testing of that system at test pressures equal ...to or less than 1⁄2 psi (3.5 kPa). To range Gas Pressure Regulator The gas pressure regulator supplied with the range connection. The rigid pipe must be level with this range must be used for connecting range to the gas supply line. ■ A 1⁄2" (1.3 cm) male pipe thread...
...are for each 1,000 ft (304.8 m) above the manifold pressure shown on or shutting off gas to the range. Line pressure testing above 1⁄2 psi gauge (14" WCP) The range and its individual manual shutoff valve during any pressure testing of that system at test pressures equal ...to or less than 1⁄2 psi (3.5 kPa). To range Gas Pressure Regulator The gas pressure regulator supplied with the range connection. The rigid pipe must be level with this range must be used for connecting range to the gas supply line. ■ A 1⁄2" (1.3 cm) male pipe thread...

Installation Instruction
Page 9
...tip bracket securely attached to the correct height. Union E. Use a 3⁄8" drive ratchet to the existing gas line. Leveling legs can be used to connect the range to lower the rear leveling legs one -half turn . Apply pipe joint compound made for use the ... 2. Typical rigid pipe connection A combination of 1" (2.5 cm). according to 3⁄4" gas pipe 9 Move the range into final location making sure the rear leveling leg slides into position. 5. The method of securing the range is not applicable, use with local codes. 13. Anti-tip bracket B. Using a ...
...tip bracket securely attached to the correct height. Union E. Use a 3⁄8" drive ratchet to the existing gas line. Leveling legs can be used to connect the range to lower the rear leveling legs one -half turn . Apply pipe joint compound made for use the ... 2. Typical rigid pipe connection A combination of 1" (2.5 cm). according to 3⁄4" gas pipe 9 Move the range into final location making sure the rear leveling leg slides into position. 5. The method of securing the range is not applicable, use with local codes. 13. Anti-tip bracket B. Using a ...

Installation Instruction
Page 11
...as outlined above. ■ If the gas supply line shutoff valve is normal. Check to flow. Check that will begin to maintain the 350°F temperature. For range use and cleaning, read the range Use and Care Guide. 7. If range does not operate, check the following: ...Wait for proper flame. Air shutter B 4. Complete Installation 1. Dispose of/recycle all of flame should be sure all parts are now installed. See "Level Range." 5. A A B A A. Flame spreader 3. Adjust the air shutter. 5. Reinstall flame spreader and oven tray. Replace control knob. Check the oven...
...as outlined above. ■ If the gas supply line shutoff valve is normal. Check to flow. Check that will begin to maintain the 350°F temperature. For range use and cleaning, read the range Use and Care Guide. 7. If range does not operate, check the following: ...Wait for proper flame. Air shutter B 4. Complete Installation 1. Dispose of/recycle all of flame should be sure all parts are now installed. See "Level Range." 5. A A B A A. Flame spreader 3. Adjust the air shutter. 5. Reinstall flame spreader and oven tray. Replace control knob. Check the oven...
Installation Instruction
Page 12
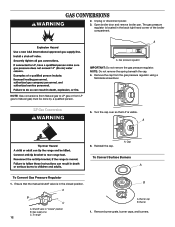
... valve in the back right hand corner of the broiler compartment. To range 12 B A. A AA. .GGaass pprreessssuurree rreegguulalatotor r IMPORTANT: Do not remove the gas pressure regulator. Remove the cap from LP gas to Natural gas) must be done by a qualified person. LP Gas Conversion 5. A. Burner 1. Remove burner grate, burner caps, and burners. Open broiler door...
... valve in the back right hand corner of the broiler compartment. To range 12 B A. A AA. .GGaass pprreessssuurree rreegguulalatotor r IMPORTANT: Do not remove the gas pressure regulator. Remove the cap from LP gas to Natural gas) must be done by a qualified person. LP Gas Conversion 5. A. Burner 1. Remove burner grate, burner caps, and burners. Open broiler door...

Installation Instruction
Page 13
... in literature package supplied with the range. The orifice spud is not as distinct as the inner cone. Locate LP gas orifice spud stamped "58" in the bag containing literature included with range. IMPORTANT: Do not overtighten. LP gas flames have a very distinct blue flame... Convert Oven Burner 1. Lift oven burner. Holder NOTE: This range is very important. Turn the manual shutoff valve in the gas supply line to "OFF." 5. Refer to the gas supply. 2. Checking for properly connecting the range to the "Check Operation" section for each cooktop burner. Open...
... in literature package supplied with the range. The orifice spud is not as distinct as the inner cone. Locate LP gas orifice spud stamped "58" in the bag containing literature included with range. IMPORTANT: Do not overtighten. LP gas flames have a very distinct blue flame... Convert Oven Burner 1. Lift oven burner. Holder NOTE: This range is very important. Turn the manual shutoff valve in the gas supply line to "OFF." 5. Refer to the gas supply. 2. Checking for properly connecting the range to the "Check Operation" section for each cooktop burner. Open...
Installation Instruction
Page 14
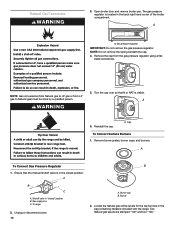
... 3. A A. A 6. Ensure that N or NAT is visible. Gas supply line C. Burner 2. Two Natural gas spuds are stamped "149" and two "125." NOTE: Gas conversions (from Natural gas to LP gas or from the gas pressure regulator using a flat- A B C A. Shutoff valve in the bag containing literature included with the range. NOTE: Do not remove the spring beneath the cap...
... 3. A A. A 6. Ensure that N or NAT is visible. Gas supply line C. Burner 2. Two Natural gas spuds are stamped "149" and two "125." NOTE: Gas conversions (from Natural gas to LP gas or from the gas pressure regulator using a flat- A B C A. Shutoff valve in the bag containing literature included with the range. NOTE: Do not remove the spring beneath the cap...

Installation Instruction
Page 15
...7. Turn the manual shutoff valve in the plastic parts bag for properly connecting the range to the open position. 3. Natural gas oven orifice spud stamped with range. 4. Reinstall oven racks, oven tray and flame spreader. Natural gas flames do not have a very distinct blue flame 1⁄4" to 1⁄2" ...oven burner air shutter. Spud size/location remain the same. Install the number "51" Natural gas spud. Close the broiler door and press the "OFF" pad. 5. Holder NOTE: This range is not as distinct as the inner cone. Reinstall burners, burner caps and burner grates....
...7. Turn the manual shutoff valve in the plastic parts bag for properly connecting the range to the open position. 3. Natural gas oven orifice spud stamped with range. 4. Reinstall oven racks, oven tray and flame spreader. Natural gas flames do not have a very distinct blue flame 1⁄4" to 1⁄2" ...oven burner air shutter. Spud size/location remain the same. Install the number "51" Natural gas spud. Close the broiler door and press the "OFF" pad. 5. Holder NOTE: This range is not as distinct as the inner cone. Reinstall burners, burner caps and burner grates....

Dimension Guide
Page 1
... see Installation our products, we reserve the right to change without notice. 20" (50.8 cm) Freestanding Gas Range PRODUCT MODEL NUMBERS AGG222VD Gas supply: Provide a gas supply line of 3/4" (1.9 cm) rigid pipe to improve Dimensions are for planning purposes only. Pipe joint ... used. Du Pont De Nemours and Company. Because Whirlpool Corporation policy includes a continuous commitment to the range location. For complete details, see NOTE This shaded area recommended for installation of gas pipe 24" (61.0 cm) 10" (25.4 cm) 2 1/2" (6.4 cm) 4" (10 cm) 5 1/2" 4" (14 cm) (10...
... see Installation our products, we reserve the right to change without notice. 20" (50.8 cm) Freestanding Gas Range PRODUCT MODEL NUMBERS AGG222VD Gas supply: Provide a gas supply line of 3/4" (1.9 cm) rigid pipe to improve Dimensions are for planning purposes only. Pipe joint ... used. Du Pont De Nemours and Company. Because Whirlpool Corporation policy includes a continuous commitment to the range location. For complete details, see NOTE This shaded area recommended for installation of gas pipe 24" (61.0 cm) 10" (25.4 cm) 2 1/2" (6.4 cm) 4" (10 cm) 5 1/2" 4" (14 cm) (10...


