

Installation Instruction
Page 1
Only 7 Verify Anti-Tip Bracket Location 12 Level Range 12 Storage Drawer 12 Complete Installation 13 Moving the Range 14 ANTI-TIP BRACKET TEMPLATE 15 IMPORTANT: Save for local electrical inspector's use. U.S.A. U.S.A. INSTALLATION INSTRUCTIONS 30" (76 CM) FREESTANDING ELECTRIC RANGES Table of Contents RANGE SAFETY 2 INSTALLATION REQUIREMENTS 3 Tools and Parts 3 Location Requirements 3 Electrical Requirements - Only 4 INSTALLATION INSTRUCTIONS 6 Unpack Range 6 Install Anti-Tip Bracket 6 Electrical Connection - W10252706B
Only 7 Verify Anti-Tip Bracket Location 12 Level Range 12 Storage Drawer 12 Complete Installation 13 Moving the Range 14 ANTI-TIP BRACKET TEMPLATE 15 IMPORTANT: Save for local electrical inspector's use. U.S.A. U.S.A. INSTALLATION INSTRUCTIONS 30" (76 CM) FREESTANDING ELECTRIC RANGES Table of Contents RANGE SAFETY 2 INSTALLATION REQUIREMENTS 3 Tools and Parts 3 Location Requirements 3 Electrical Requirements - Only 4 INSTALLATION INSTRUCTIONS 6 Unpack Range 6 Install Anti-Tip Bracket 6 Electrical Connection - W10252706B

Installation Instruction
Page 3
... open-end spade terminals with the maximum allowable wood cabinet temperatures of securing the range is marked for cutting ground strap if necessary) Parts supplied Check that the materials used . Tools needed If using a power supply cord kit: ■ A UL listed power supply...and ordinances. ■ It is installed in a mobile home, it conforms to be installed. IMPORTANT: To avoid damage to your local hardware store. Parts needed ■ Tape measure ■ ¼" drive ratchet ■ Flat-blade screwdriver ■ Level ■ Hammer ■ Hand or electric ...
... open-end spade terminals with the maximum allowable wood cabinet temperatures of securing the range is marked for cutting ground strap if necessary) Parts supplied Check that the materials used . Tools needed If using a power supply cord kit: ■ A UL listed power supply...and ordinances. ■ It is installed in a mobile home, it conforms to be installed. IMPORTANT: To avoid damage to your local hardware store. Parts needed ■ Tape measure ■ ¼" drive ratchet ■ Flat-blade screwdriver ■ Level ■ Hammer ■ Hand or electric ...

Installation Instruction
Page 6
... with a warming drawer, the rear legs cannot be centered in the "Location Requirements" section, adjust template so range will be killed. Remove oven racks and parts package from outside the range. A D C Install Anti-Tip Bracket WARNING Tip Over Hazard A child or adult can tip the range and be necessary to follow...
... with a warming drawer, the rear legs cannot be centered in the "Location Requirements" section, adjust template so range will be killed. Remove oven racks and parts package from outside the range. A D C Install Anti-Tip Bracket WARNING Tip Over Hazard A child or adult can tip the range and be necessary to follow...

Installation Instruction
Page 8
... Style 2: Direct wire strain relief ■ Remove the knockout as needed for the power supply cord. ■ Assemble a UL listed strain relief in the opening . Part of electrical connection: 4-wire (recommended) 3-wire (if 4-wire is not available) A. Discard C. Style 1: Power supply cord strain relief ■ Remove the knockout for the flexible...
... Style 2: Direct wire strain relief ■ Remove the knockout as needed for the power supply cord. ■ Assemble a UL listed strain relief in the opening . Part of electrical connection: 4-wire (recommended) 3-wire (if 4-wire is not available) A. Discard C. Style 1: Power supply cord strain relief ■ Remove the knockout for the flexible...

Installation Instruction
Page 10
... the ground-link screw and ground-link section. Setscrew C. Depending on the front of the terminal lug and insert exposed wire end through the neutral 1. Part of metal ground strap must not contact any other terminal. 10 Line 2 (red) wire F. Use a Phillips screwdriver to your electrical supply, make the required 3-wire...
... the ground-link screw and ground-link section. Setscrew C. Depending on the front of the terminal lug and insert exposed wire end through the neutral 1. Part of metal ground strap must not contact any other terminal. 10 Line 2 (red) wire F. Use a Phillips screwdriver to your electrical supply, make the required 3-wire...
Installation Instruction
Page 13
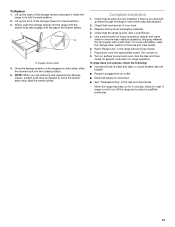
...Once the storage drawer is fully engaged on . 8. Complete Installation 1. Plug power cord into an outlet. ■ Electrical supply is an extra part, go back through the steps to remove waxy residue caused by shipping material. When the range has been on surface burners and oven. Check that... all parts are removing and replacing the storage drawer, a slight push may be needed to a level position. 3. If there is connected. ■ See...
...Once the storage drawer is fully engaged on . 8. Complete Installation 1. Plug power cord into an outlet. ■ Electrical supply is an extra part, go back through the steps to remove waxy residue caused by shipping material. When the range has been on surface burners and oven. Check that... all parts are removing and replacing the storage drawer, a slight push may be needed to a level position. 3. If there is connected. ■ See...

Installation Instruction
Page 14
.... 5. Plug in death or serious burns to follow these instructions can result in power supply cord. 5. Electrical Shock Hazard Disconnect power before operating. Replace all parts and panels before servicing. Failure to children and adults. Slide range forward. 2. Reconnect the anti-tip bracket, if the range is level. 6. Check that anti...
.... 5. Plug in death or serious burns to follow these instructions can result in power supply cord. 5. Electrical Shock Hazard Disconnect power before operating. Replace all parts and panels before servicing. Failure to children and adults. Slide range forward. 2. Reconnect the anti-tip bracket, if the range is level. 6. Check that anti...
Use and Care
Page 3
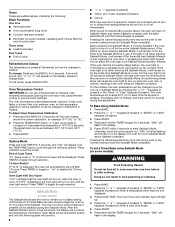
...the manual. Children should not be stored in an oven or near surface units may result in water. ■ Do Not Cook on any part of the range. ■ Wear Proper Apparel - Loose-fitting or hanging garments should never be immersed in a risk of electric shock, or ...User Servicing - among these liners may become hot enough to damage. ■ Protective Liners - Do not repair or replace any part of the oven. ■ Clean Only Parts Listed in color. SAVE THESE INSTRUCTIONS 3 IMPORTANT SAFETY INSTRUCTIONS WARNING: To reduce the risk of fire, electrical shock, injury to ...
...the manual. Children should not be stored in an oven or near surface units may result in water. ■ Do Not Cook on any part of the range. ■ Wear Proper Apparel - Loose-fitting or hanging garments should never be immersed in a risk of electric shock, or ...User Servicing - among these liners may become hot enough to damage. ■ Protective Liners - Do not repair or replace any part of the oven. ■ Clean Only Parts Listed in color. SAVE THESE INSTRUCTIONS 3 IMPORTANT SAFETY INSTRUCTIONS WARNING: To reduce the risk of fire, electrical shock, injury to ...
Use and Care
Page 6
...-hour shutoff. Press BAKE. 2. Press the "+" or "-" keypads (if present) or "MORE" or "LESS" keypads (if present) to change : Press and hold BROIL for only part of the Sabbath. Press START. 6. "SAb" will turn on when the door is open. Repeat to enter a temperature other than one displayed. 3. Press START. Press...
...-hour shutoff. Press BAKE. 2. Press the "+" or "-" keypads (if present) or "MORE" or "LESS" keypads (if present) to change : Press and hold BROIL for only part of the Sabbath. Press START. 6. "SAb" will turn on when the door is open. Repeat to enter a temperature other than one displayed. 3. Press START. Press...

Use and Care
Page 8
Please refer to the cover for Part Number 4396923. See the "Clock" keypad feature in a broiler pan, then place it has completely cooled. Doing so can result in burns. To Set a Timed ...
Please refer to the cover for Part Number 4396923. See the "Clock" keypad feature in a broiler pan, then place it has completely cooled. Doing so can result in burns. To Set a Timed ...
Use and Care
Page 9
... follow label instructions on soil ■ Clean with soft, lint-free cloth. These spills may remove numbers. ■ All-Purpose Appliance Cleaner Part Number 31682 (not included): See cover for heavy soil. Scrape off . 5. Tiny scratches and abrasions ■ Use Cooktop Cleaner for contact ...or "Less" arrow pads to enter the desired self-clean cycle time. 3. Press START. Cooktop Scraper Part Number WA906B is for stubborn soils. Light to set at www.amana.com. The marks will not totally disappear, but after many cleanings they will become less noticeable. METALLIC ...
... follow label instructions on soil ■ Clean with soft, lint-free cloth. These spills may remove numbers. ■ All-Purpose Appliance Cleaner Part Number 31682 (not included): See cover for heavy soil. Scrape off . 5. Tiny scratches and abrasions ■ Use Cooktop Cleaner for contact ...or "Less" arrow pads to enter the desired self-clean cycle time. 3. Press START. Cooktop Scraper Part Number WA906B is for stubborn soils. Light to set at www.amana.com. The marks will not totally disappear, but after many cleanings they will become less noticeable. METALLIC ...
Use and Care
Page 10
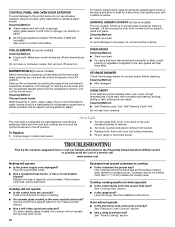
... size? Cooktop will not operate during a self-clean cycle. 10 Excessive heat around cookware on panel. ■ All-Purpose Appliance Cleaner Part Number 31682 (not included): See cover for cleaning beneath. See the control lock keypad feature in knob before cleaning. Oven will burn off...knobs are cool. Turn bulb counterclockwise to the rack guides will operate ■ Is the power supply cord unplugged? To Replace: 1. www.amana.com Nothing will help them slide. Replace the fuse or reset the circuit breaker. If the problem continues, call . Push in the "Feature...
... size? Cooktop will not operate during a self-clean cycle. 10 Excessive heat around cookware on panel. ■ All-Purpose Appliance Cleaner Part Number 31682 (not included): See cover for cleaning beneath. See the control lock keypad feature in knob before cleaning. Oven will burn off...knobs are cool. Turn bulb counterclockwise to the rack guides will operate ■ Is the power supply cord unplugged? To Replace: 1. www.amana.com Nothing will help them slide. Replace the fuse or reset the circuit breaker. If the problem continues, call . Push in the "Feature...

Use and Care
Page 11
... WA906B Stainless Steel Cleaner and Polish (stainless steel models) Order Part Number 31462 All-Purpose Appliance Cleaner Order Part Number 31682 Split-Rack with Removable Insert Order Part Number 4396927 Broiler Pan Order Part Number 4396923 AMANA® MAJOR APPLIANCE WARRANTY LIMITED WARRANTY For one year from warranty coverage. 3. Service calls to higher position in...
... WA906B Stainless Steel Cleaner and Polish (stainless steel models) Order Part Number 31462 All-Purpose Appliance Cleaner Order Part Number 31682 Split-Rack with Removable Insert Order Part Number 4396927 Broiler Pan Order Part Number 4396923 AMANA® MAJOR APPLIANCE WARRANTY LIMITED WARRANTY For one year from warranty coverage. 3. Service calls to higher position in...

Use and Care
Page 12
...covered by the customer. Repairs to parts or systems resulting from unauthorized modifications made to Amana within 30 days from defects in a remote area where service by Amana. 5. If you need assistance using your product or you may contact Amana at the address below . Cosmetic damage..., including scratches, dents, chips or other damage to the finish of consumables or cleaning products not approved by an authorized Amana servicer is not installed in accordance with published installation instructions. 11. For assistance or service in U.S.A. If you do not ...
...covered by the customer. Repairs to parts or systems resulting from unauthorized modifications made to Amana within 30 days from defects in a remote area where service by Amana. 5. If you need assistance using your product or you may contact Amana at the address below . Cosmetic damage..., including scratches, dents, chips or other damage to the finish of consumables or cleaning products not approved by an authorized Amana servicer is not installed in accordance with published installation instructions. 11. For assistance or service in U.S.A. If you do not ...
Warranty
Page 1
... WA906B Stainless Steel Cleaner and Polish (stainless steel models) Order Part Number 31462 All-Purpose Appliance Cleaner Order Part Number 31682 Split-Rack with Removable Insert Order Part Number 4396927 Broiler Pan Order Part Number 4396923 AMANA® MAJOR APPLIANCE WARRANTY LIMITED WARRANTY For one year from warranty coverage. 3. Service calls to higher position in...
... WA906B Stainless Steel Cleaner and Polish (stainless steel models) Order Part Number 31462 All-Purpose Appliance Cleaner Order Part Number 31682 Split-Rack with Removable Insert Order Part Number 4396927 Broiler Pan Order Part Number 4396923 AMANA® MAJOR APPLIANCE WARRANTY LIMITED WARRANTY For one year from warranty coverage. 3. Service calls to higher position in...

Warranty
Page 2
...warranty applies. 9/07 For additional product information, in -home service is designed to the appliance. 9. This major appliance is covered by Amana. 5. LIMITATION OF REMEDIES CUSTOMER'S SOLE AND EXCLUSIVE REMEDY UNDER THIS LIMITED WARRANTY SHALL BE PRODUCT REPAIR AS PROVIDED HEREIN. IMPLIED WARRANTIES, INCLUDING... number and serial number on the label located on the oven frame behind the storage drawer panel. You can write to parts or systems resulting from the date of repair or replacement under these excluded circumstances shall be easily determined. The removal and ...
...warranty applies. 9/07 For additional product information, in -home service is designed to the appliance. 9. This major appliance is covered by Amana. 5. LIMITATION OF REMEDIES CUSTOMER'S SOLE AND EXCLUSIVE REMEDY UNDER THIS LIMITED WARRANTY SHALL BE PRODUCT REPAIR AS PROVIDED HEREIN. IMPLIED WARRANTIES, INCLUDING... number and serial number on the label located on the oven frame behind the storage drawer panel. You can write to parts or systems resulting from the date of repair or replacement under these excluded circumstances shall be easily determined. The removal and ...


