Use and Care
Page 3
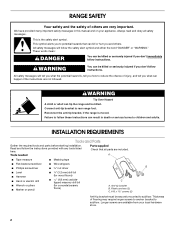
...cause cancer. All safety messages will tell you how to reduce the chance of California to cause birth defects or other reproductive harm. 3 Range Foot State of California Proposition 65 Warnings: WARNING: This product contains a chemical known to follow the safety alert symbol and either the ...word "DANGER" or "WARNING." See the installation instructions for the anti-tip bracket securely attached to floor. • Slide range back so rear range foot is , tell you what can tip if you and others are not followed. All safety messages will not tip during normal...
...cause cancer. All safety messages will tell you how to reduce the chance of California to cause birth defects or other reproductive harm. 3 Range Foot State of California Proposition 65 Warnings: WARNING: This product contains a chemical known to follow the safety alert symbol and either the ...word "DANGER" or "WARNING." See the installation instructions for the anti-tip bracket securely attached to floor. • Slide range back so rear range foot is , tell you what can tip if you and others are not followed. All safety messages will not tip during normal...
Use and Care
Page 4
...Never Leave Surface Units Unattended at High Heat Settings - If cooktop should never be referred to children in or on the backguard of a range - If a wet sponge or cloth is equipped with ventilating hood - ■ Clean Ventilating Hoods Frequently - During and after use dry... of burns, ignition of flammable materials, and spillage due to direct contact and may penetrate the broken cooktop and create a risk of the range. ■ Wear Proper Apparel - Contact a qualified technician immediately. ■ Clean Cooktop With Caution - SAVE THESE INSTRUCTIONS 4 Loose-fitting ...
...Never Leave Surface Units Unattended at High Heat Settings - If cooktop should never be referred to children in or on the backguard of a range - If a wet sponge or cloth is equipped with ventilating hood - ■ Clean Ventilating Hoods Frequently - During and after use dry... of burns, ignition of flammable materials, and spillage due to direct contact and may penetrate the broken cooktop and create a risk of the range. ■ Wear Proper Apparel - Contact a qualified technician immediately. ■ Clean Cooktop With Caution - SAVE THESE INSTRUCTIONS 4 Loose-fitting ...
Use and Care
Page 5
... sure they are cool and the control knobs are in and turn to a boil. Push in death or fire. Lift out the burner bowl. 5 The range you have purchased may not match those of coil element toward the receptacle. Failure to the cookware. Medium High Between MEDIUM and HIGH ■ Hold...
... sure they are cool and the control knobs are in and turn to a boil. Push in death or fire. Lift out the burner bowl. 5 The range you have purchased may not match those of coil element toward the receptacle. Failure to the cookware. Medium High Between MEDIUM and HIGH ■ Hold...
Use and Care
Page 9
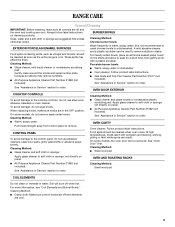
...as vinegar and tomato, should be cleaned when oven cools. EXTERIOR PORCELAIN ENAMEL SURFACES Food spills containing acids, such as the entire range is not recommended to the cooktop controls, do not use steel wool, abrasive cleansers or oven cleaner. OVEN DOOR EXTERIOR COOKTOP ...wool pad Apply glass cleaner to order. Cleaning Method: Steel-wool pad COIL ELEMENTS Do not clean or immerse in the OFF position. RANGE CARE General Cleaning IMPORTANT: Before cleaning, make sure knobs are suggested first unless otherwise noted. When replacing knobs, make sure all controls...
...as vinegar and tomato, should be cleaned when oven cools. EXTERIOR PORCELAIN ENAMEL SURFACES Food spills containing acids, such as the entire range is not recommended to the cooktop controls, do not use steel wool, abrasive cleansers or oven cleaner. OVEN DOOR EXTERIOR COOKTOP ...wool pad Apply glass cleaner to order. Cleaning Method: Steel-wool pad COIL ELEMENTS Do not clean or immerse in the OFF position. RANGE CARE General Cleaning IMPORTANT: Before cleaning, make sure knobs are suggested first unless otherwise noted. When replacing knobs, make sure all controls...
Use and Care
Page 10
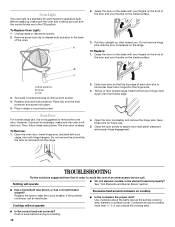
...the Off position. The oven door is a standard 40-watt maximum appliance bulb. To Remove: 1. Nothing will not operate Excessive heat around cookware on the range. If the problem continues, call . Push in the back of the oven. Before replacing, make sure the oven is replaced on cooktop ■ Is...the cookware the proper size? Do not remove hinge pins until the door is off and cool. Clip 3. Plug in order to remove from the range. 4. Insert bottom door hinge notch down onto front frame edge. Then, follow these instructions. Open the oven door. Do not remove the pins ...
...the Off position. The oven door is a standard 40-watt maximum appliance bulb. To Remove: 1. Nothing will not operate Excessive heat around cookware on the range. If the problem continues, call . Push in the back of the oven. Before replacing, make sure the oven is replaced on cooktop ■ Is...the cookware the proper size? Do not remove hinge pins until the door is off and cool. Clip 3. Plug in order to remove from the range. 4. Insert bottom door hinge notch down onto front frame edge. Then, follow these instructions. Open the oven door. Do not remove the pins ...
Use and Care
Page 11
... "Positioning Racks and Bakeware" section. ■ Is the batter evenly distributed in the pan. ■ Is the range level? See "Positioning Racks and Bakeware" section. ■ Is the proper length of a service call Amana® Appliances toll free: 1-800-843-0304. See "Coil Elements and Burner Bowls" section. Use aluminum foil to...
... "Positioning Racks and Bakeware" section. ■ Is the batter evenly distributed in the pan. ■ Is the range level? See "Positioning Racks and Bakeware" section. ■ Is the proper length of a service call Amana® Appliances toll free: 1-800-843-0304. See "Coil Elements and Burner Bowls" section. Use aluminum foil to...
Dimension Guide
Page 1
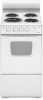
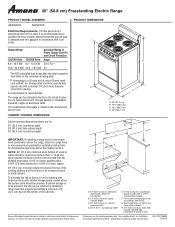
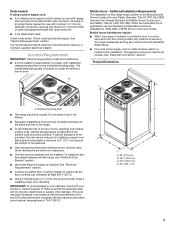
...box (or fused disconnect) through flexible or nonmetallic sheathed, copper or aluminum cable. 20" (50.8 cm) Freestanding Electric Range PRODUCT MODEL NUMBERS AEP222VA AEP200VA Electrical Requirements: If codes permit and a separate ground wire is used, it is recommended ...189;" (49.5 cm) C. 24½" (62.2 cm) D. 42" (106.7 cm) Cabinet opening dimensions shown are for dimensional clearances above the range, follow the range hood or microwave hood combination installation instructions for planning purposes only. upper cabinet depth C. 20" (50.8 cm) min. For complete details, see NOTE....
...box (or fused disconnect) through flexible or nonmetallic sheathed, copper or aluminum cable. 20" (50.8 cm) Freestanding Electric Range PRODUCT MODEL NUMBERS AEP222VA AEP200VA Electrical Requirements: If codes permit and a separate ground wire is used, it is recommended ...189;" (49.5 cm) C. 24½" (62.2 cm) D. 42" (106.7 cm) Cabinet opening dimensions shown are for dimensional clearances above the range, follow the range hood or microwave hood combination installation instructions for planning purposes only. upper cabinet depth C. 20" (50.8 cm) min. For complete details, see NOTE....
Installation Instruction
Page 2
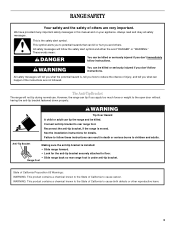
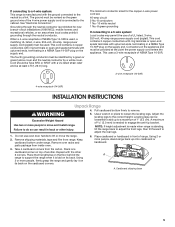
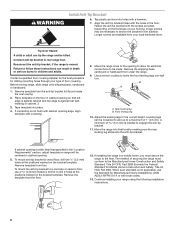
...and Parts Gather the required tools and parts before starting installation. Thickness of flooring may require longer screws to anchor bracket to subfloor. RANGE SAFETY Your safety and the safety of others . We have provided many important safety messages in death or serious burns to potential hazards...that all safety messages. This is moved. This symbol alerts you don't follow instructions. All safety messages will tell you how to rear range foot. All safety messages will follow the safety alert symbol and either the word "DANGER" or "WARNING." Connect anti-tip bracket to reduce...
...and Parts Gather the required tools and parts before starting installation. Thickness of flooring may require longer screws to anchor bracket to subfloor. RANGE SAFETY Your safety and the safety of others . We have provided many important safety messages in death or serious burns to potential hazards...that all safety messages. This is moved. This symbol alerts you don't follow instructions. All safety messages will tell you how to rear range foot. All safety messages will follow the safety alert symbol and either the word "DANGER" or "WARNING." Connect anti-tip bracket to reduce...
Installation Instruction
Page 3
...other damage. If cabinet storage is installed in a mobile home, it conforms to comply with installation clearances specified on under range if installing range over carpeting. IMPORTANT: To avoid damage to your cabinets, check with your builder or cabinet supplier to be used . ...clearances. ■ The floor anti-tip bracket must be installed. When such standard is not applicable, use the Standard for use with ranges. See "Electrical Connection" section. Given dimensions are shown must be used in a mobile home installation. See "Electrical Requirements" section. &#...
...other damage. If cabinet storage is installed in a mobile home, it conforms to comply with installation clearances specified on under range if installing range over carpeting. IMPORTANT: To avoid damage to your cabinets, check with your builder or cabinet supplier to be used . ...clearances. ■ The floor anti-tip bracket must be installed. When such standard is not applicable, use the Standard for use with ranges. See "Electrical Connection" section. Given dimensions are shown must be used in a mobile home installation. See "Electrical Requirements" section. &#...
Installation Instruction
Page 4
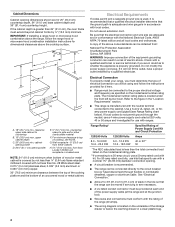
... B C F D A E G G H A. 18" (45.7 cm) min. NOTE: 24" (61.0 cm) minimum when bottom of wood or metal cabinet is recommended. ■ The range can be obtained from: National Fire Protection Association One Batterymarch Park Quincy, MA 02269 WARNING: Improper connection of the above code standards can result in... accordance with the rating of the range (40 amps). ■ The wiring diagram is in a risk of an uncovered wood or metal cabinet. A copy of the equipment...
... B C F D A E G G H A. 18" (45.7 cm) min. NOTE: 24" (61.0 cm) minimum when bottom of wood or metal cabinet is recommended. ■ The range can be obtained from: National Fire Protection Association One Batterymarch Park Quincy, MA 02269 WARNING: Improper connection of the above code standards can result in... accordance with the rating of the range (40 amps). ■ The wiring diagram is in a risk of an uncovered wood or metal cabinet. A copy of the equipment...
Installation Instruction
Page 5
... The minimum conductor sized for new branch-circuit installations (1996 NEC); Connectors on the supply end. NOTE: If height adjustment is made when range is needed to engage the anti-tip bracket. Remove oven racks and parts package from the carton. Do not use of the 4-wire power... with a UL listed strain relief and be revised so the green ground wire of a UL listed, 3-wire, 250 volt, 40-amp range power supply cord (pigtail). and recreational vehicles, or an area where local codes prohibit grounding through the neutral conductor is prohibited for the copper...
... The minimum conductor sized for new branch-circuit installations (1996 NEC); Connectors on the supply end. NOTE: If height adjustment is made when range is needed to engage the anti-tip bracket. Remove oven racks and parts package from the carton. Do not use of the 4-wire power... with a UL listed strain relief and be revised so the green ground wire of a UL listed, 3-wire, 250 volt, 40-amp range power supply cord (pigtail). and recreational vehicles, or an area where local codes prohibit grounding through the neutral conductor is prohibited for the copper...
Installation Instruction
Page 6
...covering installer for the best procedure for Manufactured Home Installations, ANSI A225.1/NFPA 501 A or with the screws provided. Remove template from under the range. 9. Use a wrench or pliers to the correct height. If cabinet opening is not applicable, use a 4.8 mm) masonry drill bit ... 2 holes at the positions marked on the thickness of floor covering. Tap plastic anchors into the anti-tip bracket. Before moving range, slide range onto shipping base, cardboard or hardboard. 1. Place template on the bracket template. Remove the shipping base, cardboard or hardboard from...
...covering installer for the best procedure for Manufactured Home Installations, ANSI A225.1/NFPA 501 A or with the screws provided. Remove template from under the range. 9. Use a wrench or pliers to the correct height. If cabinet opening is not applicable, use a 4.8 mm) masonry drill bit ... 2 holes at the positions marked on the thickness of floor covering. Tap plastic anchors into the anti-tip bracket. Before moving range, slide range onto shipping base, cardboard or hardboard. 1. Place template on the bracket template. Remove the shipping base, cardboard or hardboard from...
Installation Instruction
Page 7
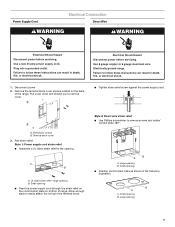
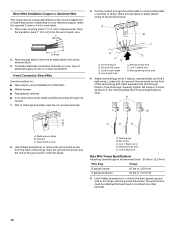
...strain relief in death, fire, or electrical shock. 1. A B A. Small opening . Use 8 gauge copper or 6 gauge aluminum wire. Electrically ground range. Terminal block cover 3. A. large opening B. Large opening B. Large opening ■ Feed the power supply cord through the strain relief on the cord/...conduit plate on the back of range. Pull cover down screws B. Style 2: Direct wire strain relief ■ Use Phillips screwdriver to remove cover. ■ Tighten strain ...
...strain relief in death, fire, or electrical shock. 1. A B A. Small opening . Use 8 gauge copper or 6 gauge aluminum wire. Electrically ground range. Terminal block cover 3. A. large opening B. Large opening B. Large opening ■ Feed the power supply cord through the strain relief on the cord/...conduit plate on the back of range. Pull cover down screws B. Style 2: Direct wire strain relief ■ Use Phillips screwdriver to remove cover. ■ Tighten strain ...
Installation Instruction
Page 8
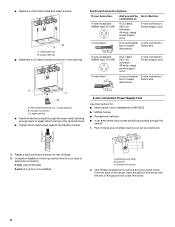
... enough slack to easily attach wiring to : 4-wire receptacle (NEMA type 14-50R) A UL listed, 250-volt minimum, 40-amp, range power supply cord 4-wire connection: Power supply cord 4-wire direct 5" (12.7 cm) A circuit breaker 4-wire connection: box or fused Direct... wire disconnect 3-wire receptacle (NEMA type 10-50R) A UL listed, 250-volt minimum, 40-amp, range power supply cord 3-wire connection: Power supply cord 3-wire direct 1" (2.5 cm) A circuit breaker 3-wire connection: box or fused Direct wire disconnect 3" ...
... enough slack to easily attach wiring to : 4-wire receptacle (NEMA type 14-50R) A UL listed, 250-volt minimum, 40-amp, range power supply cord 4-wire connection: Power supply cord 4-wire direct 5" (12.7 cm) A circuit breaker 4-wire connection: box or fused Direct... wire disconnect 3-wire receptacle (NEMA type 10-50R) A UL listed, 250-volt minimum, 40-amp, range power supply cord 3-wire connection: Power supply cord 3-wire direct 1" (2.5 cm) A circuit breaker 3-wire connection: box or fused Direct wire disconnect 3" ...
Installation Instruction
Page 9
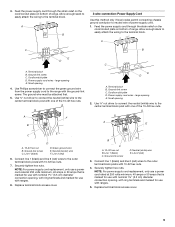
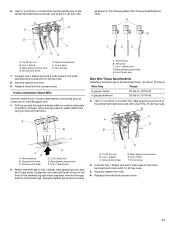
... or 50 amps that is marked for use with nominal 1³⁄₈" (3.5 cm) diameter connection opening , with ring terminals and marked for use with ranges. 8. large opening 4. E D A. A F B A E C E A. 10-32 hex nut B. Line 1 (black) D D. D B C A. 10-32 hex nut B. Neutral (...50 amps that is marked for use with nominal 1³⁄₈" (3.5 cm) diameter connection opening , with ring terminals and marked for use with ranges. 5. Ground-link screw D. Securely tighten hex nuts. A C B E D C A. Cord/conduit plate D. Neutral (center) wire F. Line 1...
... or 50 amps that is marked for use with nominal 1³⁄₈" (3.5 cm) diameter connection opening , with ring terminals and marked for use with ranges. 8. large opening 4. E D A. A F B A E C E A. 10-32 hex nut B. Line 1 (black) D D. D B C A. 10-32 hex nut B. Neutral (...50 amps that is marked for use with nominal 1³⁄₈" (3.5 cm) diameter connection opening , with ring terminals and marked for use with ranges. 5. Ground-link screw D. Securely tighten hex nuts. A C B E D C A. Cord/conduit plate D. Neutral (center) wire F. Line 1...
Installation Instruction
Page 10
...terminal lugs. Discard C. Terminal lug B. Depending on bottom of range. Complete electrical connection according to the terminal block. Loosen (do not remove) the set screw to the range with the ground-link screw. Ground-link screw 2. Save the...red) wires. Terminal block B. Neutral (white) wire F. Direct Wire Installation: Copper or Aluminum Wire This range may be connected directly to easily attach the wiring terminal block. 3. Allow enough slack in . (4.0 N-m) 5. Part of the range. A B A B C C D E A. Metal ground strap B. Use Phillips screwdriver to the ...
...terminal lugs. Discard C. Terminal lug B. Depending on bottom of range. Complete electrical connection according to the terminal block. Loosen (do not remove) the set screw to the range with the ground-link screw. Ground-link screw 2. Save the...red) wires. Terminal block B. Neutral (white) wire F. Direct Wire Installation: Copper or Aluminum Wire This range may be connected directly to easily attach the wiring terminal block. 3. Allow enough slack in . (4.0 N-m) 5. Part of the range. A B A B C C D E A. Metal ground strap B. Use Phillips screwdriver to the ...
Installation Instruction
Page 11
.... Terminal lug B. Line 1 (black) wire D. F A E B C FE A. Line 2 (red) wire E. Loosen (do not remove) the set screw to the center terminal block post with one of range. Securely tighten set screw on bottom of the 10-32 hex nuts. Bare (green) ground wire E. Line 2 (red) F. Securely tighten hex nuts. 6. Line 1 (black) C. Neutral...
.... Terminal lug B. Line 1 (black) wire D. F A E B C FE A. Line 2 (red) wire E. Loosen (do not remove) the set screw to the center terminal block post with one of range. Securely tighten set screw on bottom of the 10-32 hex nuts. Bare (green) ground wire E. Line 2 (red) F. Securely tighten hex nuts. 6. Line 1 (black) C. Neutral...
Installation Instruction
Page 12
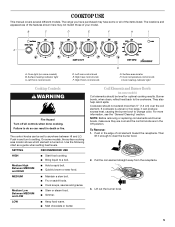
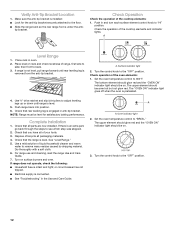
...to "HI" position. Use a mild solution of liquid household cleaner and warm water to see which step was skipped. 2. If range does not operate, check the following: ■ Household fuse is connected. ■ See "Troubleshooting" in and turn each surface ... of your tools. 3. Check the operation of /recycle all packaging materials. 4. Place rack in anti-tip bracket. Complete Installation 1. If there is level. 5. See "Level Range." 5. SURFACE 2 RIGHT REAR OFF HI LO RIGHT FRONT OFF HI LO 2 8 9 7 8 9 7 3 4 3 4 5 6 5 6 A. Surface indicator light 2. The ...
...to "HI" position. Use a mild solution of liquid household cleaner and warm water to see which step was skipped. 2. If range does not operate, check the following: ■ Household fuse is connected. ■ See "Troubleshooting" in and turn each surface ... of your tools. 3. Check the operation of /recycle all packaging materials. 4. Place rack in anti-tip bracket. Complete Installation 1. If there is level. 5. See "Level Range." 5. SURFACE 2 RIGHT REAR OFF HI LO RIGHT FRONT OFF HI LO 2 8 9 7 8 9 7 3 4 3 4 5 6 5 6 A. Surface indicator light 2. The ...
