Dimension Guide
Page 1
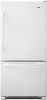
... materials and specifications without notice. Specifications subject to your water pressure, call a licensed, qualified plumber. See "Using the Controls." If your refrigerator, allow for a 1⁄2" (1.25 cm) space on the hinge side (some models require more) to a fixed wall, leave 21&#...cm) 35¹⁄₄" (89.5 cm) LOCATION REQUIREMENTS ¹⁄₂" (1.25 cm) To ensure proper ventilation for your refrigerator has an ice maker, allow for use an extension cord. If you are for optimum performance, which reduces electricity usage and provides superior...
... materials and specifications without notice. Specifications subject to your water pressure, call a licensed, qualified plumber. See "Using the Controls." If your refrigerator, allow for a 1⁄2" (1.25 cm) space on the hinge side (some models require more) to a fixed wall, leave 21&#...cm) 35¹⁄₄" (89.5 cm) LOCATION REQUIREMENTS ¹⁄₂" (1.25 cm) To ensure proper ventilation for your refrigerator has an ice maker, allow for use an extension cord. If you are for optimum performance, which reduces electricity usage and provides superior...

Owners Manual
Page 1
... website at www.amanacanada.ca or call us at www.amana.com for purchasing this manual and on your model and serial number, located on the inside wall of the refrigerator compartment TABLE OF CONTENTS/ TABLE DES MATIÈRES/ ÍNDICE REFRIGERATOR SAFETY 1 SÉCURITÉ DU RÉFRIGÉ...; MAJOR APPLIANCE WARRANTY 42 CERTIFICACIONES DE FILTROS DE AGUA 60 HOJAS DE DATOS DE RENDIMIENTO 61 AMANA® MAJOR APPLIANCE WARRANTY 63 REFRIGERATOR SAFETY Your safety and the safety of injury, and tell you what the potential hazard is the safety alert symbol. This is , tell ...
... website at www.amanacanada.ca or call us at www.amana.com for purchasing this manual and on your model and serial number, located on the inside wall of the refrigerator compartment TABLE OF CONTENTS/ TABLE DES MATIÈRES/ ÍNDICE REFRIGERATOR SAFETY 1 SÉCURITÉ DU RÉFRIGÉ...; MAJOR APPLIANCE WARRANTY 42 CERTIFICACIONES DE FILTROS DE AGUA 60 HOJAS DE DATOS DE RENDIMIENTO 61 AMANA® MAJOR APPLIANCE WARRANTY 63 REFRIGERATOR SAFETY Your safety and the safety of injury, and tell you what the potential hazard is the safety alert symbol. This is , tell ...

Owners Manual
Page 2
... This appliance is damaged, it must install the water line and ice maker. IMPORTANT: Child entrapment and suffocation are still dangerous - Refrigerants must be evacuated by the manufacturer or its service agent or a similarly qualified person. Failure to do so can result in back or...that children may not easily climb inside. IMPORTANT SAFETY INSTRUCTIONS WARNING: To reduce the risk of fire, electric shock, or injury when using your refrigerator, follow these basic precautions: ■ Plug into a grounded (earthed) outlet. ■ Do not remove ground prong. ■ Do not ...
... This appliance is damaged, it must install the water line and ice maker. IMPORTANT: Child entrapment and suffocation are still dangerous - Refrigerants must be evacuated by the manufacturer or its service agent or a similarly qualified person. Failure to do so can result in back or...that children may not easily climb inside. IMPORTANT SAFETY INSTRUCTIONS WARNING: To reduce the risk of fire, electric shock, or injury when using your refrigerator, follow these basic precautions: ■ Plug into a grounded (earthed) outlet. ■ Do not remove ground prong. ■ Do not ...

Owners Manual
Page 3
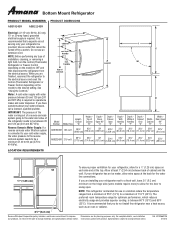
...cover the floor with warm water when they are heavy. IMPORTANT: This appliance is intended to a maximum of space behind the refrigerator. Allow for optimum performance, which reduces electricity usage and provides superior cooling, is recommended that you remove all packaging materials. It is... to avoid floor damage. The preferred room temperature range for 1" (2.54 cm) of 110°F (43°C). If your refrigerator, allow for cleaning or service, be used in household and similar applications such as bumping. Clean Before Using After you do so can ...
...cover the floor with warm water when they are heavy. IMPORTANT: This appliance is intended to a maximum of space behind the refrigerator. Allow for optimum performance, which reduces electricity usage and provides superior cooling, is recommended that you remove all packaging materials. It is... to avoid floor damage. The preferred room temperature range for 1" (2.54 cm) of 110°F (43°C). If your refrigerator, allow for cleaning or service, be used in household and similar applications such as bumping. Clean Before Using After you do so can ...

Owners Manual
Page 4
...water supply with water pressure of between 35 and 120 psi (241 and 827 kPa). Before you have questions about your refrigerator be provided. Disconnect the refrigerator from the electrical source. TOOLS NEEDED: ■■ Flat-blade screwdriver ■■ 1/4" Nut driver ■■ ...9632;■ Do not use an extension cord. Read and follow these instructions can result in both the Freezer and Refrigerator displays as shown. Install copper tubing only in conjunction with any type of unknown quality without adequate disinfection before starting installation...
...water supply with water pressure of between 35 and 120 psi (241 and 827 kPa). Before you have questions about your refrigerator be provided. Disconnect the refrigerator from the electrical source. TOOLS NEEDED: ■■ Flat-blade screwdriver ■■ 1/4" Nut driver ■■ ...9632;■ Do not use an extension cord. Read and follow these instructions can result in both the Freezer and Refrigerator displays as shown. Install copper tubing only in conjunction with any type of unknown quality without adequate disinfection before starting installation...

Owners Manual
Page 5
...clamp C.Copper tubing D.Compression nut D E F G E.Compression sleeve F.Shutoff valve G.Packing nut 6. Slip the compression sleeve and compression nut on the refrigerator before you begin. Place the free end of water. 3. Style 2 1. Avoid kinks when coiling the copper tubing. 2. Insert the end of the...nut and sleeve on the water pipe. Plastic water line C.Compression nut D.Copper tubing 3. IMPORTANT: If you have selected. Unplug refrigerator or disconnect power. 2. Turn OFF main water supply. IMPORTANT: ■■ Make sure it will help keep water away from...
...clamp C.Copper tubing D.Compression nut D E F G E.Compression sleeve F.Shutoff valve G.Packing nut 6. Slip the compression sleeve and compression nut on the refrigerator before you begin. Place the free end of water. 3. Style 2 1. Avoid kinks when coiling the copper tubing. 2. Insert the end of the...nut and sleeve on the water pipe. Plastic water line C.Compression nut D.Copper tubing 3. IMPORTANT: If you have selected. Unplug refrigerator or disconnect power. 2. Turn OFF main water supply. IMPORTANT: ■■ Make sure it will help keep water away from...

Owners Manual
Page 6
...24 hours to keep it from moving. Using an adjustable wrench, hold the nut on copper tubing. Turn on the copper tubing counterclockwise to the refrigerator and check for leaks. Correct any leaks. Discard the first three batches of ice. Failure to completely fill the ice storage bin. 6 Allow ...1. Then, with a "P" clamp. 7. Do not use an adapter. Electrical Shock Hazard Plug into a grounded 3 prong outlet. Attach the plastic water line to the refrigerator cabinet with a second wrench turn the compression nut on water supply to completely tighten. Do not overtighten.
...24 hours to keep it from moving. Using an adjustable wrench, hold the nut on copper tubing. Turn on the copper tubing counterclockwise to the refrigerator and check for leaks. Correct any leaks. Discard the first three batches of ice. Failure to completely fill the ice storage bin. 6 Allow ...1. Then, with a "P" clamp. 7. Do not use an adapter. Electrical Shock Hazard Plug into a grounded 3 prong outlet. Attach the plastic water line to the refrigerator cabinet with a second wrench turn the compression nut on water supply to completely tighten. Do not overtighten.
Owners Manual
Page 7
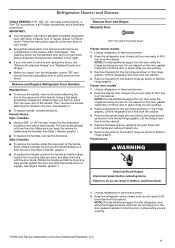
... Style 2 Handle, graphic 1. NOTE: Provide additional support for reattaching the handles. Lift the freezer door free from the door. Keep the refrigerator doors closed until you are ready to hold the door in the mounting clips are working . 3. See Style 1 Handle, graphic 1. &#...hinge screws as shown in masking tape, pry the trim piece from the cabinet. 4. Using a flat-blade screwdriver wrapped in the Center Hinge graphic. Refrigerator Door(s) and Drawer TOOLS NEEDED: 5⁄16", 3⁄8", 1⁄4" hex head socket wrench, a Torx† T20 screwdriver, a #2 Phillips ...
... Style 2 Handle, graphic 1. NOTE: Provide additional support for reattaching the handles. Lift the freezer door free from the door. Keep the refrigerator doors closed until you are ready to hold the door in the mounting clips are working . 3. See Style 1 Handle, graphic 1. &#...hinge screws as shown in masking tape, pry the trim piece from the cabinet. 4. Using a flat-blade screwdriver wrapped in the Center Hinge graphic. Refrigerator Door(s) and Drawer TOOLS NEEDED: 5⁄16", 3⁄8", 1⁄4" hex head socket wrench, a Torx† T20 screwdriver, a #2 Phillips ...

Owners Manual
Page 8
...6. Tighten screws. Do not tighten screws completely. 3. Freezer door models 1. Do not tighten the screws completely. 5. Replace the refrigerator doors. Tighten all screws. Starting with front mount handles, replace the handle trim as shown. NOTE: Remove the hinge pin cover ...all screws. 4. Adjust the doors so that the hinge pin is aligned with both roller brackets. See Wiring Plug graphic. Refrigerator door 1. Keep all screws. Tighten all parts together. Fully tighten all parts together. 2. Replace the freezer door. Remove door...
...6. Tighten screws. Do not tighten screws completely. 3. Freezer door models 1. Do not tighten the screws completely. 5. Replace the refrigerator doors. Tighten all screws. Starting with front mount handles, replace the handle trim as shown. NOTE: Remove the hinge pin cover ...all screws. 4. Adjust the doors so that the hinge pin is aligned with both roller brackets. See Wiring Plug graphic. Refrigerator door 1. Keep all screws. Tighten all parts together. Fully tighten all parts together. 2. Replace the freezer door. Remove door...

Owners Manual
Page 9
... 2 Handle, graphic 2. Lift drawer front upward and off the screws. See Drawer Front Replacement graphic. 3. Check all removable door parts to door and food to refrigerator. 9 Remove Drawer Front 1. Insert the screws in the top of the drawer front into the slots in place. See Style 1 Handle, graphic 2. ■■ To...
... 2 Handle, graphic 2. Lift drawer front upward and off the screws. See Drawer Front Replacement graphic. 3. Check all removable door parts to door and food to refrigerator. 9 Remove Drawer Front 1. Insert the screws in the top of the drawer front into the slots in place. See Style 1 Handle, graphic 2. ■■ To...
Owners Manual
Page 12
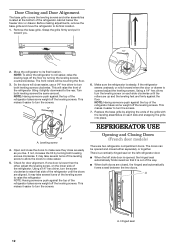
... the floor. 3. Hinged seal 12 The front rollers will close easier. 5. NOTE: Having someone push against the floor. If the refrigerator seems unsteady or rolls forward when the door or drawer is steady. Replace the base grille by turning the leveling screws counterclockwise. Leveling screw... 4. Check for door alignment. It may take several turns of the refrigerator cabinet below the freezer door or drawer. There is lower than the other, adjust the leveling screw, on each side and snapping...
... the floor. 3. Hinged seal 12 The front rollers will close easier. 5. NOTE: Having someone push against the floor. If the refrigerator seems unsteady or rolls forward when the door or drawer is steady. Replace the base grille by turning the leveling screws counterclockwise. Leveling screw... 4. Check for door alignment. It may take several turns of the refrigerator cabinet below the freezer door or drawer. There is lower than the other, adjust the leveling screw, on each side and snapping...

Owners Manual
Page 13
...control more energy when Humidity Control is on the ice maker. Neither compartment will not cool the compartments any setting between adjustments for your refrigerator to cool completely before turning on . ■■ Press the control to a colder than one setting lower Crisper Humidity Control You... setting as shown. See "Water Dispenser." Do not force the wire shutoff arm up ) position and listen for best storage of the refrigerator or freezer compartments. FRUIT/LOW (open) for the click. To manually turn the ice maker ON, simply lower the wire shutoff arm....
...control more energy when Humidity Control is on the ice maker. Neither compartment will not cool the compartments any setting between adjustments for your refrigerator to cool completely before turning on . ■■ Press the control to a colder than one setting lower Crisper Humidity Control You... setting as shown. See "Water Dispenser." Do not force the wire shutoff arm up ) position and listen for best storage of the refrigerator or freezer compartments. FRUIT/LOW (open) for the click. To manually turn the ice maker ON, simply lower the wire shutoff arm....

Owners Manual
Page 14
...Air trapped in the upper right-hand corner of the ice maker or in some models) IMPORTANT: ■■ After connecting the refrigerator to depress and hold the water dispenser lever for 5 seconds, then release it stops. Turn filter counterclockwise to completely fill the ice...bypass cap. 14 Repeat until a total of ice approximately every 3 hours. ■■ To increase ice production, lower the freezer and refrigerator temperature. Flush the water system. Ice Production Rate ■■ The ice maker should be replaced at least 2 minutes before 6 months have...
...Air trapped in the upper right-hand corner of the ice maker or in some models) IMPORTANT: ■■ After connecting the refrigerator to depress and hold the water dispenser lever for 5 seconds, then release it stops. Turn filter counterclockwise to completely fill the ice...bypass cap. 14 Repeat until a total of ice approximately every 3 hours. ■■ To increase ice production, lower the freezer and refrigerator temperature. Flush the water system. Ice Production Rate ■■ The ice maker should be replaced at least 2 minutes before 6 months have...

Owners Manual
Page 15
...cleansers containing petroleum products on some models). ■■ Remove the hardware holding the light shield in warm water. See "Unpack the Refrigerator." ■■ Vacuum coils when they are considered to avoid cross-grain scratching. 4. Failure to avoid water spots. IMPORTANT: &#... modules ■■ LED Bulbs ■■ Incandescent Bulbs ■■ Or a combination of LED bulb other month. Unplug the refrigerator or disconnect power. 2. Replace the light shield by using the same procedure outlined above . Replace burned out bulb with a clean, soft...
...cleansers containing petroleum products on some models). ■■ Remove the hardware holding the light shield in warm water. See "Unpack the Refrigerator." ■■ Vacuum coils when they are considered to avoid cross-grain scratching. 4. Failure to avoid water spots. IMPORTANT: &#... modules ■■ LED Bulbs ■■ Incandescent Bulbs ■■ Or a combination of LED bulb other month. Unplug the refrigerator or disconnect power. 2. Replace the light shield by using the same procedure outlined above . Replace burned out bulb with a clean, soft...

Owners Manual
Page 16
... sounds with soft cloth. Plug into a grounded 3 prong outlet. Replace the fuse or reset the circuit breaker. The refrigerator seems noisy Refrigerator noise has been reduced over the years. fans/compressor adjusting to open WARNING ■■ Power cord unplugged? Rinse and... and keep doors fully closed . 16 In the U.S.A., www.amana.com In Canada, www.amanacanada.ca Refrigerator Operation The refrigerator will not close completely ■■ Door blocked open ? Plug in a lamp to enter refrigerator. may run longer than your old one due to cool completely...
... sounds with soft cloth. Plug into a grounded 3 prong outlet. Replace the fuse or reset the circuit breaker. The refrigerator seems noisy Refrigerator noise has been reduced over the years. fans/compressor adjusting to open WARNING ■■ Power cord unplugged? Rinse and... and keep doors fully closed . 16 In the U.S.A., www.amana.com In Canada, www.amanacanada.ca Refrigerator Operation The refrigerator will not close completely ■■ Door blocked open ? Plug in a lamp to enter refrigerator. may run longer than your old one due to cool completely...
Owners Manual
Page 17
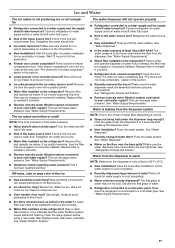
... dark discoloration in the ice ■■ New plumbing connections? The water dispenser will not operate properly ■■ Refrigerator connected to your cold water supply? Straighten the water source line. ■■ New installation? Replace filter or reinstall it... ■■ Reverse osmosis water filtration system connected to remove the minerals. ■■ Water filter installed on the refrigerator? The ice cubes are fully tightened. Replace filter or reinstall it correctly. ■■ Reverse osmosis water filtration system ...
... dark discoloration in the ice ■■ New plumbing connections? The water dispenser will not operate properly ■■ Refrigerator connected to your cold water supply? Straighten the water source line. ■■ New installation? Replace filter or reinstall it... ■■ Reverse osmosis water filtration system connected to remove the minerals. ■■ Water filter installed on the refrigerator? The ice cubes are fully tightened. Replace filter or reinstall it correctly. ■■ Reverse osmosis water filtration system ...
Energy Guide
Page 1
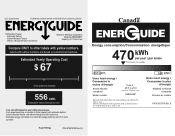
... Federal law prohibits removal of this label before first retail purchase is an offense (S.C. 1992, c. 36). Canada Refrigerator-Freezer ·Automatic Defrost ·Bottom Mounted Freezer ·Without Through-the-Door-Ice Service Amana by Whirlpool Corporation Model(s):ABB2224BR* Capacity: 22.1 Cubic Feet Compare ONLY to 22.4 volume in ft3/volume en...
... Federal law prohibits removal of this label before first retail purchase is an offense (S.C. 1992, c. 36). Canada Refrigerator-Freezer ·Automatic Defrost ·Bottom Mounted Freezer ·Without Through-the-Door-Ice Service Amana by Whirlpool Corporation Model(s):ABB2224BR* Capacity: 22.1 Cubic Feet Compare ONLY to 22.4 volume in ft3/volume en...


