
Owners Manual
Page 2
... not remove ground prong. ■ Do not use an adapter. ■ Do not use an extension cord. ■ Disconnect power before servicing. ■ Replace all parts and panels before operating. ■ Remove doors from your old refrigerator, please follow these instructions to help prevent accidents. Important information to know about disposal...
... not remove ground prong. ■ Do not use an adapter. ■ Do not use an extension cord. ■ Disconnect power before servicing. ■ Replace all parts and panels before operating. ■ Remove doors from your old refrigerator, please follow these instructions to help prevent accidents. Important information to know about disposal...

Owners Manual
Page 4
... 60 psi (276 to 414 kPa): ■■ Check to 414 kPa). ¹⁄₂" (1.25 cm) Water Supply Requirements Gather the required tools and parts before or after heavy usage. ■■ If your model, turn the refrigerator to operate the water dispenser and ice maker. Do not use a cord...
... 60 psi (276 to 414 kPa): ■■ Check to 414 kPa). ¹⁄₂" (1.25 cm) Water Supply Requirements Gather the required tools and parts before or after heavy usage. ■■ If your model, turn the refrigerator to operate the water dispenser and ice maker. Do not use a cord...
Owners Manual
Page 7
...on the side of the handle. Keep the refrigerator door closed until you are working. †TORX and T20 are working . 3. Remove the parts for the bottom hinge as shown in Bottom Hinge graphic. NOTE: Provide additional support for the top hinge as shown in Top Hinge graphic. ...Using a flat-blade screwdriver wrapped in Top Hinge graphic. Remove the parts for the refrigerator door while the hinges are flat against the door and slide the handle down and align the holes with either a freezer ...
...on the side of the handle. Keep the refrigerator door closed until you are working. †TORX and T20 are working . 3. Remove the parts for the bottom hinge as shown in Bottom Hinge graphic. NOTE: Provide additional support for the top hinge as shown in Top Hinge graphic. ...Using a flat-blade screwdriver wrapped in Top Hinge graphic. Remove the parts for the refrigerator door while the hinges are flat against the door and slide the handle down and align the holes with either a freezer ...

Owners Manual
Page 8
...gasket magnets to hold the doors in place. NOTE: Provide additional support for the door while the hinges are being moved. Tighten all parts together. Before removing the left -hand side refrigerator door. 5. See Bottom Hinge graphic. Refrigerator door 1. Freezer door 1. Keep all screws... NOTE: Provide additional support for the refrigerator doors while the hinges are being moved. Replace the refrigerator door. 4. Assemble the parts for the door while the hinges are in place while you . Adjust the doors so that the bottom of refrigerator door as...
...gasket magnets to hold the doors in place. NOTE: Provide additional support for the door while the hinges are being moved. Tighten all parts together. Before removing the left -hand side refrigerator door. 5. See Bottom Hinge graphic. Refrigerator door 1. Freezer door 1. Keep all screws... NOTE: Provide additional support for the refrigerator doors while the hinges are being moved. Replace the refrigerator door. 4. Assemble the parts for the door while the hinges are in place while you . Adjust the doors so that the bottom of refrigerator door as...

Owners Manual
Page 9
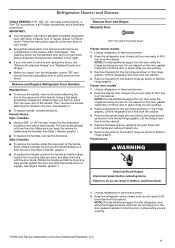
... holes with the door studs. Lift drawer front upward and off the screws. Slide the drawer glides out of each handle. Check all removable door parts to door and food to refrigerator. 9 WARNING Electrical Shock Hazard Plug into a grounded 3 prong outlet. 3. Remove and Replace Drawer Handle Style 1 Handle ■■ Using...
... holes with the door studs. Lift drawer front upward and off the screws. Slide the drawer glides out of each handle. Check all removable door parts to door and food to refrigerator. 9 WARNING Electrical Shock Hazard Plug into a grounded 3 prong outlet. 3. Remove and Replace Drawer Handle Style 1 Handle ■■ Using...

Owners Manual
Page 14
... be used without adequate disinfection before 6 months have passed, replace the water filter more often. This will be only as good as salt) can damage parts of your dealer or call 1-800-253-1301 U.S.A. Dispense enough water every week to remove. 2. Replacing the Water Filter To purchase a replacement water filter, model...
... be used without adequate disinfection before 6 months have passed, replace the water filter more often. This will be only as good as salt) can damage parts of your dealer or call 1-800-253-1301 U.S.A. Dispense enough water every week to remove. 2. Replacing the Water Filter To purchase a replacement water filter, model...

Owners Manual
Page 15
...or reconnect power. Painted metal: Wash painted metal exteriors with only incandescent bulb(s) of the same size, shape and wattage. ■■ Order Part Number W10565137 (3.6 W). Unplug the refrigerator or disconnect power. 2. Replace the burned-out bulb(s) with clean, warm water and dry immediately to ...release it locks into the liner holes on exterior surfaces (doors and cabinet), plastic parts, interior and door liners or gaskets. Wipe up spills immediately. Plug in one section will transfer to do not force the shield ...
...or reconnect power. Painted metal: Wash painted metal exteriors with only incandescent bulb(s) of the same size, shape and wattage. ■■ Order Part Number W10565137 (3.6 W). Unplug the refrigerator or disconnect power. 2. Replace the burned-out bulb(s) with clean, warm water and dry immediately to ...release it locks into the liner holes on exterior surfaces (doors and cabinet), plastic parts, interior and door liners or gaskets. Wipe up spills immediately. Plug in one section will transfer to do not force the shield ...

Owners Manual
Page 21
...6777. and Canada, direct all requests for the remaining term of the Use and Care Guide or visit producthelp.amana.com. 2. Consumable parts (e.g., light bulbs, batteries, air or water filters, preservation solutions). warranted for warranty service to review the Troubleshooting ...materials or workmanship that vary from defects in this major appliance was purchased. Discoloration, rust, or oxidation of non-genuine Amana parts or accessories. Removal or reinstallation of inaccessible appliances or built-in fixtures (e.g., trim, decorative panels, flooring, cabinetry, islands...
...6777. and Canada, direct all requests for the remaining term of the Use and Care Guide or visit producthelp.amana.com. 2. Consumable parts (e.g., light bulbs, batteries, air or water filters, preservation solutions). warranted for warranty service to review the Troubleshooting ...materials or workmanship that vary from defects in this major appliance was purchased. Discoloration, rust, or oxidation of non-genuine Amana parts or accessories. Removal or reinstallation of inaccessible appliances or built-in fixtures (e.g., trim, decorative panels, flooring, cabinetry, islands...


