
Installation Manual
Page 1
License Plate Mounting Kit for Rearview Camera KTX-C10LP • INSTALLATION MANUAL Please read all of these instructions regarding your product and retain them for the rearview camera, HCE-C105 and HCE-C1070. Tel.: 1-800-ALPINE-1 (1-800-257-4631) ALPINE ELECTRONICS OF CANADA, INC. 7300 Warden Ave. ALPINE ELECTRONICS OF AMERICA, INC. 19145 Gramercy Place Torrance, California 90501 U.S.A. Suite 203, Markham, Ontario L3R 9Z6, Canada Tel.: 1-800-ALPINE-1 (1-800-257-4631) KTX-C10lP is suitable for future reference.
License Plate Mounting Kit for Rearview Camera KTX-C10LP • INSTALLATION MANUAL Please read all of these instructions regarding your product and retain them for the rearview camera, HCE-C105 and HCE-C1070. Tel.: 1-800-ALPINE-1 (1-800-257-4631) ALPINE ELECTRONICS OF CANADA, INC. 7300 Warden Ave. ALPINE ELECTRONICS OF AMERICA, INC. 19145 Gramercy Place Torrance, California 90501 U.S.A. Suite 203, Markham, Ontario L3R 9Z6, Canada Tel.: 1-800-ALPINE-1 (1-800-257-4631) KTX-C10lP is suitable for future reference.
Installation Manual
Page 2
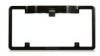
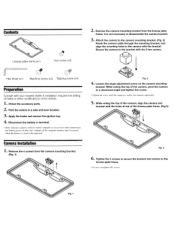
... 4 screws from the license plate frame. Tighten the 4 screws to secure the bracket and camera to the bracket with your nearest dealer if installation requires the drilling of holes or other modifications of the camera, pivot the camera to disassemble the camera bracket. 3. In this case, contents ... to a downward angle and tighten the screw. • Tighten the screw until the camera is disconnected. Check the accessory parts. 2. Camera Installation 1. Loosen the angle adjustment screw on the camera mounting bracket. Contents License plate frame (x1) Hex screw (x2) 2.
... 4 screws from the license plate frame. Tighten the 4 screws to secure the bracket and camera to the bracket with your nearest dealer if installation requires the drilling of holes or other modifications of the camera, pivot the camera to disassemble the camera bracket. 3. In this case, contents ... to a downward angle and tighten the screw. • Tighten the screw until the camera is disconnected. Check the accessory parts. 2. Camera Installation 1. Loosen the angle adjustment screw on the camera mounting bracket. Contents License plate frame (x1) Hex screw (x2) 2.
Installation Manual
Page 3
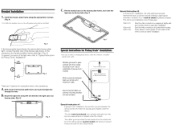
...frame, and route the light wire to moisture. File the marked area on rear bumper) Special Instruction #1 In pickup truck* installations. including pickup trucks. Install the license plate frame using heat-shrink tubing. Seal the white connector using the appropriate 4 screws. (Fig. 4) • ...white connector by wrapping it tightly with silicone to the connectors: A. Apply dielectric white grease to prevent corrosion. where the connector is installed under the chassis. -The rubber grommet where the wire passes from inside of pickup truck* cab to underside of pickup truck* ...
...frame, and route the light wire to moisture. File the marked area on rear bumper) Special Instruction #1 In pickup truck* installations. including pickup trucks. Install the license plate frame using heat-shrink tubing. Seal the white connector using the appropriate 4 screws. (Fig. 4) • ...white connector by wrapping it tightly with silicone to the connectors: A. Apply dielectric white grease to prevent corrosion. where the connector is installed under the chassis. -The rubber grommet where the wire passes from inside of pickup truck* cab to underside of pickup truck* ...
Installation Manual
Page 4
... A 12 VOLT NEGATIVE GROUND. (Check with your dealer if you purchased this unit requires special technical skill and experience. The wiring and installation of other equipment. Route the cables and wiring away from being cut away cable insulation to supply power to become loose resulting in metal,...them can result in an accident. Failure to do so may result in place. Failure to heed them can result in the chassis for installation, take such precautions may result in fire or electric shock. Use of this product to contact, damage or obstruct pipes, fuel lines, ...
... A 12 VOLT NEGATIVE GROUND. (Check with your dealer if you purchased this unit requires special technical skill and experience. The wiring and installation of other equipment. Route the cables and wiring away from being cut away cable insulation to supply power to become loose resulting in metal,...them can result in an accident. Failure to do so may result in place. Failure to heed them can result in the chassis for installation, take such precautions may result in fire or electric shock. Use of this product to contact, damage or obstruct pipes, fuel lines, ...
Installation Manual
Page 5
...) Or visit our website at its option, repair or replace the product with a new or reconditioned product without Alpine's consent. @ Any product not distributed by the installation center. .HOW TO CONTACT CUSTOMER SERVICE: Should the product require service, please call the following : CD Damage ... not cover the following number for which service is not valid unless your Alpine car audio product has been installed in your vehicle by an Authorized Installation Center, and this warranty stamped upon installation by Alpine within the United States, Puerto Rico or Canada. ® Any product ...
...) Or visit our website at its option, repair or replace the product with a new or reconditioned product without Alpine's consent. @ Any product not distributed by the installation center. .HOW TO CONTACT CUSTOMER SERVICE: Should the product require service, please call the following : CD Damage ... not cover the following number for which service is not valid unless your Alpine car audio product has been installed in your vehicle by an Authorized Installation Center, and this warranty stamped upon installation by Alpine within the United States, Puerto Rico or Canada. ® Any product ...
