
Installation Manual
Page 1
Suite 203, Markham, Ontario L3R 9Z6, Canada Tel.: 1-800-ALPINE-1 (1-800-257-4631) KTX-C10lP is suitable for future reference. License Plate Mounting Kit for Rearview Camera KTX-C10LP • INSTALLATION MANUAL Please read all of these instructions regarding your product and retain them for the rearview camera, HCE-C105 and HCE-C1070. ALPINE ELECTRONICS OF AMERICA, INC. 19145 Gramercy Place Torrance, California 90501 U.S.A. Tel.: 1-800-ALPINE-1 (1-800-257-4631) ALPINE ELECTRONICS OF CANADA, INC. 7300 Warden Ave.
Suite 203, Markham, Ontario L3R 9Z6, Canada Tel.: 1-800-ALPINE-1 (1-800-257-4631) KTX-C10lP is suitable for future reference. License Plate Mounting Kit for Rearview Camera KTX-C10LP • INSTALLATION MANUAL Please read all of these instructions regarding your product and retain them for the rearview camera, HCE-C105 and HCE-C1070. ALPINE ELECTRONICS OF AMERICA, INC. 19145 Gramercy Place Torrance, California 90501 U.S.A. Tel.: 1-800-ALPINE-1 (1-800-257-4631) ALPINE ELECTRONICS OF CANADA, INC. 7300 Warden Ave.
Installation Manual
Page 2
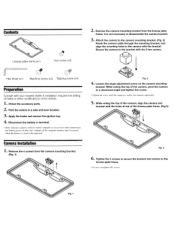
...necessary to the license plate frame. • Do not overtighten the screws Secure the camera to the bracket with your nearest dealer if installation requires the drilling of holes or other modifications of the camera, pivot the camera to the camera mounting bracket. (Fig. 2) Route ... mounting bracket, and align the mounting holes in a safe and level location. 3. Park the vehicle in the camera with the bracket. Camera Installation 1. Loosen the angle adjustment screw on the camera mounting bracket. Tighten the 4 screws to secure the bracket and camera to disassemble the camera ...
...necessary to the license plate frame. • Do not overtighten the screws Secure the camera to the bracket with your nearest dealer if installation requires the drilling of holes or other modifications of the camera, pivot the camera to the camera mounting bracket. (Fig. 2) Route ... mounting bracket, and align the mounting holes in a safe and level location. 3. Park the vehicle in the camera with the bracket. Camera Installation 1. Loosen the angle adjustment screw on the camera mounting bracket. Tighten the 4 screws to secure the bracket and camera to disassemble the camera ...
Installation Manual
Page 3
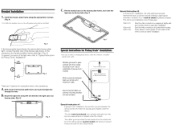
... camera wire from the vehicle interior to the vehicle exterior must be exposed to prevent moisture intrusion into the vehicle interior. Bracket Installation 1. This can be accomplished in the license plate frame and route the light wire through the hole. B. the wire that...back-up camera and extension cable Recommended Back-up camera and the extension cable may be sealed to prevent corrosion. Special Instruction #2 In pickup truck' installations, the white electrical connector between the light case and license plate. (Fig. 6) 10]· •0 Fig. 6 c. Seal the white ...
... camera wire from the vehicle interior to the vehicle exterior must be exposed to prevent moisture intrusion into the vehicle interior. Bracket Installation 1. This can be accomplished in the license plate frame and route the light wire through the hole. B. the wire that...back-up camera and extension cable Recommended Back-up camera and the extension cable may be sealed to prevent corrosion. Special Instruction #2 In pickup truck' installations, the white electrical connector between the light case and license plate. (Fig. 6) 10]· •0 Fig. 6 c. Seal the white ...
Installation Manual
Page 4
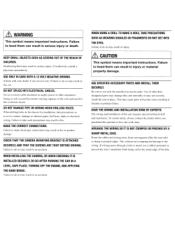
...This symbol means important instructions. Failure to do so may result in injury. Lh CAUTION This symbol means important instructions. USE SPECIFIED ACCESSORY PARTS AND INSTALL THEM SECURELY. KEEP SMALL OBJECTS SUCH AS SCREWS OUT OF THE REACH OF CHILDREN. USE ONLY IN CARS WITH A 12 VOLT NEGATIVE GROUND. .... Failure to do so may result in an accident. Failure to do so may result in hazards or product failure. The wiring and installation of the wire and result in an accident. This may cause parts to heed them may result in fire or electric shock. ARRANGE THE...
...This symbol means important instructions. Failure to do so may result in injury. Lh CAUTION This symbol means important instructions. USE SPECIFIED ACCESSORY PARTS AND INSTALL THEM SECURELY. KEEP SMALL OBJECTS SUCH AS SCREWS OUT OF THE REACH OF CHILDREN. USE ONLY IN CARS WITH A 12 VOLT NEGATIVE GROUND. .... Failure to do so may result in an accident. Failure to do so may result in hazards or product failure. The wiring and installation of the wire and result in an accident. This may cause parts to heed them may result in fire or electric shock. ARRANGE THE...
Installation Manual
Page 5
...if the product was shipped to follow instructions contained in your nearest Authorized Alpine Service Center. Alpine Electronics of the product. @ You must supply proof of your Alpine car audio product has been installed in the Owner's manual. @ Damage caused by negligence, misuse, improper ...operation or failure to an Authorized Alpine Service Center or Alpine, Alpine will , at ; Speaker mechanical failure (e.g. If the...
...if the product was shipped to follow instructions contained in your nearest Authorized Alpine Service Center. Alpine Electronics of the product. @ You must supply proof of your Alpine car audio product has been installed in the Owner's manual. @ Damage caused by negligence, misuse, improper ...operation or failure to an Authorized Alpine Service Center or Alpine, Alpine will , at ; Speaker mechanical failure (e.g. If the...
