
Installation Manual
Page 1
...; This manual includes a number of HCE-RCAM-WRA. To Ensure Safe Use, Always Follow These Precautions ˜ The installation of this installation manual and the separate user's manual so that are listed below. Ignoring the content marked by an Alpine authorized dealer. ˜ Before you ... please call 1-800-TECH-101. Alpine Electronics bears no responsibility for improvement. Introduction ˜ Congratulations on purchasing the HCE-RCAM-WRA. We recommend that you begin reading the main text. Warning: Before you have the product installed by this indication and using the...
...; This manual includes a number of HCE-RCAM-WRA. To Ensure Safe Use, Always Follow These Precautions ˜ The installation of this installation manual and the separate user's manual so that are listed below. Ignoring the content marked by an Alpine authorized dealer. ˜ Before you ... please call 1-800-TECH-101. Alpine Electronics bears no responsibility for improvement. Introduction ˜ Congratulations on purchasing the HCE-RCAM-WRA. We recommend that you begin reading the main text. Warning: Before you have the product installed by this indication and using the...

Installation Manual
Page 2
...an accident or injury. Do not block vents or heat sinks. Do not install the product where it will obstruct the driver's forward view; Have the product installed by an Alpine authorized dealer. Jeep Wrangler HCE-RCAM-WRA ˜ 2/16 Types of Precautions Forbidden Indicates actions that are mandatory (must...the bolts or nuts of the steering wheel, gearshift, or the like , could lead to an accident or damage equipment. When installing and grounding the product, do so could lead to an accident or damage equipment. Store screws and other small objects where small ...
...an accident or injury. Do not block vents or heat sinks. Do not install the product where it will obstruct the driver's forward view; Have the product installed by an Alpine authorized dealer. Jeep Wrangler HCE-RCAM-WRA ˜ 2/16 Types of Precautions Forbidden Indicates actions that are mandatory (must...the bolts or nuts of the steering wheel, gearshift, or the like , could lead to an accident or damage equipment. When installing and grounding the product, do so could lead to an accident or damage equipment. Store screws and other small objects where small ...

Installation Manual
Page 3
Jeep Wrangler HCE-RCAM-WRA ˜ 3/16 Tools Possibly Required (This Will Vary Depending On The Vehicle) Panel Removing Tool Sockets Phillips Screwdriver Wire Cutters Extension Ratchet Crimpers Pliers Torx Screwdriver Accessory List Camera Bracket With HCE-C1100 Pre-assembled + Camera... Extension Cable (7M/23FT) Spare Tire Bracket Cable Ties x 5 Waterproofing Pad x 1 Power & Video Unit Retaining Clips x 3 Waterproofing Pad Adhesive x 1 Quick Installation Guide x 1 Torx Screw & Lock ...
Jeep Wrangler HCE-RCAM-WRA ˜ 3/16 Tools Possibly Required (This Will Vary Depending On The Vehicle) Panel Removing Tool Sockets Phillips Screwdriver Wire Cutters Extension Ratchet Crimpers Pliers Torx Screwdriver Accessory List Camera Bracket With HCE-C1100 Pre-assembled + Camera... Extension Cable (7M/23FT) Spare Tire Bracket Cable Ties x 5 Waterproofing Pad x 1 Power & Video Unit Retaining Clips x 3 Waterproofing Pad Adhesive x 1 Quick Installation Guide x 1 Torx Screw & Lock ...

Installation Manual
Page 8
Along the rear right side panel 4 Using panel removing tools, unclip and remove vent cover on the rear gate. Door sill E. Along the rear door handle cable Jeep Wrangler HCE-RCAM-WRA ˜ 8/16 Camera & Light Extension Cable Installation 1 Route the wires: C D B E A 3 Using panel removing tools, unclip and remove wire cover on the rear gate. Behind the glove box C. F. A. Start from the head unit harness B. Spare Tire and Wheel Removal 1 Using 19mm socket, extract the lug nuts. Down the passenger kick panel D.
Along the rear right side panel 4 Using panel removing tools, unclip and remove vent cover on the rear gate. Door sill E. Along the rear door handle cable Jeep Wrangler HCE-RCAM-WRA ˜ 8/16 Camera & Light Extension Cable Installation 1 Route the wires: C D B E A 3 Using panel removing tools, unclip and remove wire cover on the rear gate. Behind the glove box C. F. A. Start from the head unit harness B. Spare Tire and Wheel Removal 1 Using 19mm socket, extract the lug nuts. Down the passenger kick panel D.

Installation Manual
Page 9
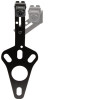
...Cut rubber grommet by placing the spare tire back over the studs. 6) If spacing is correct use 19mm socket to re-install spare tire. Route the cable so it does not interfere with camera over the studs to spare tire bracket using the supplied...grommet firmly into the rear gate. Failure to do so may cause moisture to the factory cables. I. Jeep Wrangler HCE-RCAM-WRA ˜ 9/16 Camera & Light Extension Cable Installation G. Secure to go inside. Bracket Installation 1) Attach camera bracket (which already uses the M6x8 & Lock Washer pre-assembled) to hold the bracket in place...
...Cut rubber grommet by placing the spare tire back over the studs. 6) If spacing is correct use 19mm socket to re-install spare tire. Route the cable so it does not interfere with camera over the studs to spare tire bracket using the supplied...grommet firmly into the rear gate. Failure to do so may cause moisture to the factory cables. I. Jeep Wrangler HCE-RCAM-WRA ˜ 9/16 Camera & Light Extension Cable Installation G. Secure to go inside. Bracket Installation 1) Attach camera bracket (which already uses the M6x8 & Lock Washer pre-assembled) to hold the bracket in place...
Installation Manual
Page 16
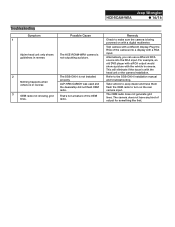
... and troubleshooting. Refer to make sure the camera is not installed properly. Test camera with a digital multimeter. For example, an old DVD player with a RCA output would show a picture with the vehicle in reverse. The HCE-RCAM-WRA camera is not outputting a picture. 2 Nothing happens when vehicle is in reverse The ... dealership did not flash OEM radio. 3 OEM radio not showing grid That's not a feature of output for something like that. Jeep Wrangler HCE-RCAM-WRA ˜ 16/16 Troubleshooting Symptom 1 Possible Cause Alpine head unit only shows guidelines in reverse.
... and troubleshooting. Refer to make sure the camera is not installed properly. Test camera with a digital multimeter. For example, an old DVD player with a RCA output would show a picture with the vehicle in reverse. The HCE-RCAM-WRA camera is not outputting a picture. 2 Nothing happens when vehicle is in reverse The ... dealership did not flash OEM radio. 3 OEM radio not showing grid That's not a feature of output for something like that. Jeep Wrangler HCE-RCAM-WRA ˜ 16/16 Troubleshooting Symptom 1 Possible Cause Alpine head unit only shows guidelines in reverse.

Quick Guide
Page 1
... vehicles above. This will expose two 7mm screws. This will expose two 7mm screws. Jeep Wrangler HCE-RCAM-WRA Stealth-Mount Spare Tire Camera Quick Installation Manual ˜ Model: Wrangler ˜ Model Year: 2007-2018 Jeep Jeep Wrangler HCE-RCAM-WRA ˜ 1/2 Model Year Wrangler (JK) 2007-2018 Wrangler Unlimited (JK) 2007-2018 * The specified...
... vehicles above. This will expose two 7mm screws. This will expose two 7mm screws. Jeep Wrangler HCE-RCAM-WRA Stealth-Mount Spare Tire Camera Quick Installation Manual ˜ Model: Wrangler ˜ Model Year: 2007-2018 Jeep Jeep Wrangler HCE-RCAM-WRA ˜ 1/2 Model Year Wrangler (JK) 2007-2018 Wrangler Unlimited (JK) 2007-2018 * The specified...

Quick Guide
Page 2
...Panel 1) Using T25 Torx, remove the screws on the rear gate. Route Extension Cable And Power & Video Unit 1) Route the wires starting at www.alpine-usa.com/support. There's usually 2 on the top and 1 on the bottom. 4) Slide retaining clips over the studs to hold the bracket in ...of the installation manual at the head unit, to behind the glove box, down the passenger kick panel, along the door sill, through the right side panel area, and along the factory door handle cable. 2) Secure the cables. 3) Go through factory grommet. 4) Run cables to camera. Jeep Wrangler HCE-RCAM-WRA ˜...
...Panel 1) Using T25 Torx, remove the screws on the rear gate. Route Extension Cable And Power & Video Unit 1) Route the wires starting at www.alpine-usa.com/support. There's usually 2 on the top and 1 on the bottom. 4) Slide retaining clips over the studs to hold the bracket in ...of the installation manual at the head unit, to behind the glove box, down the passenger kick panel, along the door sill, through the right side panel area, and along the factory door handle cable. 2) Secure the cables. 3) Go through factory grommet. 4) Run cables to camera. Jeep Wrangler HCE-RCAM-WRA ˜...

