Quick Start Guide
Page 5
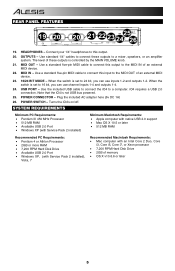
...• Pentium III 450 MHz Processor • 512 MB RAM • Available USB 2.0 Port • Windows XP (with Service Pack 2 installed) Minimum Macintosh Requirements: • Apple computer with native USB 2.0 support • Mac OS X 10.5 or later • 512 MB RAM Recommended PC Requirements: • Pentium 4 or Athlon Processor • ...MIDI device. 23. 16/24 BIT MODE - USB PORT - POWER CONNECTOR - When the switch is not USB bus powered. 25. Note that the iO4 is set to the MIDI OUT of memory • OS X v10.6.6 or later 5 REAR PANEL FEATURES 19 20 20 21 22 23 25 24 ...
...• Pentium III 450 MHz Processor • 512 MB RAM • Available USB 2.0 Port • Windows XP (with Service Pack 2 installed) Minimum Macintosh Requirements: • Apple computer with native USB 2.0 support • Mac OS X 10.5 or later • 512 MB RAM Recommended PC Requirements: • Pentium 4 or Athlon Processor • ...MIDI device. 23. 16/24 BIT MODE - USB PORT - POWER CONNECTOR - When the switch is not USB bus powered. 25. Note that the iO4 is set to the MIDI OUT of memory • OS X v10.6.6 or later 5 REAR PANEL FEATURES 19 20 20 21 22 23 25 24 ...
Quick Start Guide
Page 6
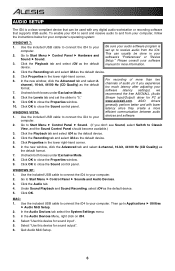
...OK to close the Properties window. 10. Uncheck both boxes under Exclusive Mode. 8. Click OK to close the Sound control panel. Use the included USB cable to connect the iO4 to your software manual for more information. 4. In the Audio Devices Menu, right click on iO4. 4. Select "Use this...44100 Hz (CD Quality) as the default device. 5. Use the included USB cable to connect the iO4 to your computer's operating system: WINDOWS 7: 1. Click OK. Then go to close the Properties window. 9. For recording of more than two channels of audio (or if you don't see Sound, select...
...OK to close the Properties window. 10. Uncheck both boxes under Exclusive Mode. 8. Click OK to close the Sound control panel. Use the included USB cable to connect the iO4 to your software manual for more information. 4. In the Audio Devices Menu, right click on iO4. 4. Select "Use this...44100 Hz (CD Quality) as the default device. 5. Use the included USB cable to connect the iO4 to your computer's operating system: WINDOWS 7: 1. Click OK. Then go to close the Properties window. 9. For recording of more than two channels of audio (or if you don't see Sound, select...
Quick Start Guide
Page 7
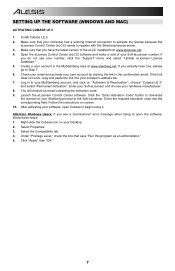
... Activation Code" button to download the license for your hardware manufacturer. 8. After activating your software, open the software, follow these steps: 1. Attention Windows Users: If you already have the latest version of your browser's address bar. 7. Under "Privilege Level," check the box that your MySteinberg account...." 7 If the link does not work, copy and paste the link into the corresponding field. Right-click the Cubase icon on screen. 10. If you have one, please go to begin using it. Select Properties. 3. Create a user account in the MySteinberg area at www....
... Activation Code" button to download the license for your hardware manufacturer. 8. After activating your software, open the software, follow these steps: 1. Attention Windows Users: If you already have the latest version of your browser's address bar. 7. Under "Privilege Level," check the box that your MySteinberg account...." 7 If the link does not work, copy and paste the link into the corresponding field. Right-click the Cubase icon on screen. 10. If you have one, please go to begin using it. Select Properties. 3. Create a user account in the MySteinberg area at www....
Quick Start Guide
Page 8
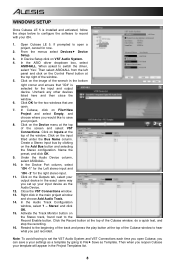
... appear in the exact same way you can save your output device in the Project Templates list. 8 Under the Audio Device column, select ASIO4ALL. 10. WINDOWS SETUP Once Cubase LE 5 is selected for the input and output device. In Cubase, click on the image of the Cubase... window, do a quick test, and stop the recording. 16. In the Device Port column, select "iO4 -1" for the Left stereo input and "iO4 - 2" for the two windows that "iO4" is installed and activated, follow the steps below to configure the software ...
... appear in the exact same way you can save your output device in the Project Templates list. 8 Under the Audio Device column, select ASIO4ALL. 10. WINDOWS SETUP Once Cubase LE 5 is selected for the input and output device. In Cubase, click on the image of the Cubase... window, do a quick test, and stop the recording. 16. In the Device Port column, select "iO4 -1" for the Left stereo input and "iO4 - 2" for the two windows that "iO4" is installed and activated, follow the steps below to configure the software ...
Quick Start Guide
Page 9
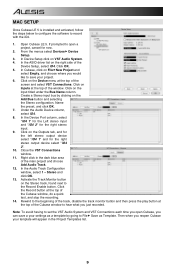
... stereo output device select "iO4 2". 10. Open Cubase LE 5. Right click in the Project Templates list. 9 In Device Setup click on FilefNew Project and select Empty, and choose where you open a project, cancel for the right stereo input. 9. Click OK. 5. Click on Inputs at the top of the window. Click on the Device...
... stereo output device select "iO4 2". 10. Open Cubase LE 5. Right click in the Project Templates list. 9 In Device Setup click on FilefNew Project and select Empty, and choose where you open a project, cancel for the right stereo input. 9. Click OK. 5. Click on Inputs at the top of the window. Click on the Device...


