User Manual
Page 3
...; Cursor, Cursor buttons ...2 „ Field, DATA wheel...2 „ [SEQUENCE] button...2 „ [TRACK] button ...2 „ [PARAMS] button ...2 „ MODE button...2 Tutorial of the MPC500 ...2 Playing Back a Demo Song...3 Playing a Preset Program...3 Recording a Performance with the Pads 4 Playing Back Several Sequences in a Series 4 „ Selecting the sequences in real time... „ Setting the same number of the bars for the sample and the sequence 8 Saving the Data ...9 Turning Off the Autoload Function ...9 Other Useful Functions ...9 „ Q-Link slider ...9
...; Cursor, Cursor buttons ...2 „ Field, DATA wheel...2 „ [SEQUENCE] button...2 „ [TRACK] button ...2 „ [PARAMS] button ...2 „ MODE button...2 Tutorial of the MPC500 ...2 Playing Back a Demo Song...3 Playing a Preset Program...3 Recording a Performance with the Pads 4 Playing Back Several Sequences in a Series 4 „ Selecting the sequences in real time... „ Setting the same number of the bars for the sample and the sequence 8 Saving the Data ...9 Turning Off the Autoload Function ...9 Other Useful Functions ...9 „ Q-Link slider ...9

User Manual
Page 4
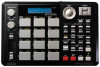
The mode that you need to know to use to this page at any time by the recorded sequences. This Quickstart Manual describes the basic operation to MUSIC PRODUCTION CENTER MPC500. Tutorial of the MPC500 The MPC500 consists of the selected field, by pressing the [TRACK] button. &#... what section was active when the [PARAMS] button is pressed. „ MODE button By pressing the [MODE] button and hitting a pad, you use the MPC500. [DATA] wheel Cursor buttons [PARAMS] button [TRACK] button [SEQUENCE] button „ Cursor, Cursor buttons [MODE] button The highlighted part on...
The mode that you need to know to use to this page at any time by the recorded sequences. This Quickstart Manual describes the basic operation to MUSIC PRODUCTION CENTER MPC500. Tutorial of the MPC500 The MPC500 consists of the selected field, by pressing the [TRACK] button. &#... what section was active when the [PARAMS] button is pressed. „ MODE button By pressing the [MODE] button and hitting a pad, you use the MPC500. [DATA] wheel Cursor buttons [PARAMS] button [TRACK] button [SEQUENCE] button „ Cursor, Cursor buttons [MODE] button The highlighted part on...
User Manual
Page 5
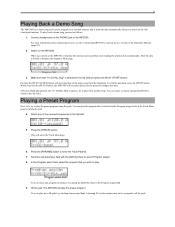
.... 7. In the Program select field, select the program that "01-DJ-Hip_Hop" is loaded, it loads the data automatically when you switch on the MPC500. Press the [PARAMS] button to select 'Program assign'. 8. This will start -up to all the pads. Switch on the unit (Autoload function). ... try to play back another song. To stop the playback, press the [STOP] button. DJ-Hip_Hop" sequence, try to play the preset program using the pads. 3 Playing Back a Demo Song The MPC500 has a demo song and a preset program in its internal memory and it displays the Sequence Main page. 3.
.... 7. In the Program select field, select the program that "01-DJ-Hip_Hop" is loaded, it loads the data automatically when you switch on the MPC500. Press the [PARAMS] button to select 'Program assign'. 8. This will start -up to all the pads. Switch on the unit (Autoload function). ... try to play back another song. To stop the playback, press the [STOP] button. DJ-Hip_Hop" sequence, try to play the preset program using the pads. 3 Playing Back a Demo Song The MPC500 has a demo song and a preset program in its internal memory and it displays the Sequence Main page. 3.

User Manual
Page 6
...'s Manual. (page 19) Playing Back Several Sequences in the Main Sequence page, select the sequence you can add the performance to a sequence using the internal preset program, proceed as follows. 1. To add the recording to the click sounds. Hold the pad that you can select any track...on which you can record a new performance separately. This is set the order of this guide. 6. You can select any sequence for 2 bars, the MPC500 will start a new recording by hitting pads. „ Deleting only a specific pad 1. The performance data will be played in real time, or set...
...'s Manual. (page 19) Playing Back Several Sequences in the Main Sequence page, select the sequence you can add the performance to a sequence using the internal preset program, proceed as follows. 1. To add the recording to the click sounds. Hold the pad that you can select any track...on which you can record a new performance separately. This is set the order of this guide. 6. You can select any sequence for 2 bars, the MPC500 will start a new recording by hitting pads. „ Deleting only a specific pad 1. The performance data will be played in real time, or set...

User Manual
Page 7
...and then [PAD 12] (SONG). You will see the "Chapter 6: Song mode" section of the MPC500. Select the Step field and choose step 2. 6. The assigned sequence will start the playback of using the [DATA] wheel. 5. Note: The example given below describes recording from a CD player connected to ...the end, the MPC500 will be played. 2. Select the Sq field during the playback will learn how to assign and play first using the internal preset. Scroll with the pads, instead of the sequence. 3. In the Sequence...
...and then [PAD 12] (SONG). You will see the "Chapter 6: Song mode" section of the MPC500. Select the Step field and choose step 2. 6. The assigned sequence will start the playback of using the [DATA] wheel. 5. Note: The example given below describes recording from a CD player connected to ...the end, the MPC500 will be played. 2. Select the Sq field during the playback will learn how to assign and play first using the internal preset. Scroll with the pads, instead of the sequence. 3. In the Sequence...
User Manual
Page 8
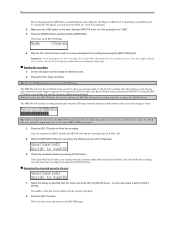
... when the CD player starts playing and a threshold of audio signal is full. 2. Pressing the [CANCEL] button exits Record Enable mode and resets the MPC500. If you do not like the recording, you can remove the recording by pressing the [CANCEL] button. „ Assigning the recorded sound to finish ...: If the recording level is in the Assign to ¼ inch TS connectors. 2. Make sure the LINE button on screen and adjust the recording level using the [REC GAIN] knob. Pressing the [DO IT] button a second time will gain a lot of this screen and returns to begin recording. The...
... when the CD player starts playing and a threshold of audio signal is full. 2. Pressing the [CANCEL] button exits Record Enable mode and resets the MPC500. If you do not like the recording, you can remove the recording by pressing the [CANCEL] button. „ Assigning the recorded sound to finish ...: If the recording level is in the Assign to ¼ inch TS connectors. 2. Make sure the LINE button on screen and adjust the recording level using the [REC GAIN] knob. Pressing the [DO IT] button a second time will gain a lot of this screen and returns to begin recording. The...
User Manual
Page 9
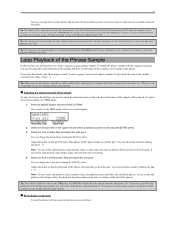
...in the "Recording a sound" section on the upper line and select a sample you wish to edit using a phrase sample. Select the Trim st (start) field and adjust the start point to the end ... Phrase Sample In this point so that the playback of the phrase will learn how to create a sequence using the [DATA] wheel. 3. Adjust this section, you will end when you hit the pad. Note :... change the start point by bars (1bar, 2 bars....). Select the End in the TRIM page, the MPC500 will not be played. 7 Now you can play the recorded sample with the sequence function, you need ...
...in the "Recording a sound" section on the upper line and select a sample you wish to edit using a phrase sample. Select the Trim st (start) field and adjust the start point to the end ... Phrase Sample In this point so that the playback of the phrase will learn how to create a sequence using the [DATA] wheel. 3. Adjust this section, you will end when you hit the pad. Note :... change the start point by bars (1bar, 2 bars....). Select the End in the TRIM page, the MPC500 will not be played. 7 Now you can play the recorded sample with the sequence function, you need ...

User Manual
Page 11
... can control pad parameters, such as described in Flying Pan / Delay can also turn this case, when you turn on the MPC500. 1. Other Useful Functions The MPC500 has many exciting and clever functions for your computer" (page 167) of the sequence when it is changed. Also the LFO ...in the Parameter field. 4. 9 Tip: While it cannot create them on again. The MPC500 has a lot more features for music creation. „ Effects ...
... can control pad parameters, such as described in Flying Pan / Delay can also turn this case, when you turn on the MPC500. 1. Other Useful Functions The MPC500 has many exciting and clever functions for your computer" (page 167) of the sequence when it is changed. Also the LFO ...in the Parameter field. 4. 9 Tip: While it cannot create them on again. The MPC500 has a lot more features for music creation. „ Effects ...
