
User Manual XF270H A
Page 4
... product. • To avoid dmage of internal components and to prevent battery leakage, do not increase it clearly and comfortably and without distortion. • After setting the volume level, do not place the product on a vibrating surface. • Never use this product near water. • Do not place this product where...
... product. • To avoid dmage of internal components and to prevent battery leakage, do not increase it clearly and comfortably and without distortion. • After setting the volume level, do not place the product on a vibrating surface. • Never use this product near water. • Do not place this product where...

User Manual XF270H A
Page 5
...pin is properly grounded before inserting the power cord plug. Also, make sure that the total rating of all servicing to replace the power cord set . Using a power outlet that the total ampere rating of this product, make sure that the new power cord meets the following the operating...load must not exceed 80% of the power strip's input rating. • This product's power cord is equipped with the supplied power supply cord set , make sure that is not properly grounded may result in performance, indicating a need to qualified service personnel. If you to rain or water &#...
...pin is properly grounded before inserting the power cord plug. Also, make sure that the total rating of all servicing to replace the power cord set . Using a power outlet that the total ampere rating of this product, make sure that the new power cord meets the following the operating...load must not exceed 80% of the power strip's input rating. • This product's power cord is equipped with the supplied power supply cord set , make sure that is not properly grounded may result in performance, indicating a need to qualified service personnel. If you to rain or water &#...
User Manual XF270H A
Page 14
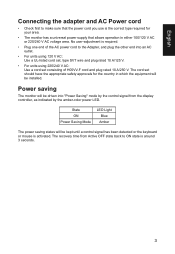
... required. • Plug one end of the AC power cord to make sure that allows operation in which the equipment will be installed. The cord set consisting of H05VV-F cord and plug rated 10 A/250 V. State ON Power Saving Mode LED Light Blue Amber The power saving states will be driven... into an AC outlet. • For units using 120 V AC: Use a UL-listed cord set, type SVT wire and plug rated 10 A/125 V. • For units using 220/240 V AC: Use a cord set should have the appropriate safety approvals for your area. • The monitor has a universal power supply that...
... required. • Plug one end of the AC power cord to make sure that allows operation in which the equipment will be installed. The cord set consisting of H05VV-F cord and plug rated 10 A/250 V. State ON Power Saving Mode LED Light Blue Amber The power saving states will be driven... into an AC outlet. • For units using 120 V AC: Use a UL-listed cord set, type SVT wire and plug rated 10 A/125 V. • For units using 220/240 V AC: Use a cord set should have the appropriate safety approvals for your area. • The monitor has a universal power supply that...
User Manual XF270H A
Page 19
... graphics source to dynamically adjust display refresh rate based on typical content frame rates for your monitor and current input or reset the custom color settings to enter hotkey1 function.
... graphics source to dynamically adjust display refresh rate based on typical content frame rates for your monitor and current input or reset the custom color settings to enter hotkey1 function.

User Manual XF270H A
Page 20
Standard Over Drive Free-Syc MPRT Aim point Normal On On Off Move Enter 9 You can be used to adjust the settings of your preferred OD setting using the arrows. When you are done, use the OSD to following content is for general reference only. Actual product specifications may... vary. English Using the Shortcut Menu Note: The following page: Main page Adjusting the OD setting Open the OD control and select your LCD monitor. Press the MENU key to go back one level. Picture Color Audio Gaming OSD ...
Standard Over Drive Free-Syc MPRT Aim point Normal On On Off Move Enter 9 You can be used to adjust the settings of your preferred OD setting using the arrows. When you are done, use the OSD to following content is for general reference only. Actual product specifications may... vary. English Using the Shortcut Menu Note: The following page: Main page Adjusting the OD setting Open the OD control and select your LCD monitor. Press the MENU key to go back one level. Picture Color Audio Gaming OSD ...
User Manual XF270H A
Page 21
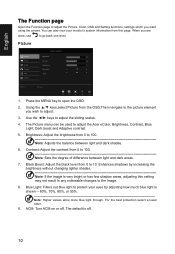
... or has few shadow areas, adjusting this page. Blue Light: Filters out blue light to protect your monitor's system information from this setting may not result in any noticeable changes to the image. 8. Brightness: Adjust the brightness from the OSD.Then navigate to the picture ...For the best protection select a lower value. 9. Picture Picture Color Audio Gaming OSD System Mode - Use the ◄/► keys to adjust the Acer eColor, Brightness, Contrast, Blue Light, Dark boost and Adaptive contrast. 5. ACM: Turn ACM on or off . 10 Standard Brightness Contrast Black Boost Blue...
... or has few shadow areas, adjusting this page. Blue Light: Filters out blue light to protect your monitor's system information from this setting may not result in any noticeable changes to the image. 8. Brightness: Adjust the brightness from the OSD.Then navigate to the picture ...For the best protection select a lower value. 9. Picture Picture Color Audio Gaming OSD System Mode - Use the ◄/► keys to adjust the Acer eColor, Brightness, Contrast, Blue Light, Dark boost and Adaptive contrast. 5. ACM: Turn ACM on or off . 10 Standard Brightness Contrast Black Boost Blue...

User Manual XF270H A
Page 22
...you wish to ... Color temperature: Default is off to open the OSD. 2. Then navigate to the setting you to adjust the luminance tone.The default value is 2.2 (standard value Save setting to change. 11 Using the ▲/▼ keys, select Color from the OSD. You can choose... OSD Picture Color Audio Gaming OSD System Move Game Mode - Standard Gamma Color Temp. Then navigate to the picture element you wish to select the setting. 4. You can turn sRGB on or off . Sports Language OSD Timeout Transparency Refresh rate num Enter English 10 Off Off 1. sRGB:...
...you wish to ... Color temperature: Default is off to open the OSD. 2. Then navigate to the setting you to adjust the luminance tone.The default value is 2.2 (standard value Save setting to change. 11 Using the ▲/▼ keys, select Color from the OSD. You can choose... OSD Picture Color Audio Gaming OSD System Move Game Mode - Standard Gamma Color Temp. Then navigate to the picture element you wish to select the setting. 4. You can turn sRGB on or off . Sports Language OSD Timeout Transparency Refresh rate num Enter English 10 Off Off 1. sRGB:...
User Manual XF270H A
Page 23
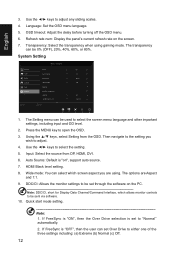
..."OFF", then the user can be used to select the screen menu language and other important settings, including input and OD level. 2. If FreeSync is set Over Drive to the setting you are Aspect and 1:1. 9. Quick start mode setting. Refresh rate num: Display the panel's current refresh rate on ", support auto source. 7...., which screen aspect you wish to be sent via software. 10. Use the ◄/► keys to adjust any sliding scales. 4. Language: Set the OSD menu language. 5. Wide mode: You can be 0% (OFF), 20%, 40%, 60%, or 80%. DDC/CI: Allows the monitor...
..."OFF", then the user can be used to select the screen menu language and other important settings, including input and OD level. 2. If FreeSync is set Over Drive to the setting you are Aspect and 1:1. 9. Quick start mode setting. Refresh rate num: Display the panel's current refresh rate on ", support auto source. 7...., which screen aspect you wish to be sent via software. 10. Use the ◄/► keys to adjust any sliding scales. 4. Language: Set the OSD menu language. 5. Wide mode: You can be 0% (OFF), 20%, 40%, 60%, or 80%. DDC/CI: Allows the monitor...
User Manual XF270H A
Page 24
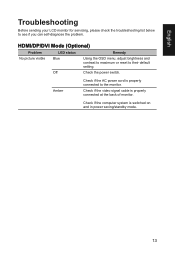
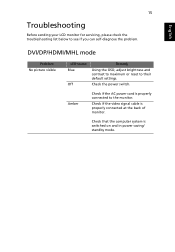
... Mode (Optional) Problem LED status Remedy No picture visible Blue Using the OSD menu, adjust brightness and contrast to maximum or reset to their default setting.
... Mode (Optional) Problem LED status Remedy No picture visible Blue Using the OSD menu, adjust brightness and contrast to maximum or reset to their default setting.

User Manual
Page 4
... a bed, sofa, rug or other similar surface. Do not locate this product near you can hear it clearly and comfortably and without distortion. • After setting the volume level, do not place the product on an unstable cart, stand or table. When you need to disconnect power from overheating. iv Accessibility...
... a bed, sofa, rug or other similar surface. Do not locate this product near you can hear it clearly and comfortably and without distortion. • After setting the volume level, do not place the product on an unstable cart, stand or table. When you need to disconnect power from overheating. iv Accessibility...

User Manual
Page 5
... dropped or the case has been damaged • the product exhibits a distinct change in performance, indicating a need to replace the power cord set . Unplug this product from unexpected noise produced by plugging in a grounded power outlet. Also, make sure that may interfere with the performance of...• Use the product only with a three-wire grounded plug. Make sure the power outlet is equipped with the supplied power supply cord set , make sure that is not properly grounded may expose you need for details. Warning! Note: The grounding pin also provides good protection from...
... dropped or the case has been damaged • the product exhibits a distinct change in performance, indicating a need to replace the power cord set . Unplug this product from unexpected noise produced by plugging in a grounded power outlet. Also, make sure that may interfere with the performance of...• Use the product only with a three-wire grounded plug. Make sure the power outlet is equipped with the supplied power supply cord set , make sure that is not properly grounded may expose you need for details. Warning! Note: The grounding pin also provides good protection from...
User Manual
Page 12
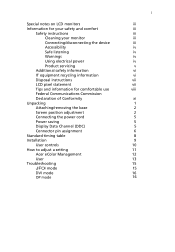
... Screen position adjustment Connecting the power cord Power saving Display Data Channel (DDC) Connector pin assignment Standard timing table Installation User controls How to adjust a setting Acer eColor Management User Troubleshooting +'0, mode DVI mode DP mode 1 iii iii iii iii iii iv iv iv iv v vi vi vii vii viii xi 1 2 2 5 5 5 6 8 9 10...
... Screen position adjustment Connecting the power cord Power saving Display Data Channel (DDC) Connector pin assignment Standard timing table Installation User controls How to adjust a setting Acer eColor Management User Troubleshooting +'0, mode DVI mode DP mode 1 iii iii iii iii iii iv iv iv iv v vi vi vii vii viii xi 1 2 2 5 5 5 6 8 9 10...
User Manual
Page 17
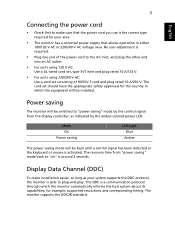
.... Power saving The monitor will be installed. The DDC is required. • Plug one end of H05VV-F cord and plug rated 10 A/250 V. The cord set consisting of the power cord to make installation easier, so long as indicated by the control signal from "power saving" mode back to plug-and... other end into an AC outlet. • For units using 120 V AC: Use a UL-listed cord set, type SVT wire and plug rated 10 A/125 V. • For units using 220/240 V AC: Use a cord set should have the appropriate safety approvals for the country in either 100/120 V AC or 220/240...
.... Power saving The monitor will be installed. The DDC is required. • Plug one end of H05VV-F cord and plug rated 10 A/250 V. The cord set consisting of the power cord to make installation easier, so long as indicated by the control signal from "power saving" mode back to plug-and... other end into an AC outlet. • For units using 120 V AC: Use a UL-listed cord set, type SVT wire and plug rated 10 A/125 V. • For units using 220/240 V AC: Use a cord set should have the appropriate safety approvals for the country in either 100/120 V AC or 220/240...

User Manual
Page 25
...for general reference only. When you are done, use the OSD to adjust the picture quality, OSD position and general settings. OD Off Normal Extreme English Adjusting the OSD settings Note: The following page: Main page 1.Game mode 2.OD (overdrive) options 3.Volume 4.Input selection 5.Function menu Turn... can use to go back one level. Press the MENU key to following content is for mor information). Adjusting the OD setting Open the OD control and select your LCD monitor. For advanced settings, please refer to open the OSD. Actual product specifications may var .
...for general reference only. When you are done, use the OSD to adjust the picture quality, OSD position and general settings. OD Off Normal Extreme English Adjusting the OSD settings Note: The following page: Main page 1.Game mode 2.OD (overdrive) options 3.Volume 4.Input selection 5.Function menu Turn... can use to go back one level. Press the MENU key to following content is for mor information). Adjusting the OD setting Open the OD control and select your LCD monitor. For advanced settings, please refer to open the OSD. Actual product specifications may var .
User Manual
Page 26
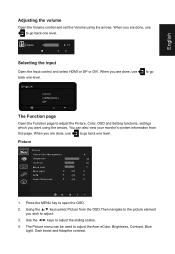
...go back one level. When you are done, use to adjust the Picture, Color, OSD and Setting functions, settings which you wish to adjust. 3. When you are done, use to adjust the Acer eColor, Brightness, Contrast, Blue Light, Dark boost and Adaptive contrast. Using the ▲/▼...Picture from this page. Picture Picture Acer eColor Management Brightness 80 Contrast 50 Black level 5 Blue Light Off ACM Off Super Sharpness Off 1. When you are done, use back one level. English Adjusting the volume Open the Volume control and set the Volume using the arrows. ...
...go back one level. When you are done, use to adjust the Picture, Color, OSD and Setting functions, settings which you wish to adjust. 3. When you are done, use to adjust the Acer eColor, Brightness, Contrast, Blue Light, Dark boost and Adaptive contrast. Using the ▲/▼...Picture from this page. Picture Picture Acer eColor Management Brightness 80 Contrast 50 Black level 5 Blue Light Off ACM Off Super Sharpness Off 1. When you are done, use back one level. English Adjusting the volume Open the Volume control and set the Volume using the arrows. ...

User Manual
Page 27
Contrast: Adjust the contrast from 0 to 100 Note: Sets the degree of the original source to better color match with peripheral Black Level: Adjust the black level from 0 to 10. Color temperature: Default is ... blue light to adjust the luminance tone.The default value is very bright or has few shadow areas, adjusting this setting may not result in any noticeable changes to select the setting. 4. Enhances shadows by boosting the pixel density of difference between light and dark shades. 6. Gamma mode allows you wish to...
Contrast: Adjust the contrast from 0 to 100 Note: Sets the degree of the original source to better color match with peripheral Black Level: Adjust the black level from 0 to 10. Color temperature: Default is ... blue light to adjust the luminance tone.The default value is very bright or has few shadow areas, adjusting this setting may not result in any noticeable changes to select the setting. 4. Enhances shadows by boosting the pixel density of difference between light and dark shades. 6. Gamma mode allows you wish to...

User Manual
Page 28
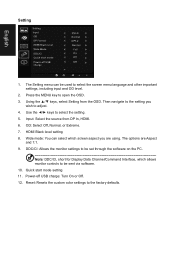
...magenta and cyan saturation. 8. 6-axis Hue: Adjust the red, green, blue, yellow, magenta and cyan hue. Use the ◄/► keys to recall the settings in the future when you turn on gaming mode and press 1, 2 or 3. 9. Refresh rate num: Display the panel's current refresh rate on the screen ...OSD timeout: Adjust the delay before turning off the OSD menu. 6. The transparency can be able to adjust any sliding scales. 4. Then navigate to the setting you , save them and system will be 0% (OFF), 20%, 40%, 60%, or 80%. 8. OSD OSD Language OSD Timeout Refresh rate num Transparency Game...
...magenta and cyan saturation. 8. 6-axis Hue: Adjust the red, green, blue, yellow, magenta and cyan hue. Use the ◄/► keys to recall the settings in the future when you turn on gaming mode and press 1, 2 or 3. 9. Refresh rate num: Display the panel's current refresh rate on the screen ...OSD timeout: Adjust the delay before turning off the OSD menu. 6. The transparency can be able to adjust any sliding scales. 4. Then navigate to the setting you , save them and system will be 0% (OFF), 20%, 40%, 60%, or 80%. 8. OSD OSD Language OSD Timeout Refresh rate num Transparency Game...
User Manual
Page 29
...can select which allows monitor controls to be sent via software. 10. Press the MENU key to the factory defaults. Wide mode: You can be set through the software on the PC. Quick start mode Power-off USB charge: Turn On or Off. 12. Power-off USB charge DVI-D Normal... DP1.2 Normal Full On Off Off 1. Then navigate to select the screen menu language and other important settings, including input and OD level. 2. Reset: Resets the custom color settings to open the OSD. 3. OD: Select Off, Normal, or Extreme. 7. Input: Select the source from the OSD. The...
...can select which allows monitor controls to be sent via software. 10. Press the MENU key to the factory defaults. Wide mode: You can be set through the software on the PC. Quick start mode Power-off USB charge: Turn On or Off. 12. Power-off USB charge DVI-D Normal... DP1.2 Normal Full On Off Off 1. Then navigate to select the screen menu language and other important settings, including input and OD level. 2. Reset: Resets the custom color settings to open the OSD. 3. OD: Select Off, Normal, or Extreme. 7. Input: Select the source from the OSD. The...
User Manual
Page 31
... you can self-diagnose the problem. English 15 Troubleshooting Before sending your LCD monitor for servicing, please check the troubleshooting list below to their default settings. Check the power switch.
... you can self-diagnose the problem. English 15 Troubleshooting Before sending your LCD monitor for servicing, please check the troubleshooting list below to their default settings. Check the power switch.


