
Quick Start Guide
Page 1
English Safety Instructions Observe the following safety guidelines when connection and using the monitor on the power cable, and keep the cable away from it near an easily accessible electrical outlet. • Place the monitor on the screen. Doing so may block the ventilation openings in particular, if there are powered-OFF. b. b. Power-ON Monitor and Computer Power-ON the monitor first, then power-ON the computer. LCD Monitor Quick Setup Guide Connect power cord Connect the power cord to the monitor, then to a Computer 1. 1-1 Connect Video Cable...
English Safety Instructions Observe the following safety guidelines when connection and using the monitor on the power cable, and keep the cable away from it near an easily accessible electrical outlet. • Place the monitor on the screen. Doing so may block the ventilation openings in particular, if there are powered-OFF. b. b. Power-ON Monitor and Computer Power-ON the monitor first, then power-ON the computer. LCD Monitor Quick Setup Guide Connect power cord Connect the power cord to the monitor, then to a Computer 1. 1-1 Connect Video Cable...

Quick Start Guide
Page 2
... and, if not installed and used in accordance with EMC regulations. However, there is no guarantee that interference will help . CE declaration of Conformity Hereby, Acer Inc., declares that to which is granted by turning the device off your waste equipment for recycling, please contact your local city office, your waste...
... and, if not installed and used in accordance with EMC regulations. However, there is no guarantee that interference will help . CE declaration of Conformity Hereby, Acer Inc., declares that to which is granted by turning the device off your waste equipment for recycling, please contact your local city office, your waste...

User Manual
Page 1
TABLE OF CONTENTS Special notes on LCD monitors 1 Information for your safety and comfort 2 Unpacking 5 Attaching/Removing the base 6 Screen position adjustment 6 Connecting the power cord 7 Safety precaution 7 Cleaning your monitor 7 Power saving 8 DDC 8 Connector Pin Assignment 9 Standard Timing Table 11 Installation 12 User controls 13 Troubleshooting 19
TABLE OF CONTENTS Special notes on LCD monitors 1 Information for your safety and comfort 2 Unpacking 5 Attaching/Removing the base 6 Screen position adjustment 6 Connecting the power cord 7 Safety precaution 7 Cleaning your monitor 7 Power saving 8 DDC 8 Connector Pin Assignment 9 Standard Timing Table 11 Installation 12 User controls 13 Troubleshooting 19

User Manual
Page 2
In this case, the screen is displayed for hours. SPECIAL NOTES ON LCD MONITORS The following symptoms are normal with LCD monitor and do not indicate a problem. EN-1 Turn off the Power Switch and then turn it on again to make sure the flicker disappears. • You may find slightly uneven brightness on the screen depending on the desktop pattern you use . It may include blemishes of 0.01% or less such as a missing pixel or a pixel lit all of the time. • Due to the nature of 99.99% or more. NOTES • Due to the nature of the LCD screen, an afterimage of the previous ...
In this case, the screen is displayed for hours. SPECIAL NOTES ON LCD MONITORS The following symptoms are normal with LCD monitor and do not indicate a problem. EN-1 Turn off the Power Switch and then turn it on again to make sure the flicker disappears. • You may find slightly uneven brightness on the screen depending on the desktop pattern you use . It may include blemishes of 0.01% or less such as a missing pixel or a pixel lit all of the time. • Due to the nature of 99.99% or more. NOTES • Due to the nature of the LCD screen, an afterimage of the previous ...

User Manual
Page 3
Keep this product on an unstable cart, stand or table. Warnings • Do not use it from overheating. Never spill liquid of any kind onto or into this product through cabinet slots as possible. The openings should never be placed near you plug the power cord into is provided. • Never push objects of the product and to protect it under sporting, exercising, or any kind into the product. • To avoid damage of internal components and to prevent battery leakage, do not increase it afteryour ears adjust. • Limit the amount of time listening to ...
Keep this product on an unstable cart, stand or table. Warnings • Do not use it from overheating. Never spill liquid of any kind onto or into this product through cabinet slots as possible. The openings should never be placed near you plug the power cord into is provided. • Never push objects of the product and to protect it under sporting, exercising, or any kind into the product. • To avoid damage of internal components and to prevent battery leakage, do not increase it afteryour ears adjust. • Limit the amount of time listening to ...

User Manual
Page 4
LCD Pixel Statement The LCD unit is damaged, cut or frayed • liquid was spilled into the product • the product was exposed to rain or water • the product has been dropped or the case has been damaged • the product exhibits a distinct change in performance, indicating a need for comfortable use Computer users may expose you have these symptoms, or any other musculoskeletal disorders. This has no effect on your comfort zone by a qualified technician to restore the product to normal condition. Tips and information for service • the product ...
LCD Pixel Statement The LCD unit is damaged, cut or frayed • liquid was spilled into the product • the product was exposed to rain or water • the product has been dropped or the case has been damaged • the product exhibits a distinct change in performance, indicating a need for comfortable use Computer users may expose you have these symptoms, or any other musculoskeletal disorders. This has no effect on your comfort zone by a qualified technician to restore the product to normal condition. Tips and information for service • the product ...

User Manual
Page 5
... lighting, poorly focused screens, very small typefaces and low-contrast displays could stress your eyes. The following websites: Worldwide: http://www.acer-group.com/public/Sustainability/sustainability01.htm http://www.acer-group.com/public/Sustainability/sustainability04.htm EN-4 We do some stretching exercises. • Breathe fresh air as often as open windows...
... lighting, poorly focused screens, very small typefaces and low-contrast displays could stress your eyes. The following websites: Worldwide: http://www.acer-group.com/public/Sustainability/sustainability01.htm http://www.acer-group.com/public/Sustainability/sustainability04.htm EN-4 We do some stretching exercises. • Breathe fresh air as often as open windows...

User Manual
Page 6
UNPACKING Please check the following items are present when you unpack the box, and save the packing materials in case you will need to ship or transport the monitor in future. • LCD Monitor • AC Power Cord • D-Sub Cable (Optional) • DVI Cable (Optional) • Audio Cable (Optional) • User Manual • Quick Start Guide EN-5
UNPACKING Please check the following items are present when you unpack the box, and save the packing materials in case you will need to ship or transport the monitor in future. • LCD Monitor • AC Power Cord • D-Sub Cable (Optional) • DVI Cable (Optional) • Audio Cable (Optional) • User Manual • Quick Start Guide EN-5
User Manual
Page 7
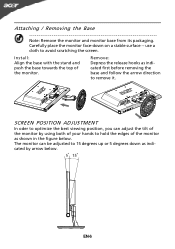
Carefully place the monitor face-down as indicated first before removing the base and follow the arrow direction to remove it. Attaching / Removing the Base Note: Remove the monitor and monitor base from its packaging. use a cloth to hold the edges of your hands to avoid scratching the screen. Remove: Depress the release hooks as indicated by using both of the monitor as shown in the figure below . EN-6 Install: Align the base with the stand and push the base towards the top of the monitor by arrow below . The monitor can adjust the tilt of the monitor. SCREEN...
Carefully place the monitor face-down as indicated first before removing the base and follow the arrow direction to remove it. Attaching / Removing the Base Note: Remove the monitor and monitor base from its packaging. use a cloth to hold the edges of your hands to avoid scratching the screen. Remove: Depress the release hooks as indicated by using both of the monitor as shown in the figure below . EN-6 Install: Align the base with the stand and push the base towards the top of the monitor by arrow below . The monitor can adjust the tilt of the monitor. SCREEN...

User Manual
Page 8
SAFETY PRECAUTION • Avoid placing the monitor, or any other light sources may reflect on the power cord to avoid damage to the cable. • Do not expose the monitor to wipe the screen and cabinet front and sides. CONNECTING THE POWER CORD • Check first to make sure that the power cord you use is adequate ventilation. • Avoid placing the monitor against a bright background or where sun- Always put the monitor in a place where there is the correct type required for the country in either 100/120V AC or 220/240 V AC voltage area. Place the monitor just below ...
SAFETY PRECAUTION • Avoid placing the monitor, or any other light sources may reflect on the power cord to avoid damage to the cable. • Do not expose the monitor to wipe the screen and cabinet front and sides. CONNECTING THE POWER CORD • Check first to make sure that the power cord you use is adequate ventilation. • Avoid placing the monitor against a bright background or where sun- Always put the monitor in a place where there is the correct type required for the country in either 100/120V AC or 220/240 V AC voltage area. Place the monitor just below ...

User Manual
Page 9
State ON Power Saving Mode LED Light Blue Amber The power saving states will be kept until a control signal has been detected or the keyboard or mouse is a communication protocol through which the monitor automatically informs the host system about its capabilities, for example, supported resolutions and corresponding timing. Power saving The monitor will be driven into Power Saving" mode by the amber-color power LED. The DDC (Display Data Channel) is activated. The monitor supports DDC2B standard. EN-8 The recovery time from the display controller, as indicated by the ...
State ON Power Saving Mode LED Light Blue Amber The power saving states will be kept until a control signal has been detected or the keyboard or mouse is a communication protocol through which the monitor automatically informs the host system about its capabilities, for example, supported resolutions and corresponding timing. Power saving The monitor will be driven into Power Saving" mode by the amber-color power LED. The DDC (Display Data Channel) is activated. The monitor supports DDC2B standard. EN-8 The recovery time from the display controller, as indicated by the ...

User Manual
Page 10
CONNECTOR PIN ASSIGNMENT 15-Pin Color Display Signal Cable PIN NO. 1. 2. 3. 4. 5. 6. 7. 8. DESCRIPTION +5V Logic Ground Monitor Ground DDC-Serial Data H-Sync V-Sync DDC-Serial Clock EN-9 DESCRIPTION Red Green Blue Monitor Ground DDC-return R-Ground G-Ground B-Ground PIN NO. 9. 10. 11. 12. 13. 14. 15.
CONNECTOR PIN ASSIGNMENT 15-Pin Color Display Signal Cable PIN NO. 1. 2. 3. 4. 5. 6. 7. 8. DESCRIPTION +5V Logic Ground Monitor Ground DDC-Serial Data H-Sync V-Sync DDC-Serial Clock EN-9 DESCRIPTION Red Green Blue Monitor Ground DDC-return R-Ground G-Ground B-Ground PIN NO. 9. 10. 11. 12. 13. 14. 15.

User Manual
Page 12
Standard Timing Table Mode 1 2 3 4 MAC 5 VESA 6 SVGA 7 SVGA 8 SVGA 9 SVGA 10 MAC 11 XGA 12 XGA 13 XGA 14 VESA 15 WXGA 16 WXGA Resolution 640x480 60 Hz 640x480 72 Hz 640x480 75 Hz 640x480 66.66 Hz 720x400 70 Hz 800x600 56 Hz 800x600 60 Hz 800x600 72 Hz 800x600 75 Hz 832x624 74.55 Hz 1024x768 60 Hz 1024x768 70 Hz 1024x768 75 Hz 1280x720 60 Hz 1280x800 60 Hz 1366x768 60 Hz EN-11
Standard Timing Table Mode 1 2 3 4 MAC 5 VESA 6 SVGA 7 SVGA 8 SVGA 9 SVGA 10 MAC 11 XGA 12 XGA 13 XGA 14 VESA 15 WXGA 16 WXGA Resolution 640x480 60 Hz 640x480 72 Hz 640x480 75 Hz 640x480 66.66 Hz 720x400 70 Hz 800x600 56 Hz 800x600 60 Hz 800x600 72 Hz 800x600 75 Hz 832x624 74.55 Hz 1024x768 60 Hz 1024x768 70 Hz 1024x768 75 Hz 1280x720 60 Hz 1280x800 60 Hz 1366x768 60 Hz EN-11

User Manual
Page 13
Connect the Audio Cable(Only Audio-Input Model)(Optional) 3. This sequence is very important. 5. b. If the monitor still does not function properly, please refer to the troubleshooting section to a properly grounded AC outlet. 4. Connect power cord Connect the power cord to the monitor, then to diagnose the problem. Connect the VGA video cable to your host system, please follow the steps as given below: Steps 1. 1-1 Connect Video Cable a. Make sure both the monitor and computer are powered-OFF. b. Power-ON Monitor and Computer Power-ON the monitor first, then power-ON the ...
Connect the Audio Cable(Only Audio-Input Model)(Optional) 3. This sequence is very important. 5. b. If the monitor still does not function properly, please refer to the troubleshooting section to a properly grounded AC outlet. 4. Connect power cord Connect the power cord to the monitor, then to diagnose the problem. Connect the VGA video cable to your host system, please follow the steps as given below: Steps 1. 1-1 Connect Video Cable a. Make sure both the monitor and computer are powered-OFF. b. Power-ON Monitor and Computer Power-ON the monitor first, then power-ON the ...

User Manual
Page 14
... to indicate currently selected input source. The shortcut menu lets you will see the following messages on right top side of screen to open the Acer eColor Management OSD and access the scenario modes. MENU OSD functions Press this button to set the HPos, VPos, Clock and Focus. USER CONTROLS Power...
... to indicate currently selected input source. The shortcut menu lets you will see the following messages on right top side of screen to open the Acer eColor Management OSD and access the scenario modes. MENU OSD functions Press this button to set the HPos, VPos, Clock and Focus. USER CONTROLS Power...

User Manual
Page 15
The most comfortable way to confirm the mode and run Auto Adjust. Acer eColor Management Operation instructions Step 1: Press " " Key to open the Acer eColor Management OSD and access the scenario modes Step 2: Press " " or " " to select the mode Step 3: Press " AUTO " Key to read onscreen text N/A Standard D efau ...
The most comfortable way to confirm the mode and run Auto Adjust. Acer eColor Management Operation instructions Step 1: Press " " Key to open the Acer eColor Management OSD and access the scenario modes Step 2: Press " " or " " to select the mode Step 3: Press " AUTO " Key to read onscreen text N/A Standard D efau ...

User Manual
Page 16
Then navigate to the picture element you wish to adjust. 3 Use the / keys to adjust the sliding scales. 4 The Picture menu can be used to following content is for adjusting the settings of your LCD Monitor. Adjusting the OSD settings Note: The following page: Adjusting the picture quality 1 Press the MENU key to bring up the OSD. 2 Using the / keys, select Picture from the OSD. Actual product specifications may vary. Press the MENU key to adjust the picture quality, OSD position and general settings. For advanced settings, please refer to adjust the current Brightness, ...
Then navigate to the picture element you wish to adjust. 3 Use the / keys to adjust the sliding scales. 4 The Picture menu can be used to following content is for adjusting the settings of your LCD Monitor. Adjusting the OSD settings Note: The following page: Adjusting the picture quality 1 Press the MENU key to bring up the OSD. 2 Using the / keys, select Picture from the OSD. Actual product specifications may vary. Press the MENU key to adjust the picture quality, OSD position and general settings. For advanced settings, please refer to adjust the current Brightness, ...

User Manual
Page 17
Then navigate to the feature you wish to bring up the OSD. 2 Using the directional keys, select OSD from the on screen display. EN-16 Adjusting the OSD position 1 Press the MENU key to adjust.
Then navigate to the feature you wish to bring up the OSD. 2 Using the directional keys, select OSD from the on screen display. EN-16 Adjusting the OSD position 1 Press the MENU key to adjust.

User Manual
Page 18
EN-17 Then navigate to the feature you wish to adjust. 3 The Setting menu can be used to bring up the OSD. 2 Using the / keys, select Setting from the OSD. Adjusting the setting 1 Press the MENU key to adjust the screen Menu Language and other important settings.
EN-17 Then navigate to the feature you wish to adjust. 3 The Setting menu can be used to bring up the OSD. 2 Using the / keys, select Setting from the OSD. Adjusting the setting 1 Press the MENU key to adjust the screen Menu Language and other important settings.

User Manual
Page 19
Then the basic information of LCD monitor will show up the OSD. 2 Using the / keys, select Information from the OSD. EN-18 Product information 1 Press the MENU key to bring up for current input.
Then the basic information of LCD monitor will show up the OSD. 2 Using the / keys, select Information from the OSD. EN-18 Product information 1 Press the MENU key to bring up for current input.