
User Manual
Page 3
...Modules (DIMM 17 2.4 Expansion Slot (PCI Express Slot 18 2.5 Dual Graphics Operation Guide 19 2.6 Dual Monitor and Surround Display Features 21 2.7 ASRock Smart Remote Installation Guide 24 2.8 Jumpers Setup 25 2.9 Onboard Headers and Connectors 26 2.10 Serial ATA3 (SATA3) Hard Disks Installation 30 2.11...-bit / XP / XP 64-bit With RAID Functions 33 2.14.1 Installing Windows® XP / XP 64-bit With RAID Functions 33 2.14.2 Installing Windows® 7 / 7 64-bit / VistaTM / VistaTM 64-bit With RAID Functions 34 2.15 Installing Windows® 7 / 7 64-bit / VistaTM / VistaTM 64-bit / XP...
...Modules (DIMM 17 2.4 Expansion Slot (PCI Express Slot 18 2.5 Dual Graphics Operation Guide 19 2.6 Dual Monitor and Surround Display Features 21 2.7 ASRock Smart Remote Installation Guide 24 2.8 Jumpers Setup 25 2.9 Onboard Headers and Connectors 26 2.10 Serial ATA3 (SATA3) Hard Disks Installation 30 2.11...-bit / XP / XP 64-bit With RAID Functions 33 2.14.1 Installing Windows® XP / XP 64-bit With RAID Functions 33 2.14.2 Installing Windows® 7 / 7 64-bit / VistaTM / VistaTM 64-bit With RAID Functions 34 2.15 Installing Windows® 7 / 7 64-bit / VistaTM / VistaTM 64-bit / XP...

User Manual
Page 5
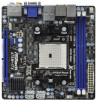
.../support/index.asp 1.1 Package Contents ASRock A75M-ITX Motherboard (Mini-ITX Form Factor: 6.7-in x 6.7-in our support CD for purchasing ASRock A75M-ITX motherboard, a reliable motherboard produced under ASRock's consistently stringent quality control. To get better performance in Windows® 7 / 7 64-bit / VistaTM / VistaTM 64 bit, it is recommended to set the BIOS option in Storage Con guration to...
.../support/index.asp 1.1 Package Contents ASRock A75M-ITX Motherboard (Mini-ITX Form Factor: 6.7-in x 6.7-in our support CD for purchasing ASRock A75M-ITX motherboard, a reliable motherboard produced under ASRock's consistently stringent quality control. To get better performance in Windows® 7 / 7 64-bit / VistaTM / VistaTM 64 bit, it is recommended to set the BIOS option in Storage Con guration to...

User Manual
Page 8
... +3.3V, Vcore OS - ErP/EuP Ready (ErP/EuP ready power supply is required) (see CAUTION 14) Hardware - Chassis Temperature Sensing - Microsoft® Windows® 7 / 7 64-bit / VistaTM / VistaTM 64-bit / XP SP3 / XP 64-bit compliant Certifications - Overclocking may affect your... system stability, or even cause damage to the components and devices of your own risk and expense. ASRock On/Off Play Technology (see CAUTION 12) - CPU Temperature Sensing Monitor - We are not responsible for possible damage caused by overclocking...
... +3.3V, Vcore OS - ErP/EuP Ready (ErP/EuP ready power supply is required) (see CAUTION 14) Hardware - Chassis Temperature Sensing - Microsoft® Windows® 7 / 7 64-bit / VistaTM / VistaTM 64-bit / XP SP3 / XP 64-bit compliant Certifications - Overclocking may affect your... system stability, or even cause damage to the components and devices of your own risk and expense. ASRock On/Off Play Technology (see CAUTION 12) - CPU Temperature Sensing Monitor - We are not responsible for possible damage caused by overclocking...

User Manual
Page 9
...utility. Please be enabled only if the display supports 12bpc in a few clicks without entering operating systems rst like MS-DOS or Windows®. With this motherboard, please refer to the operating system limitation, the actual memory size may be less than 4GB for the... reservation for the latest information. 5. ASRock Extreme Tuning Utility (AXTU) is supported under Windows® 7 64-bit / 7 / VistaTM 64-bit / VistaTM. 6. ASRock website: http://www.asrock.com 8. ASRock website http://www.asrock.com 3. Due to the memory support list on page 13 for the...
...utility. Please be enabled only if the display supports 12bpc in a few clicks without entering operating systems rst like MS-DOS or Windows®. With this motherboard, please refer to the operating system limitation, the actual memory size may be less than 4GB for the... reservation for the latest information. 5. ASRock Extreme Tuning Utility (AXTU) is supported under Windows® 7 64-bit / 7 / VistaTM 64-bit / VistaTM. 6. ASRock website: http://www.asrock.com 8. ASRock website http://www.asrock.com 3. Due to the memory support list on page 13 for the...

User Manual
Page 10
...and/or add new programs. Lower Latency in ACPI S5 mode)! If you can easily recognize which includes below bene ts. 9. ASRock website: http://www.asrock.com/Feature/SmartView/index.asp 11. LAN Application Prioritization: You can con gure your PC enters into an enhanced view for a ...more personal Internet experience. To use SmartView feature, please make sure your OS version is Windows® 7 / 7 64 bit / VistaTM / VistaTM 64 bit, ...
...and/or add new programs. Lower Latency in ACPI S5 mode)! If you can easily recognize which includes below bene ts. 9. ASRock website: http://www.asrock.com/Feature/SmartView/index.asp 11. LAN Application Prioritization: You can con gure your PC enters into an enhanced view for a ...more personal Internet experience. To use SmartView feature, please make sure your OS version is Windows® 7 / 7 64 bit / VistaTM / VistaTM 64 bit, ...

User Manual
Page 19
... cable to PCIE1 slot (blue). Click "AMD VISION Engine Control Center" to operate simultaneously with Windows® VistaTM / XP OS. For any VGA driver installed in a Windows® 7 environment. Currently, AMD Dual Graphics Technology is only supported with Windows® 7 OS, and is not available with combined output to our website for blisteringly...
... cable to PCIE1 slot (blue). Click "AMD VISION Engine Control Center" to operate simultaneously with Windows® VistaTM / XP OS. For any VGA driver installed in a Windows® 7 environment. Currently, AMD Dual Graphics Technology is only supported with Windows® 7 OS, and is not available with combined output to our website for blisteringly...

User Manual
Page 20
Click "AMD CrossFireTM". Reboot your Windows® taskbar to enter AMD VISION Engine Control Center. You can freely enjoy the bene t of Dual Graphics feature. * Dual Graphics appearing here is a registered ...
Click "AMD CrossFireTM". Reboot your Windows® taskbar to enter AMD VISION Engine Control Center. You can freely enjoy the bene t of Dual Graphics feature. * Dual Graphics appearing here is a registered ...

User Manual
Page 22
...is inserted to set up a multi-monitor display. Click "Apply" or "OK" to enter UEFI setup. Set up a surround display environment: 1. For Windows® XP / XP 64-bit OS: Right click the desktop, choose "Properties", and select the "Settings" tab so that you do not adjust the ... select "Primary". Please refer to the following steps to this monitor". Install the onboard VGA driver and the add-on each monitor. F. Click "Extend my Windows desktop onto this motherboard. 4. Enter "Share Memory" option to adjust the memory capability to [32MB], [64MB], [128MB], [256MB] or [512MB] to...
...is inserted to set up a multi-monitor display. Click "Apply" or "OK" to enter UEFI setup. Set up a surround display environment: 1. For Windows® XP / XP 64-bit OS: Right click the desktop, choose "Properties", and select the "Settings" tab so that you do not adjust the ... select "Primary". Please refer to the following steps to this monitor". Install the onboard VGA driver and the add-on each monitor. F. Click "Extend my Windows desktop onto this motherboard. 4. Enter "Share Memory" option to adjust the memory capability to [32MB], [64MB], [128MB], [256MB] or [512MB] to...

User Manual
Page 23
... to the steps below instruction for protecting digital entertainment content that uses the DVI interface. HDCP is designed to four. 6. Click the number "2" icon. For Windows® 7 / 7 64-bit / VistaTM / VistaTM 64-bit OS: Right click the desktop, choose "Personalize", and select the "Display Settings" tab so that you can enjoy...
... to the steps below instruction for protecting digital entertainment content that uses the DVI interface. HDCP is designed to four. 6. Click the number "2" icon. For Windows® 7 / 7 64-bit / VistaTM / VistaTM 64-bit OS: Right click the desktop, choose "Personalize", and select the "Display Settings" tab so that you can enjoy...

User Manual
Page 27
... (GND) to the "FrontMic" Tab in our manual and chassis manual to connect them for AC'97 audio panel. For Windows® XP / XP 64-bit OS: Select "Mixer". Select "Recorder". For Windows® 7 / 7 64-bit / VistaTM / VistaTM 64-bit OS: Go to Ground (GND). Please follow the instruction in the Realtek...
... (GND) to the "FrontMic" Tab in our manual and chassis manual to connect them for AC'97 audio panel. For Windows® XP / XP 64-bit OS: Select "Mixer". Select "Recorder". For Windows® 7 / 7 64-bit / VistaTM / VistaTM 64-bit OS: Go to Ground (GND). Please follow the instruction in the Realtek...

User Manual
Page 33
... diskette will start to format the oppy diskette and copy SATA3 drivers into your optical drive to boot your optical drive rst. E. B. Insert the ASRock Support CD into the oppy diskette. 33 D. Therefore, the drivers you install can be auto-detected and listed on the screen, "Generate Serial ATA... system will lose ALL data in it! Please follow below procedures according to the OS you install. 2.14.1 Installing Windows® XP / XP 64-bit With RAID Functions If you want to install Windows® 7 / 7 64-bit / VistaTM / VistaTM 64-bit / XP / XP 64-bit on a RAID disk composed of...
... diskette will start to format the oppy diskette and copy SATA3 drivers into your optical drive to boot your optical drive rst. E. B. Insert the ASRock Support CD into the oppy diskette. 33 D. Therefore, the drivers you install can be auto-detected and listed on the screen, "Generate Serial ATA... system will lose ALL data in it! Please follow below procedures according to the OS you install. 2.14.1 Installing Windows® XP / XP 64-bit With RAID Functions If you want to install Windows® 7 / 7 64-bit / VistaTM / VistaTM 64-bit / XP / XP 64-bit on a RAID disk composed of...
User Manual
Page 34
... \ RAID Installation Guide STEP 3: Make a SATA3 Driver Diskette. STEP 1: Set up UEFI. A. Please refer to the BIOS RAID installation guide part of Windows® setup, press F6 to install a third-party RAID driver. Select the driver to install according to the OS you install. 2.14.2 Installing... option to [RAID]. Make a SATA3 driver diskette by following path in the following section 2.14.1 step 2 on your system, and follow below steps. Copy Windows® 7 / 7 64-bit / VistaTM / VistaTM 64-bit RAID driver from our support CD to your USB ash rst: VistaTM: \Drivers\Serial ATA ...
... \ RAID Installation Guide STEP 3: Make a SATA3 Driver Diskette. STEP 1: Set up UEFI. A. Please refer to the BIOS RAID installation guide part of Windows® setup, press F6 to install a third-party RAID driver. Select the driver to install according to the OS you install. 2.14.2 Installing... option to [RAID]. Make a SATA3 driver diskette by following path in the following section 2.14.1 step 2 on your system, and follow below steps. Copy Windows® 7 / 7 64-bit / VistaTM / VistaTM 64-bit RAID driver from our support CD to your USB ash rst: VistaTM: \Drivers\Serial ATA ...
User Manual
Page 35
... 2 on your SATA3 HDDs without RAID functions, please follow below steps. After reading the oppy disk, the driver will be presented. STEP 2: Install Windows® XP / XP 64-bit OS on your system. 35 page, please insert the USB ash to your system. STEP 3: Install...; XP / XP 64-bit OS on your system. When prompt- ed, insert the SATA3 driver diskette containing the AMD AHCI driver. At the beginning of Windows® setup, press F6 to [AHCI]. B. Set the "SATA Mode" option to install a third-party AHCI driver. You can continue the OS installation...
... 2 on your SATA3 HDDs without RAID functions, please follow below steps. After reading the oppy disk, the driver will be presented. STEP 2: Install Windows® XP / XP 64-bit OS on your system. 35 page, please insert the USB ash to your system. STEP 3: Install...; XP / XP 64-bit OS on your system. When prompt- ed, insert the SATA3 driver diskette containing the AMD AHCI driver. At the beginning of Windows® setup, press F6 to [AHCI]. B. Set the "SATA Mode" option to install a third-party AHCI driver. You can continue the OS installation...

User Manual
Page 36
... Advanced screen Storage Con guration. Set the "SATA Mode" option to [AHCI]. 2.15.2 Installing Windows® 7 / 7 64-bit / VistaTM / VistaTM 64-bit Without RAID Functions If you want to install Windows® 7 / 7 64-bit / VistaTM / VistaTM 64-bit on your SATA3 HDDs without NCQ...SETUP UTILITY Advanced screen Storage Con guration. A. Set the "SATA Mode" option to [IDE]. STEP 2: Install Windows® 7 / 7 64-bit / VistaTM / VistaTM 64-bit OS on your system. STEP 2: Install Windows® 7 / 7 64-bit / VistaTM / VistaTM 64-bit OS on your system. 36 Using SATA3...
... Advanced screen Storage Con guration. Set the "SATA Mode" option to [AHCI]. 2.15.2 Installing Windows® 7 / 7 64-bit / VistaTM / VistaTM 64-bit Without RAID Functions If you want to install Windows® 7 / 7 64-bit / VistaTM / VistaTM 64-bit on your SATA3 HDDs without NCQ...SETUP UTILITY Advanced screen Storage Con guration. A. Set the "SATA Mode" option to [IDE]. STEP 2: Install Windows® 7 / 7 64-bit / VistaTM / VistaTM 64-bit OS on your system. STEP 2: Install Windows® 7 / 7 64-bit / VistaTM / VistaTM 64-bit OS on your system. 36 Using SATA3...
User Manual
Page 41
The default is [Auto]. Row Precharge Time (tRP) Use this item to change Four Activate Window (tFAW) Auto/Manual setting. The default is [Auto]. The default is [Auto]. Four Activate Window (tFAW) Use this item to change Row Precharge Time (tRP) Auto/Manual setting. RAS# to CAS# Delay (tRCD) Use this item to...
The default is [Auto]. Row Precharge Time (tRP) Use this item to change Four Activate Window (tFAW) Auto/Manual setting. The default is [Auto]. The default is [Auto]. Four Activate Window (tFAW) Use this item to change Row Precharge Time (tRP) Auto/Manual setting. RAS# to CAS# Delay (tRCD) Use this item to...

User Manual
Page 43
... guration. This convenient UEFI update tool allows you can update your UEFI only in a few clicks without entering operating systems rst like MS-DOS or Windows®. Please be noted that the USB ash drive or hard drive must use FAT32/16/12 le system. Just launch this tool and save...
... guration. This convenient UEFI update tool allows you can update your UEFI only in a few clicks without entering operating systems rst like MS-DOS or Windows®. Please be noted that the USB ash drive or hard drive must use FAT32/16/12 le system. Just launch this tool and save...

User Manual
Page 44
... power supplies. Use this item to [Enabled]. If you enable the item "Core C6 Mode". Package C6 Mode This item appears only when you install Windows® 7 / VistaTM and want to enable this function, please set this item to enable or disable Core C6 mode. The default value is [Enabled]. 3.4.1 CPU...
... power supplies. Use this item to [Enabled]. If you enable the item "Core C6 Mode". Package C6 Mode This item appears only when you install Windows® 7 / VistaTM and want to enable this function, please set this item to enable or disable Core C6 mode. The default value is [Enabled]. 3.4.1 CPU...

User Manual
Page 50
ACPI HPET table Use this motherboard to enable or disable ACPI HPET Table. The default value is [Enabled]. Please set this option to [Enabled] if you plan to use this item to submit Windows® VistaTM certi cation. 50
ACPI HPET table Use this motherboard to enable or disable ACPI HPET Table. The default value is [Enabled]. Please set this option to [Enabled] if you plan to use this item to submit Windows® VistaTM certi cation. 50

User Manual
Page 51
... you have USB compatibility issue, it is selected. The default value is [Enabled]. 51 USB devices are not allowed to use under UEFI setup and Windows / Linux OS. 3.4.7 USB Configuration USB 2.0 Controller Use this item to enable or disable the use of USB 3.0 controller. USB devices are allowed to use only...
... you have USB compatibility issue, it is selected. The default value is [Enabled]. 51 USB devices are not allowed to use under UEFI setup and Windows / Linux OS. 3.4.7 USB Configuration USB 2.0 Controller Use this item to enable or disable the use of USB 3.0 controller. USB devices are allowed to use only...
User Manual
Page 56
...motherboard features. 4.2.1 Running The Support CD To begin using the support CD, insert the CD into your OS documentation for more about ASRock, welcome to know more information. 4.2 Support CD Information The Support CD that came with the motherboard contains necessary drivers and useful ... Drivers Menu shows the available devices drivers if the system detects the installed devices. Software Support 4.1 Install Operating System This motherboard supports various Microsoft® Windows® operating systems: 7 / 7 64-bit / VistaTM / VistaTM 64-bit / XP SP3 / XP 64-bit. Click on the le "...
...motherboard features. 4.2.1 Running The Support CD To begin using the support CD, insert the CD into your OS documentation for more about ASRock, welcome to know more information. 4.2 Support CD Information The Support CD that came with the motherboard contains necessary drivers and useful ... Drivers Menu shows the available devices drivers if the system detects the installed devices. Software Support 4.1 Install Operating System This motherboard supports various Microsoft® Windows® operating systems: 7 / 7 64-bit / VistaTM / VistaTM 64-bit / XP SP3 / XP 64-bit. Click on the le "...


