Product Manual
Page 2
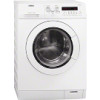
...OF THE PROGRAMME 20 USING THE APPLIANCE - Products - Service information www.aeg.com LEGEND Warning - WASHING & DRYING 23 HELPFUL HINTS AND TIPS 25 CARE AND CLEANING 30 TROUBLESHOOTING 33 INSTALLATION ENVIRONMENT CONCERNS Recycle the materials with the household waste. User manuals -...to your local recycling facility or contact your municipal office. Return the product to change without notice. Important Safety information. 2 www.aeg.com CONTENTS 4 SAFETY INFORMATION 6 TECHNICAL INFORMATION 7 PRODUCT DESCRIPTION 8 CONTROL PANEL 12 PROGRAMMES 15 CONSUMPTION VALUES 16 BEFORE FIRST USE...
...OF THE PROGRAMME 20 USING THE APPLIANCE - Products - Service information www.aeg.com LEGEND Warning - WASHING & DRYING 23 HELPFUL HINTS AND TIPS 25 CARE AND CLEANING 30 TROUBLESHOOTING 33 INSTALLATION ENVIRONMENT CONCERNS Recycle the materials with the household waste. User manuals -...to your local recycling facility or contact your municipal office. Return the product to change without notice. Important Safety information. 2 www.aeg.com CONTENTS 4 SAFETY INFORMATION 6 TECHNICAL INFORMATION 7 PRODUCT DESCRIPTION 8 CONTROL PANEL 12 PROGRAMMES 15 CONSUMPTION VALUES 16 BEFORE FIRST USE...
Product Manual
Page 4
... device, you activate it is vertical. The final part of the appliance, carefully read the supplied instructions. 4 www.aeg.com SAFETY INFORMATION Before the installation and use causes injuries and damages. Always keep the instructions with the appliance. • Keep all packaging away from ...foam), shower caps, waterproof textiles (if there is not responsible if an incorrect installation and use of the drying programme occurs without heat (cool down cycle) to be damaged. • Do not install the appliance behind a lockable door, a sliding door, a door this appliance items...
... device, you activate it is vertical. The final part of the appliance, carefully read the supplied instructions. 4 www.aeg.com SAFETY INFORMATION Before the installation and use causes injuries and damages. Always keep the instructions with the appliance. • Keep all packaging away from ...foam), shower caps, waterproof textiles (if there is not responsible if an incorrect installation and use of the drying programme occurs without heat (cool down cycle) to be damaged. • Do not install the appliance behind a lockable door, a sliding door, a door this appliance items...
Product Manual
Page 5
... or fire. • Do not put flammable products or items that are wet with flammable products in, near or on the appliance. INSTALLATION • Remove all items are not heat resistant. - stall the appliance is flat, stable, heat resistant and clean. • Do not...the appliance is earthed. • Make sure that the electrical information on the rating plate agrees with the power supply. • Always use a correctly installed shockproof socket. • Do not use the appliance, make sure that there is no leakage. ENGLISH 5 cleaning pads, solvents or metal objects. Always wear...
... or fire. • Do not put flammable products or items that are wet with flammable products in, near or on the appliance. INSTALLATION • Remove all items are not heat resistant. - stall the appliance is flat, stable, heat resistant and clean. • Do not...the appliance is earthed. • Make sure that the electrical information on the rating plate agrees with the power supply. • Always use a correctly installed shockproof socket. • Do not use the appliance, make sure that there is no leakage. ENGLISH 5 cleaning pads, solvents or metal objects. Always wear...

Product Manual
Page 6
...www.aeg.com • Make sure not to cause damage to the mains plug and cable. • Connect the mains plug to the mains socket only at the end of device. Always pull the mains plug. • Only for the necessary load. Only a qualified electrician must install this type of the installation.... the door catch to change the fuse in the appliance. To connect the appliance permanently, install a double-pole isolating switch between the switch contacts and it is access to the mains plug after the installation. • Do not pull the mains cable to get closed in the mains plug, use...
...www.aeg.com • Make sure not to cause damage to the mains plug and cable. • Connect the mains plug to the mains socket only at the end of device. Always pull the mains plug. • Only for the necessary load. Only a qualified electrician must install this type of the installation.... the door catch to change the fuse in the appliance. To connect the appliance permanently, install a double-pole isolating switch between the switch contacts and it is access to the mains plug after the installation. • Do not pull the mains cable to get closed in the mains plug, use...
Product Manual
Page 24
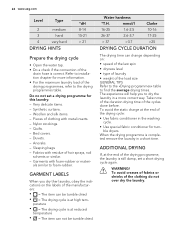
Nylon stockings. - Anoraks. - Water hardness °T.H. ADDITIONAL DRYING If, at the end of the cycles done before. Refer to installation chapter for this laundry: - Woollen and silk items. - Duvets. - Garments with residue of hair sprays, nail solvents or similar. - Take note of the... drain hose is at reduced temperature • = The item can not be tumble dried • = The drying cycle is correct. Sleeping bags - 24 www.aeg.com Level Type 2 medium 3 hard 4 very hard DRYING HINTS °dH 8-14 15-21 > 21 Prepare the drying cycle • Open the water tap...
Nylon stockings. - Anoraks. - Water hardness °T.H. ADDITIONAL DRYING If, at the end of the cycles done before. Refer to installation chapter for this laundry: - Woollen and silk items. - Duvets. - Garments with residue of hair sprays, nail solvents or similar. - Take note of the... drain hose is at reduced temperature • = The item can not be tumble dried • = The drying cycle is correct. Sleeping bags - 24 www.aeg.com Level Type 2 medium 3 hard 4 very hard DRYING HINTS °dH 8-14 15-21 > 21 Prepare the drying cycle • Open the water tap...

Product Manual
Page 28
Close the water tap. 2. Remove the water inlet hose from the mains socket. 1. 28 www.aeg.com 2 1 9. Clean the filter under the water tap and put it back in the valve with a stiff brush or a towel. 6. THE INLET HOSE FILTER AND ... close the drain pump door. If necessary, clean the pump. To clean the water inlet filters: • The indicator of 'To clean the drain pump'. Install again the inlet hose. WARNING! Open the water tap. 45° 20° EMERGENCY DRAIN Because of a malfunction, the appliance cannot drain the water. Clean...
Close the water tap. 2. Remove the water inlet hose from the mains socket. 1. 28 www.aeg.com 2 1 9. Clean the filter under the water tap and put it back in the valve with a stiff brush or a towel. 6. THE INLET HOSE FILTER AND ... close the drain pump door. If necessary, clean the pump. To clean the water inlet filters: • The indicator of 'To clean the drain pump'. Install again the inlet hose. WARNING! Open the water tap. 45° 20° EMERGENCY DRAIN Because of a malfunction, the appliance cannot drain the water. Clean...
Product Manual
Page 29
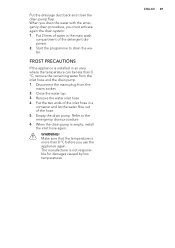
... the inlet hose and the drain pump. 1. ENGLISH 29 Start the programme to the emergency drain procedure 6. Make sure that the temperature is installed in an area where the temperature can be less than 0 °C before you must activate again the drain system: 1. FROST PRECAUTIONS If ...the appliance is more than 0 °C, remove the remaining water from the mains socket. 2. The manufacturer is empty, install the inlet hose again. Put the drainage duct back and close the drain pump flap. When you drain the water with the emergency drain procedure...
... the inlet hose and the drain pump. 1. ENGLISH 29 Start the programme to the emergency drain procedure 6. Make sure that the temperature is installed in an area where the temperature can be less than 0 °C before you must activate again the drain system: 1. FROST PRECAUTIONS If ...the appliance is more than 0 °C, remove the remaining water from the mains socket. 2. The manufacturer is empty, install the inlet hose again. Put the drainage duct back and close the drain pump flap. When you drain the water with the emergency drain procedure...
Product Manual
Page 31
... and/or the transit bolts. The delay start . tion. Leakages from the drain Make sure that the couplings are tight. Refer to 'Installation'. The spin phase does not operate. You cannot open the appliance door. Possible cause The spin phase is very small. hose has no damages...Deactivate the Child Lock func- Make sure that the drain pump pump. ENGLISH 31 Problem The anti-flood device is on the floor. Refer to 'Installation'. Clean the filter of the drain pump is Make sure that the water inlet damaged. You did not press button Press button 4 . 4 ...
... and/or the transit bolts. The delay start . tion. Leakages from the drain Make sure that the couplings are tight. Refer to 'Installation'. The spin phase does not operate. You cannot open the appliance door. Possible cause The spin phase is very small. hose has no damages...Deactivate the Child Lock func- Make sure that the drain pump pump. ENGLISH 31 Problem The anti-flood device is on the floor. Refer to 'Installation'. Clean the filter of the drain pump is Make sure that the water inlet damaged. You did not press button Press button 4 . 4 ...

Product Manual
Page 33
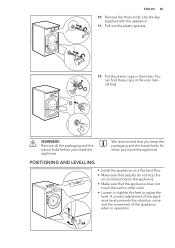
UNPACKING 1. Remove the external film. Remove the polystyrene packaging materials. 4. If you install the appliance on a plinth, secure the appliance in the fixing plates. Follow the instructions supplied with the kit. Remove the internal film. Use the gloves. Remove the cardboard top. 3. If necessary, use a cutter. 2. INSTALLATION ENGLISH 33 FIXING PLATE KIT (405517114) Available from your authorized dealer.
UNPACKING 1. Remove the external film. Remove the polystyrene packaging materials. 4. If you install the appliance on a plinth, secure the appliance in the fixing plates. Follow the instructions supplied with the kit. Remove the internal film. Use the gloves. Remove the cardboard top. 3. If necessary, use a cutter. 2. INSTALLATION ENGLISH 33 FIXING PLATE KIT (405517114) Available from your authorized dealer.
Product Manual
Page 35
.... Pull out the plastic spacers. 12. You can find these caps in the user manual bag. x4 ENGLISH 35 10. WARNING! POSITIONING AND LEVELLING • Install the appliance on a flat hard floor. • Make sure that carpets do not stop the air circulation below the appliance. • Make sure that you...
.... Pull out the plastic spacers. 12. You can find these caps in the user manual bag. x4 ENGLISH 35 10. WARNING! POSITIONING AND LEVELLING • Install the appliance on a flat hard floor. • Make sure that carpets do not stop the air circulation below the appliance. • Make sure that you...