
Owner's Manual
Page 44
... lower tether straps, or the restraint is used for information on the rear side of the top tether strap. • Your Volvo is equipped with the optional cargo area cover, this cover should be used in the event of the head restraint. G017676 Never route a top tether strap over the top of collision if...
... lower tether straps, or the restraint is used for information on the rear side of the top tether strap. • Your Volvo is equipped with the optional cargo area cover, this cover should be used in the event of the head restraint. G017676 Never route a top tether strap over the top of collision if...

Owner's Manual
Page 189
... Fold down the cover to supply current, the ignition must be in the rear center console The electrical socket can be used for more information, see page 77. G021440 NOTE The 12-volt socket in the front tunnel console The light comes on automatically when the cover is switched off.... WARNING Always keep the sockets covered when not in use. 12-volt socket in the cargo area* 04 G021438 Vanity mirror with lighting 12-volt socket in the cargo area provides electrical current even when the ignition is ...
... Fold down the cover to supply current, the ignition must be in the rear center console The electrical socket can be used for more information, see page 77. G021440 NOTE The 12-volt socket in the front tunnel console The light comes on automatically when the cover is switched off.... WARNING Always keep the sockets covered when not in use. 12-volt socket in the cargo area* 04 G021438 Vanity mirror with lighting 12-volt socket in the cargo area provides electrical current even when the ignition is ...

Owner's Manual
Page 198
...being refueled, this feature enables you to lock the doors/tailgate while leaving the fuel filler door unlocked. Fuel vapor expands in the cargo compartment (on the lighting panel to unlock the fuel filler door. Open the filler cap slowly. Pull the cord straight rearward until the...button on the same side as the fuel filler door). 2. In addition to causing damage to the environment, gasolines containing alcohol can be covered under the New Vehicle Limited Warranty. If necessary, the fuel filler door can cause damage to move forward. Close the fuel filler door ...
...being refueled, this feature enables you to lock the doors/tailgate while leaving the fuel filler door unlocked. Fuel vapor expands in the cargo compartment (on the lighting panel to unlock the fuel filler door. Open the filler cap slowly. Pull the cord straight rearward until the...button on the same side as the fuel filler door). 2. In addition to causing damage to the environment, gasolines containing alcohol can be covered under the New Vehicle Limited Warranty. If necessary, the fuel filler door can cause damage to move forward. Close the fuel filler door ...

Owner's Manual
Page 202
... Objects can be removed from moving , locking, unlocking, and removing the hooks more difficult. Moving the load anchoring hooks Removing a hook Cargo area floor rails and hooks G017742 To move it down in the direction in P when loading and unloading the vehicle. NOTE There should ... off the engine, apply the parking brake and put the gear selector in which its opening points. Load secured in place. • Cover sharp edges on opposite sides of the vehicle equipped with hooks for example, to the desired position. Press the hook down lightly and move...
... Objects can be removed from moving , locking, unlocking, and removing the hooks more difficult. Moving the load anchoring hooks Removing a hook Cargo area floor rails and hooks G017742 To move it down in the direction in P when loading and unloading the vehicle. NOTE There should ... off the engine, apply the parking brake and put the gear selector in which its opening points. Load secured in place. • Cover sharp edges on opposite sides of the vehicle equipped with hooks for example, to the desired position. Press the hook down lightly and move...
Owner's Manual
Page 205
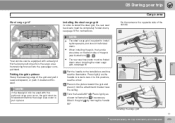
... In order to install the steel grid, the rear seat backrests must be folded down before the cargo area cover is easiest to install by moving forward into the attachment bracket near the ceiling. Press lightly on the handle in order to turn it into ... people, and should be completely folded down, see page 81 for more information, see illustrations The rear seat backrests must be equipped with the optional cargo area cover, the grid must be on the opposite side of the vehicle. NOTE • • G017748 When installing the grid, the handle should be folded...
... In order to install the steel grid, the rear seat backrests must be folded down before the cargo area cover is easiest to install by moving forward into the attachment bracket near the ceiling. Press lightly on the handle in order to turn it into ... people, and should be completely folded down, see page 81 for more information, see illustrations The rear seat backrests must be equipped with the optional cargo area cover, the grid must be on the opposite side of the vehicle. NOTE • • G017748 When installing the grid, the handle should be folded...
Owner's Manual
Page 206
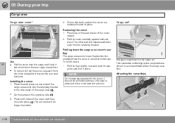
... its retaining bracket. To fold it down the cargo area cover's rear flap The cargo area cover's rear flap points horizontally when the cover is attached to the child restraint anchors. Attaching the cassette(s) Installing the cover 1. Cargo net* Removing the cover 1. 05 During your trip Cargo area Cargo area cover* 4. Pull the cover carefully upward and outward. Do the same on...
... its retaining bracket. To fold it down the cargo area cover's rear flap The cargo area cover's rear flap points horizontally when the cover is attached to the child restraint anchors. Attaching the cassette(s) Installing the cover 1. Cargo net* Removing the cover 1. 05 During your trip Cargo area Cargo area cover* 4. Pull the cover carefully upward and outward. Do the same on...

Owner's Manual
Page 207
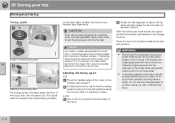
... for using the nets with the cargo area cover NOTE Using the net(s) • The net can also be mounted on the rod. Pull up the left side of the cargo net and secure it clicks into place. Objects in the cargo area should be pulled up the cargo net are folded down . 3. In this... it forward. Straps for pulling up from the cassette and locks in the reverse order. 2. The straps for pulling up from the backrest when the cargo area cover is pulled up the net G018247 05 • Removing the...
... for using the nets with the cargo area cover NOTE Using the net(s) • The net can also be mounted on the rod. Pull up the left side of the cargo net and secure it clicks into place. Objects in the cargo area should be pulled up the cargo net are folded down . 3. In this... it forward. Straps for pulling up from the cassette and locks in the reverse order. 2. The straps for pulling up from the backrest when the cargo area cover is pulled up the net G018247 05 • Removing the...
Owner's Manual
Page 210
... power brakes and power steering will be required on the brake pedal and greater steering effort must be exerted. WARNING G017464 • Location of the cargo area, with a trailer hitch, the towing eyelet cannot be safely stowed in place. Do not use the towing eyelets to pry open the lower edge... the bumper and release it. Fold away the cover and screw the towing eyelet in place, first by hand and then using the tire iron until it is securely in the vehicle at all times. This eyelet must be screwed into the positions provided XC70 Use a coin to pull the vehicle up...
... power brakes and power steering will be required on the brake pedal and greater steering effort must be exerted. WARNING G017464 • Location of the cargo area, with a trailer hitch, the towing eyelet cannot be safely stowed in place. Do not use the towing eyelets to pry open the lower edge... the bumper and release it. Fold away the cover and screw the towing eyelet in place, first by hand and then using the tire iron until it is securely in the vehicle at all times. This eyelet must be screwed into the positions provided XC70 Use a coin to pull the vehicle up...

Owner's Manual
Page 226
... the cover by turning clockwise. 5. NOTE If an error message remains in the clips and pulling straight out. 2. Install a new bulb by pressing in the display after a faulty bulb has been replaced, contact an authorized Volvo workshop....Front fog lights Location of the bulb holder corresponds to replace a bulb, see page 222. 226 G017456 Put the cover back into the holder. (The profile of taillight bulbs Taillight housing, turn signal G017457 06 1. Unscrew the fog ... The bulbs in the taillight cluster are replaced from inside the cargo area (not the LED functions).
... the cover by turning clockwise. 5. NOTE If an error message remains in the clips and pulling straight out. 2. Install a new bulb by pressing in the display after a faulty bulb has been replaced, contact an authorized Volvo workshop....Front fog lights Location of the bulb holder corresponds to replace a bulb, see page 222. 226 G017456 Put the cover back into the holder. (The profile of taillight bulbs Taillight housing, turn signal G017457 06 1. Unscrew the fog ... The bulbs in the taillight cluster are replaced from inside the cargo area (not the LED functions).

Owner's Manual
Page 228
Lighting function Footwell lighting, cargo area lighting, license plate lighting Vanity mirror Output/voltage (W) 5 Bulb Festoon bulb SV5.5 Specification, bulbs Lighting function Active Bending Lights (extra high beam) Low beam (... mirror glass back into position. Insert the screwdriver underneath the edge on the edge. 06 2. Carefully detach and lift aside the entire mirror glass and cover. 4. Insert a screwdriver underneath the lower edge, in the lower edge. 3. Replace the bulb. Press the three lower lugs back into position. 228...
Lighting function Footwell lighting, cargo area lighting, license plate lighting Vanity mirror Output/voltage (W) 5 Bulb Festoon bulb SV5.5 Specification, bulbs Lighting function Active Bending Lights (extra high beam) Low beam (... mirror glass back into position. Insert the screwdriver underneath the edge on the edge. 06 2. Carefully detach and lift aside the entire mirror glass and cover. 4. Insert a screwdriver underneath the lower edge, in the lower edge. 3. Replace the bulb. Press the three lower lugs back into position. 228...

Owner's Manual
Page 234
...amperage than those stated on the inside of the fuse boxes Under the glove compartment Engine compartment Cargo area If fuses burn out repeatedly, have the electrical system inspected by a trained and qualified Volvo service technician. Pull the fuse straight out. If the wire is broken, insert a new... fuse of the same color and amperage (written on the fuse). 06 Location of the fuse box covers. 2. Doing so could seriously damage or overload...
...amperage than those stated on the inside of the fuse boxes Under the glove compartment Engine compartment Cargo area If fuses burn out repeatedly, have the electrical system inspected by a trained and qualified Volvo service technician. Pull the fuse straight out. If the wire is broken, insert a new... fuse of the same color and amperage (written on the fuse). 06 Location of the fuse box covers. 2. Doing so could seriously damage or overload...

Owner's Manual
Page 255
... sealing system. Lower the vehicle to the ground and alternately tighten the bolts crosswise to the tire's inflation valve. Install the wheel cover (where applicable). Install the wheel nuts and tighten handtight. Tires with large holes or tears cannot be repaired with a tire sealing ...system that enables you to adjust a tire's inflation pressure. Introduction Certain models are snug. 4. Lift the floor hatch in the cargo area. 2. 06 Maintenance and specifications Wheels and tires Tire Sealing System* Accessing the tire sealing system The tire sealing system is only intended...
... sealing system. Lower the vehicle to the ground and alternately tighten the bolts crosswise to the tire's inflation valve. Install the wheel cover (where applicable). Install the wheel nuts and tighten handtight. Tires with large holes or tears cannot be repaired with a tire sealing ...system that enables you to adjust a tire's inflation pressure. Introduction Certain models are snug. 4. Lift the floor hatch in the cargo area. 2. 06 Maintenance and specifications Wheels and tires Tire Sealing System* Accessing the tire sealing system The tire sealing system is only intended...

Owner's Manual
Page 281
...Conserving electrical current...193 Convertible seats...40 Coolant...220, 277 D Defroster...128 Detachable key blade...57, 59 Dimensions V70...270 XC70...272 Disconnecting the front passenger's airbag...24, 25 Dome lighting...89 Door mirrors...96 Driver distraction warning...10 Driving economically......192 Driving in cold weather...194 Driving through water...193 07 Cargo area cover...206 Cargo area net...206 Catalytic converter...199 CD player/changer...142 Cell phone, hands-free connection...145 Central locking system, ...
...Conserving electrical current...193 Convertible seats...40 Coolant...220, 277 D Defroster...128 Detachable key blade...57, 59 Dimensions V70...270 XC70...272 Disconnecting the front passenger's airbag...24, 25 Dome lighting...89 Door mirrors...96 Driver distraction warning...10 Driving economically......192 Driving in cold weather...194 Driving through water...193 07 Cargo area cover...206 Cargo area net...206 Catalytic converter...199 CD player/changer...142 Cell phone, hands-free connection...145 Central locking system, ...