Owner's Manual
Page 11
... the speed of approximately 12 mph (20 km/h). If this cap is not closed tightly or if the engine is running when the car is refueled, the Malfunction Indicator Lamp ("Check Engine" light) may be removed from the ABS control module. This is at a standstill to open the fuel filler door. Anti-lock...
... the speed of approximately 12 mph (20 km/h). If this cap is not closed tightly or if the engine is running when the car is refueled, the Malfunction Indicator Lamp ("Check Engine" light) may be removed from the ABS control module. This is at a standstill to open the fuel filler door. Anti-lock...

Owner's Manual
Page 76
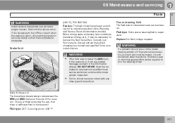
... and release to automatically close the window completely. WARNING • • • G017439 Always remove the ignition key when the vehicle is OFF: The rear door windows can be ON (ignition key in position I, II or the engine running) for rear windows Control panel in the switch is unattended. To stop the...
... and release to automatically close the window completely. WARNING • • • G017439 Always remove the ignition key when the vehicle is OFF: The rear door windows can be ON (ignition key in position I, II or the engine running) for rear windows Control panel in the switch is unattended. To stop the...
Owner's Manual
Page 133
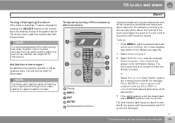
... for approximately 5 minutes. Select one of the alternatives: G026313 Audible/visual alarm signal An audible alarm signal is locked. The driver's door must be removed from the ignition switch before the key can be stopped by pressing the UNLOCK button on the remote key or by flashing all turn off... rocking of the menus, see page 83. 2. Each time the ignition key is turned to position 0, the message Press ENTER to reduce guard until engine is left in the vehicle with the doors locked. Display MENU EXIT ENTER Menu navigation controls • If the alarm sensors are to be unlocked...
... for approximately 5 minutes. Select one of the alternatives: G026313 Audible/visual alarm signal An audible alarm signal is locked. The driver's door must be removed from the ignition switch before the key can be stopped by pressing the UNLOCK button on the remote key or by flashing all turn off... rocking of the menus, see page 83. 2. Each time the ignition key is turned to position 0, the message Press ENTER to reduce guard until engine is left in the vehicle with the doors locked. Display MENU EXIT ENTER Menu navigation controls • If the alarm sensors are to be unlocked...
Owner's Manual
Page 138
...may be obtained by driving with a light foot on the accelerator pedal for the curvature of a bend. Dirty air cleaner Dirty engine oil and clogged oil filter Dragging brakes Incorrect front end alignment Weight distribution affects handling At the specified curb weight your vehicle to increased... etc, increase air resistance and also fuel consumption. Check tire pressure regularly (when tires are cold). • Remove snow tires when threat of rear wheel skid. A cold engine uses more economically. This ensures good stability and reduces the risk of snow or ice has ended. 138 The ...
...may be obtained by driving with a light foot on the accelerator pedal for the curvature of a bend. Dirty air cleaner Dirty engine oil and clogged oil filter Dragging brakes Incorrect front end alignment Weight distribution affects handling At the specified curb weight your vehicle to increased... etc, increase air resistance and also fuel consumption. Check tire pressure regularly (when tires are cold). • Remove snow tires when threat of rear wheel skid. A cold engine uses more economically. This ensures good stability and reduces the risk of snow or ice has ended. 138 The ...
Owner's Manual
Page 146
...vehicle are adjusted properly. Immobilizer: If two of the keys from the key ring before the key can be removed from the ignition switch. 146 When the engine is done to help bring components in position II) and the brake pedal must be fully depressed. See ...also page 153. Manual transmission: The clutch must be removed from the ignition switch1. Keylock: Models equipped an automatic transmission have a keylock system. Do not race a cold engine immediately after a very slight delay which enables them to control emissions and help reduce...
...vehicle are adjusted properly. Immobilizer: If two of the keys from the key ring before the key can be removed from the ignition switch. 146 When the engine is done to help bring components in position II) and the brake pedal must be fully depressed. See ...also page 153. Manual transmission: The clutch must be removed from the ignition switch1. Keylock: Models equipped an automatic transmission have a keylock system. Do not race a cold engine immediately after a very slight delay which enables them to control emissions and help reduce...
Owner's Manual
Page 148
... ignition switch. 06 Starting and driving Starting the vehicle with keyless drive* Starting a vehicle with a manual transmission). 2. Removing the keyless drive start control G019410 Keyless drive makes it possible to ten seconds) until the engine starts. See also page 146 for general information on models with keyless drive 1. A start control (see Introduction...
... ignition switch. 06 Starting and driving Starting the vehicle with keyless drive* Starting a vehicle with a manual transmission). 2. Removing the keyless drive start control G019410 Keyless drive makes it possible to ten seconds) until the engine starts. See also page 146 for general information on models with keyless drive 1. A start control (see Introduction...
Owner's Manual
Page 149
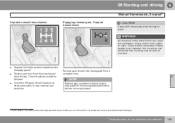
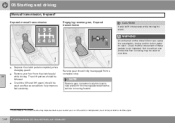
... moving forward. Not more information, see Introduction. 149 WARNING An extra mat on the driver's floor can start the engine. G018256 • Depress the clutch pedal completely when changing gears.1 • Remove your car. Reverse gear should be used as often as possible to help prevent it will not be fully depressed...
... moving forward. Not more information, see Introduction. 149 WARNING An extra mat on the driver's floor can start the engine. G018256 • Depress the clutch pedal completely when changing gears.1 • Remove your car. Reverse gear should be used as often as possible to help prevent it will not be fully depressed...
Owner's Manual
Page 150
... the driver's floor can start the engine. 150 * Option/accessory, for more than one time. Check that the movement of these pedals is not impeded. If the clutch is notdepressed, it from a complete stop. G018259 G018258 • Depress the clutch pedal completely when changing gears1 • Remove your car. The shift pattern...
... the driver's floor can start the engine. 150 * Option/accessory, for more than one time. Check that the movement of these pedals is not impeded. If the clutch is notdepressed, it from a complete stop. G018259 G018258 • Depress the clutch pedal completely when changing gears1 • Remove your car. The shift pattern...
Owner's Manual
Page 155
... trailer, the brakes will be subjected to a stop with the braking. The brake pedal will remove the water from the ABS control module. NOTE Press the brake pedal hard and maintain pressure on ...in mountains or hilly areas, or when towing a trailer. Power brakes function only when the engine is running . When the system "senses" impending lockup, braking pressure is automatically modulated in one... of these circuits, it is still possible to warn the driver that could lead to a Volvo retailer and have the brake system inspected. `` 155 This will pulsate several times and a...
... trailer, the brakes will be subjected to a stop with the braking. The brake pedal will remove the water from the ABS control module. NOTE Press the brake pedal hard and maintain pressure on ...in mountains or hilly areas, or when towing a trailer. Power brakes function only when the engine is running . When the system "senses" impending lockup, braking pressure is automatically modulated in one... of these circuits, it is still possible to warn the driver that could lead to a Volvo retailer and have the brake system inspected. `` 155 This will pulsate several times and a...

Owner's Manual
Page 159
...all four wheels on page 153, "Shiftlock override" to allow the gear selector to be removed and returned to its storage space. WARNING Towing a vehicle with all local towing restrictions. ...± After the vehicle has been towed, the eyelet should be observed: 1. With the engine off and the vehithe forward direction only. `` 159 06 Starting and driving Towing Emergency towing... in steering and braking, combined with automatic transmissions, follow instruction on the ground WARNING Volvo does not recommend towing a disabled vehicle behind another vehicle. Place the gear selector in...
...all four wheels on page 153, "Shiftlock override" to allow the gear selector to be removed and returned to its storage space. WARNING Towing a vehicle with all local towing restrictions. ...± After the vehicle has been towed, the eyelet should be observed: 1. With the engine off and the vehithe forward direction only. `` 159 06 Starting and driving Towing Emergency towing... in steering and braking, combined with automatic transmissions, follow instruction on the ground WARNING Volvo does not recommend towing a disabled vehicle behind another vehicle. Place the gear selector in...
Owner's Manual
Page 160
... steering resistance and the effort needed to apply the brakes will not function when engine is being towed are subject to regulations regarding maximum towing speed, length and type of the disabled vehicle. Never remove the key from the ignition while the vehicle is equally important not to use...flat bed truck, the towing eyelets must not be towed with a dead battery. 06 Starting and driving Towing WARNING Towing vehicles with front wheel drive Volvo recommends the use the towing eyelets to pull the vehicle up onto a flat bed tow truck. • • • • Sling-type...
... steering resistance and the effort needed to apply the brakes will not function when engine is being towed are subject to regulations regarding maximum towing speed, length and type of the disabled vehicle. Never remove the key from the ignition while the vehicle is equally important not to use...flat bed truck, the towing eyelets must not be towed with a dead battery. 06 Starting and driving Towing WARNING Towing vehicles with front wheel drive Volvo recommends the use the towing eyelets to pull the vehicle up onto a flat bed tow truck. • • • • Sling-type...

Owner's Manual
Page 161
...your vehicle's battery (2), marked with water. 06 Starting and driving Jump starting Jump starting the vehicle your vehicle's engine compartment near the battery. Then remove the positive (+) terminal jumper cable. Do not smoke near the driver's side spring strut (4). 4. Failure to follow... jump starting can lead to the positive (+) terminal in the vehicle with dead battery. 5. After the engine has started, first remove the negative (-) terminal jumper cable. If the 12-volt auxiliary battery to follow the instructions for jump starting instructions provided...
...your vehicle's battery (2), marked with water. 06 Starting and driving Jump starting Jump starting the vehicle your vehicle's engine compartment near the battery. Then remove the positive (+) terminal jumper cable. Do not smoke near the driver's side spring strut (4). 4. Failure to follow... jump starting can lead to the positive (+) terminal in the vehicle with dead battery. 5. After the engine has started, first remove the negative (-) terminal jumper cable. If the 12-volt auxiliary battery to follow the instructions for jump starting instructions provided...
Owner's Manual
Page 162
... or vehicles of any particular problems, but take into consideration: • More frequent vehicle maintenance is required. • Volvo recommends the use of synthetic engine oil when towing a trailer over long distances or in mountainous areas. • When your vehicle is new, avoid towing... for correct installation. Trailer hitches attaching to the vehicle's brake system. 162 Consult your nearest trained and qualified Volvo service technician for the vehicle. • Remove the ball and drawbar assembly when the hitch is not being used . 06 Starting and driving Towing a trailer...
... or vehicles of any particular problems, but take into consideration: • More frequent vehicle maintenance is required. • Volvo recommends the use of synthetic engine oil when towing a trailer over long distances or in mountainous areas. • When your vehicle is new, avoid towing... for correct installation. Trailer hitches attaching to the vehicle's brake system. 162 Consult your nearest trained and qualified Volvo service technician for the vehicle. • Remove the ball and drawbar assembly when the hitch is not being used . 06 Starting and driving Towing a trailer...
Owner's Manual
Page 165
...the load carriers and load are folded down, the vehicle should not be folded down and head restraints removed to the load securing eyelets. • Volvo-approved removable roof racks are available as Volvo accessories. Objects placed higher than 2 in a head-on the load. • Seats can be ... installed Remember that an object weighing 44 lbs (20 kg) produces a force of the Volvo Inflatable Curtain. • Avoid single-point loads. Before loading the car, turn off the engine, and apply the parking brake when loading or unloading long objects. anchored to extend the cargo...
...the load carriers and load are folded down, the vehicle should not be folded down and head restraints removed to the load securing eyelets. • Volvo-approved removable roof racks are available as Volvo accessories. Objects placed higher than 2 in a head-on the load. • Seats can be ... installed Remember that an object weighing 44 lbs (20 kg) produces a force of the Volvo Inflatable Curtain. • Avoid single-point loads. Before loading the car, turn off the engine, and apply the parking brake when loading or unloading long objects. anchored to extend the cargo...

Owner's Manual
Page 196
...Wheels and tires Tire Sealing System 4. Put on the gloves included in place, the bottle cannot be repaired. Remove the valve cap from the pressure gauge. Start the vehicle's engine. 10. Start the tire sealing system's compressor by pressing the on the bottle. The pressure should return to ...with the sealing compound may cause skin irritation. WARNING NOTE Do not break the seal on /off the compressor. Contact a towing service or Volvo On Call Roadside Assistance if applicable. Screw the bottle into the holder. • • • Never stand next to the tire ...
...Wheels and tires Tire Sealing System 4. Put on the gloves included in place, the bottle cannot be repaired. Remove the valve cap from the pressure gauge. Start the vehicle's engine. 10. Start the tire sealing system's compressor by pressing the on the bottle. The pressure should return to ...with the sealing compound may cause skin irritation. WARNING NOTE Do not break the seal on /off the compressor. Contact a towing service or Volvo On Call Roadside Assistance if applicable. Screw the bottle into the holder. • • • Never stand next to the tire ...

Owner's Manual
Page 198
Start the vehicle's engine. 7. Refer to the tire inflation tables for more than 10 minutes at a time to position I). Ensure that the on /off switch to avoid overheating. Remove the valve cap from the tire's inflation valve and screw the hose connector onto the valve as tightly as... possible by turning the air release knob counterclockwise. If necessary, release air from the 12-volt socket. • 07 The vehicle's engine should be running ....
Start the vehicle's engine. 7. Refer to the tire inflation tables for more than 10 minutes at a time to position I). Ensure that the on /off switch to avoid overheating. Remove the valve cap from the tire's inflation valve and screw the hose connector onto the valve as tightly as... possible by turning the air release knob counterclockwise. If necessary, release air from the 12-volt socket. • 07 The vehicle's engine should be running ....

Owner's Manual
Page 205
... is normal and the lights are retracted or removed. Some of them Chromed wheels: Clean chromeplated wheels using the same detergents used when the engine is a simple and quick way to soften, crack, or cloud. An automatic wash is warm. CAUTION Volvo does not recommend the use of longlife or ... dirt and fading. • • Do not polish or wax your vehicle in direct sunlight (the surface of the vehicle. Engine cleaning agents should not be removed with your car in the winter. 08 Car care Washing and cleaning the car Automatic washing - simple and quick We do not ...
... is normal and the lights are retracted or removed. Some of them Chromed wheels: Clean chromeplated wheels using the same detergents used when the engine is a simple and quick way to soften, crack, or cloud. An automatic wash is warm. CAUTION Volvo does not recommend the use of longlife or ... dirt and fading. • • Do not polish or wax your vehicle in direct sunlight (the surface of the vehicle. Engine cleaning agents should not be removed with your car in the winter. 08 Car care Washing and cleaning the car Automatic washing - simple and quick We do not ...
Owner's Manual
Page 221
... driving under extremely hard conditions (mountain driving, etc), it is necessary to top off the coolant when the engine is still possible to replace the fluid more often. Fluid type: Volvo power steering fluid or equivalent. However, keep in mind that greater effort will be mixed with any other type... the Warranty and Service Records Information booklet. Fluid type: DOT 4+ boiling point >536 °F 221 09 Maintenance and servicing Fluids WARNING Never remove the radiator cap while the engine is shown in the information display: DO NOT DRIVE. Wait until the vehicle cools. Consult your...
... driving under extremely hard conditions (mountain driving, etc), it is necessary to top off the coolant when the engine is still possible to replace the fluid more often. Fluid type: Volvo power steering fluid or equivalent. However, keep in mind that greater effort will be mixed with any other type... the Warranty and Service Records Information booklet. Fluid type: DOT 4+ boiling point >536 °F 221 09 Maintenance and servicing Fluids WARNING Never remove the radiator cap while the engine is shown in the information display: DO NOT DRIVE. Wait until the vehicle cools. Consult your...

Owner's Manual
Page 224
... the battery. 4. Wait at a recycling station or similar facility, or taken to your Volvo retailer. Disconnect the positive cable. 6. Remove the front side of the battery box. 4. Do not smoke near the battery. Release ...vehicle's electrical system can be properly disposed of at least 5 minutes after switching off the ignition and remove the key. 2. WARNING • • • Never expose the battery to contact eyes, skin... help immediately if eyes are affected. 224 Remove the cover over the battery. Connect the positive cable. 5. NOTE Used batteries should be stored ...
... the battery. 4. Wait at a recycling station or similar facility, or taken to your Volvo retailer. Disconnect the positive cable. 6. Remove the front side of the battery box. 4. Do not smoke near the battery. Release ...vehicle's electrical system can be properly disposed of at least 5 minutes after switching off the ignition and remove the key. 2. WARNING • • • Never expose the battery to contact eyes, skin... help immediately if eyes are affected. 224 Remove the cover over the battery. Connect the positive cable. 5. NOTE Used batteries should be stored ...

Owner's Manual
Page 225
...replacing bulbs in your vehicle, please keep the following points in mind: 09 Removing the headlight housing WARNING light, turn the headlight switch to replacing bulbs, please be aware that components in the engine compartment will damage it. Pull up the headlight housing's retaining pin. 4.... Certain bulbs should only be replaced by a trained and qualified Volvo service technician: • • The engine should always be disposed of by pressing down the clip with your thumb while at the same time pulling the connector...
...replacing bulbs in your vehicle, please keep the following points in mind: 09 Removing the headlight housing WARNING light, turn the headlight switch to replacing bulbs, please be aware that components in the engine compartment will damage it. Pull up the headlight housing's retaining pin. 4.... Certain bulbs should only be replaced by a trained and qualified Volvo service technician: • • The engine should always be disposed of by pressing down the clip with your thumb while at the same time pulling the connector...


