Owner's Manual
Page 4
......13 00 01 02 01 Safety 02 Instruments and controls Occupant safety...Seat belts...Supplemental Restraint System...Occupant Weight Sensor (OWS)...Side impact protection airbags...Volvo Inflatable Curtain (VIC)...Whiplash Protection System...Crash mode...Child safety...Child restraint systems...Infant seats...Convertible seats...Booster cushions...ISOFIX lower anchors...Top tether anchors...*...Personal settings...HomeLink® Wireless Control System*... 50 53 55 57 60 62 63 66 68 70 72 74 75 76 78 81 83 86 4 * Option/accessory, for more information, see Introduction.
......13 00 01 02 01 Safety 02 Instruments and controls Occupant safety...Seat belts...Supplemental Restraint System...Occupant Weight Sensor (OWS)...Side impact protection airbags...Volvo Inflatable Curtain (VIC)...Whiplash Protection System...Crash mode...Child safety...Child restraint systems...Infant seats...Convertible seats...Booster cushions...ISOFIX lower anchors...Top tether anchors...*...Personal settings...HomeLink® Wireless Control System*... 50 53 55 57 60 62 63 66 68 70 72 74 75 76 78 81 83 86 4 * Option/accessory, for more information, see Introduction.
Owner's Manual
Page 5
Contents 03 Climate General information...92 Air vents...94 Manual climate control...95 Electronic Climate Control (ECC)*...98 Air distribution...101 03 04 05 04 Interior 05 Locks and alarm Front seats...Interior lighting...Storage compartments...Rear seat...Trunk ...104 109 111 115 117 Remote key and key blade...Valet locking ...Keyless drive*...Locking and unlocking...Child safety locks...Alarm*... 120 124 125 129 131 132 * Option/accessory, for more information, see Introduction. 5
Contents 03 Climate General information...92 Air vents...94 Manual climate control...95 Electronic Climate Control (ECC)*...98 Air distribution...101 03 04 05 04 Interior 05 Locks and alarm Front seats...Interior lighting...Storage compartments...Rear seat...Trunk ...104 109 111 115 117 Remote key and key blade...Valet locking ...Keyless drive*...Locking and unlocking...Child safety locks...Alarm*... 120 124 125 129 131 132 * Option/accessory, for more information, see Introduction. 5
Owner's Manual
Page 6
... (TPMS) 176 179 181 182 183 185 186 188 189 190 191 192 194 199 Washing and cleaning the car...204 Paint touch up...208 6 * Option/accessory, for more information, see Introduction.
... (TPMS) 176 179 181 182 183 185 186 188 189 190 191 192 194 199 Washing and cleaning the car...204 Paint touch up...208 6 * Option/accessory, for more information, see Introduction.
Owner's Manual
Page 10
... to the emission control system(s) may be difficult or impossible to cause cancer, and birth defects or other reproductive harm. Optional or accessory equipment may contain Perchlorate material. You should be familiar with these requirements. Please note that country's applicable safety.... Special handling may not be available in the U.S., Canada and other reproductive harm. Optional or accessory equipment may apply for reference. Shiftlock (automatic transmission) When your Volvo not certifiable for legal operation in all countries or markets. For this position, turn...
... to the emission control system(s) may be difficult or impossible to cause cancer, and birth defects or other reproductive harm. Optional or accessory equipment may contain Perchlorate material. You should be familiar with these requirements. Please note that country's applicable safety.... Special handling may not be available in the U.S., Canada and other reproductive harm. Optional or accessory equipment may apply for reference. Shiftlock (automatic transmission) When your Volvo not certifiable for legal operation in all countries or markets. For this position, turn...
Owner's Manual
Page 34
...attempt to reset CRASH MODE to start control, see any signs of the safety systems, the brake system, etc. 3. Remove the ignition key or optional keyless drive start the vehicle. 01 Safety 01 Crash mode Driving after a collision fuel lines, sensors for one or more of the safety systems ... more of the seat belt pretensioners) has deployed. This could make it should only be driven or towed (pulled by a trained and qualified Volvo service technician. After CRASH MODE SEE MANUAL has been displayed, if you may be concealed damage that the vehicle's functionality has been reduced. This...
...attempt to reset CRASH MODE to start control, see any signs of the safety systems, the brake system, etc. 3. Remove the ignition key or optional keyless drive start the vehicle. 01 Safety 01 Crash mode Driving after a collision fuel lines, sensors for one or more of the safety systems ... more of the seat belt pretensioners) has deployed. This could make it should only be driven or towed (pulled by a trained and qualified Volvo service technician. After CRASH MODE SEE MANUAL has been displayed, if you may be concealed damage that the vehicle's functionality has been reduced. This...
Owner's Manual
Page 48
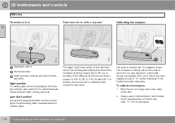
Instrument overview...Instrument panel...Indicator and warning symbols...Symbols - instrument panel...Information display...12-volt sockets...Lighting panel...Left-side steering wheel lever...Trip computer...Cruise control*...Right-side steering wheel lever...Steering wheel adjustment, Hazard warning flashers...Parking brake...Power windows...Mirrors...Power moonroof*...Personal settings...HomeLink® Wireless Control System*... 50 53 55 57 60 62 63 66 68 70 72 74 75 76 78 81 83 86 48 * Option/accessory, for more information, see Introduction. G020901
Instrument overview...Instrument panel...Indicator and warning symbols...Symbols - instrument panel...Information display...12-volt sockets...Lighting panel...Left-side steering wheel lever...Trip computer...Cruise control*...Right-side steering wheel lever...Steering wheel adjustment, Hazard warning flashers...Parking brake...Power windows...Mirrors...Power moonroof*...Personal settings...HomeLink® Wireless Control System*... 50 53 55 57 60 62 63 66 68 70 72 74 75 76 78 81 83 86 48 * Option/accessory, for more information, see Introduction. G020901
Owner's Manual
Page 51
... brake 12-volt socket Courtesy lighting switch Driver's side reading light Passenger's side reading light Seat belt reminder and Occupant Weight Sensor indicator Position for optional equipment Position for optional equipment 02 * Option/accessory, for more information, see Introduction. 51
... brake 12-volt socket Courtesy lighting switch Driver's side reading light Passenger's side reading light Seat belt reminder and Occupant Weight Sensor indicator Position for optional equipment Position for optional equipment 02 * Option/accessory, for more information, see Introduction. 51

Owner's Manual
Page 54
... briefly to measure short distances. A long press (more than 2 seconds) resets the currently selected trip odometer. 02 Instruments and controls Instrument panel odometer, trip odometers, optional rain sensor, and cruise control. 02 Trip odometer reset button - The trip odometers are used to switch between the odometer for the car's total mileage...
... briefly to measure short distances. A long press (more than 2 seconds) resets the currently selected trip odometer. 02 Instruments and controls Instrument panel odometer, trip odometers, optional rain sensor, and cruise control. 02 Trip odometer reset button - The trip odometers are used to switch between the odometer for the car's total mileage...

Owner's Manual
Page 55
...have their functions illustrated, depending on until the parking brake has been released. Follow the instructions provided, or contact a trained and qualified Volvo service technician. When the engine starts, all of the instrument panel If the red warning symbol lights up: 1. The message can ...and controls Indicator and warning symbols Function check The indicator and warning symbols1 light up when you turn the ignition key or the optional keyless drive start control to a message in the information display. This shows that could affect the car's drivability.This symbol ...
...have their functions illustrated, depending on until the parking brake has been released. Follow the instructions provided, or contact a trained and qualified Volvo service technician. When the engine starts, all of the instrument panel If the red warning symbol lights up: 1. The message can ...and controls Indicator and warning symbols Function check The indicator and warning symbols1 light up when you turn the ignition key or the optional keyless drive start control to a message in the information display. This shows that could affect the car's drivability.This symbol ...

Owner's Manual
Page 62
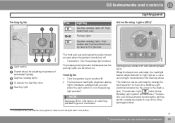
..., etc. Auxiliary equipment The buttons to the left of the 12-volt socket can be used to plug in position I (or higher) for Volvo-installed optional or auxiliary equipment. 12-volt socket (rear seat) G026349 12-volt socket, auxiliary equipment The 12-volt socket can be used for a cigarette ...a cigarette lighter. 02 Instruments and controls 12-volt sockets 12-volt socket (front seat) 02 NOTE The cover should be purchased from your Volvo retailer. Ashtrays/cigarette lighter The auxiliary socket can be kept on when the auxiliary socket is 10 A. NOTE The 12-volt socket in use.
..., etc. Auxiliary equipment The buttons to the left of the 12-volt socket can be used to plug in position I (or higher) for Volvo-installed optional or auxiliary equipment. 12-volt socket (rear seat) G026349 12-volt socket, auxiliary equipment The 12-volt socket can be used for a cigarette ...a cigarette lighter. 02 Instruments and controls 12-volt sockets 12-volt socket (front seat) 02 NOTE The cover should be purchased from your Volvo retailer. Ashtrays/cigarette lighter The auxiliary socket can be kept on when the auxiliary socket is 10 A. NOTE The 12-volt socket in use.
Owner's Manual
Page 63
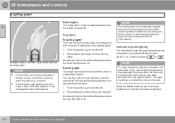
... turning the lighting switch to the Active Bending Light position (indicated by turning the lighting switch counterclockwise to movements of the other lighting positions. G026507 `` * Option/accessory, for adjusting brightness of instrument lighting Daytime running lights) illuminate automatically, except when the light switch (1) is activated, the headlight beams adjust laterally to...
... turning the lighting switch to the Active Bending Light position (indicated by turning the lighting switch counterclockwise to movements of the other lighting positions. G026507 `` * Option/accessory, for adjusting brightness of instrument lighting Daytime running lights) illuminate automatically, except when the light switch (1) is activated, the headlight beams adjust laterally to...
Owner's Manual
Page 64
... II. Press button (5) to less than 500 ft. (150 meters). An indicator light in combination with the high/low beam headlights or the optional front fog lights. 1. The rear fog light will also be activated in twilight or dark conditions, and only when the vehicle is in motion.... Move the thumb wheel (2) up to increase brightness or down to decrease brightness. 64 * Option/accessory, for other vehicles to turn on the rear fog light. The single rear fog light is located in combination with ABL deactivated (left) and...
... II. Press button (5) to less than 500 ft. (150 meters). An indicator light in combination with the high/low beam headlights or the optional front fog lights. 1. The rear fog light will also be activated in twilight or dark conditions, and only when the vehicle is in motion.... Move the thumb wheel (2) up to increase brightness or down to decrease brightness. 64 * Option/accessory, for other vehicles to turn on the rear fog light. The single rear fog light is located in combination with ABL deactivated (left) and...

Owner's Manual
Page 70
... be displayed. • If the speed drops below 20 mph (30 km/h). Momentary acceleration, for approximately a half second and release the button to position N. 70 * Option/accessory, for more information, see Introduction. Press + or - for less than 1 minute (e.g. The cruise control buttons are located on the left side of the instrument...
... be displayed. • If the speed drops below 20 mph (30 km/h). Momentary acceleration, for approximately a half second and release the button to position N. 70 * Option/accessory, for more information, see Introduction. Press + or - for less than 1 minute (e.g. The cruise control buttons are located on the left side of the instrument...
Owner's Manual
Page 71
... by : • Pressing the CRUISE button (CRUISE • ON will be displayed. Putting the gear selector in heavy traffic or when driving on steep downgrades. * Option/accessory, for more information, see Introduction. 71
... by : • Pressing the CRUISE button (CRUISE • ON will be displayed. Putting the gear selector in heavy traffic or when driving on steep downgrades. * Option/accessory, for more information, see Introduction. 71

Owner's Manual
Page 72
... washers Pull the lever toward the steering wheel and release it. The wipers will sweep one stroke at "normal" speed. Low/high beam headlights on Optional Active Bending Lights will be washed once for every five times the windshield is washed. Before using the wipers, ice and snow should be washed...
... washers Pull the lever toward the steering wheel and release it. The wipers will sweep one stroke at "normal" speed. Low/high beam headlights on Optional Active Bending Lights will be washed once for every five times the windshield is washed. Before using the wipers, ice and snow should be washed...
Owner's Manual
Page 73
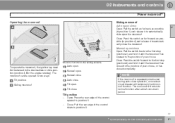
... the lower display. - Thumb wheel The thumb wheel is used to the amount of rain on the previous page) up to increase/decrease the optional rain sensor's sensitivity when the this function is left on, the wipers will sweep the windshield more information, see page 72). Switch on the...is switched off if the key is activated. 02 Manual deactivation The rain sensor can be deactivated when washing the car in the ignition. * Option/accessory, for more frequently) or down . or Moving the windshield wiper lever down (the wipers will appear in the illustration on the windshield ...
... the lower display. - Thumb wheel The thumb wheel is used to the amount of rain on the previous page) up to increase/decrease the optional rain sensor's sensitivity when the this function is left on, the wipers will sweep the windshield more information, see page 72). Switch on the...is switched off if the key is activated. 02 Manual deactivation The rain sensor can be deactivated when washing the car in the ignition. * Option/accessory, for more frequently) or down . or Moving the windshield wiper lever down (the wipers will appear in the illustration on the windshield ...
Owner's Manual
Page 78
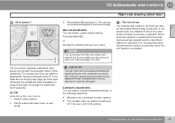
The upper right-hand corner of following traffic and automatically reduces glare. 78 * Option/accessory, for at least 6 seconds. The display shows your car's orientation with compass* Calibrating the compass Day/night control Normal position Night position, reduces ...the car in a large, open area, away from following vehicles, use control (1) to switch between the normal and night-driving positions. Auto-dim function* An optional integrated sensor reacts to headlights from traffic. 2. Eight different directions can be adjusted if the car is initially set for the zone to which the...
The upper right-hand corner of following traffic and automatically reduces glare. 78 * Option/accessory, for at least 6 seconds. The display shows your car's orientation with compass* Calibrating the compass Day/night control Normal position Night position, reduces ...the car in a large, open area, away from following vehicles, use control (1) to switch between the normal and night-driving positions. Auto-dim function* An optional integrated sensor reacts to headlights from traffic. 2. Eight different directions can be adjusted if the car is initially set for the zone to which the...

Owner's Manual
Page 79
... mirrors should always be . After you have adjusted the mirror(s), press the L or R switch again (the LED will go on ) to activate the adjustment control. * Option/accessory, for at a maximum speed of the door mirrors is stored when the vehicle is opened within 2 minutes, the... optional power driver's seat and side door mirrors will go on ) to activate the adjustment control. Press down the L and R mirror control buttons on the driver's ...
... mirrors should always be . After you have adjusted the mirror(s), press the L or R switch again (the LED will go on ) to activate the adjustment control. * Option/accessory, for at a maximum speed of the door mirrors is stored when the vehicle is opened within 2 minutes, the... optional power driver's seat and side door mirrors will go on ) to activate the adjustment control. Press down the L and R mirror control buttons on the driver's ...
Owner's Manual
Page 80
...area." when locking. Blind Spot Information System (BLIS)* The Blind Spot Information System (BLIS) is locked/unlocked with the remote key or with the optional keyless drive system (see page 83). Return to "neutral" position If a mirror has been inadvertently moved (bumped in a parking lot, etc.) ...fold in the mirrors by pressing the L and R mirror control buttons on the driver's door control panel. To do so: 80 * Option/accessory, for detailed information. Fold in or out. This function can be moved back to the fully extended position. 1. Automatic folding When the...
...area." when locking. Blind Spot Information System (BLIS)* The Blind Spot Information System (BLIS) is locked/unlocked with the remote key or with the optional keyless drive system (see page 83). Return to "neutral" position If a mirror has been inadvertently moved (bumped in a parking lot, etc.) ...fold in the mirrors by pressing the L and R mirror control buttons on the driver's door control panel. To do so: 80 * Option/accessory, for detailed information. Fold in or out. This function can be moved back to the fully extended position. 1. Automatic folding When the...
Owner's Manual
Page 81
... be turned to the intermediate or drive position (position I, II or the engine running). Close: Pull the rear edge of the control upward to position 6. `` * Option/accessory, for more information, see Introduction. 81
... be turned to the intermediate or drive position (position I, II or the engine running). Close: Pull the rear edge of the control upward to position 6. `` * Option/accessory, for more information, see Introduction. 81