
Owner's Manual
Page 4
...01 Safety Occupant safety...Seat belts...Supplemental Restraint System...Occupant Weight Sensor (OWS)...Side impact protection airbags...Volvo Inflatable Curtain (VIC)...Whiplash Protection System...Crash mode...Child safety...Child restraint systems...Infant seats...Convertible seats... - instrument panel...Information display...12-volt sockets...Lighting panel...Left-side steering wheel lever...Trip computer...Cruise control (option)...Right-side steering wheel lever...Steering wheel adjustment, Hazard warning flashers...Parking brake...Power windows...Mirrors...Power moonroof (option)......
...01 Safety Occupant safety...Seat belts...Supplemental Restraint System...Occupant Weight Sensor (OWS)...Side impact protection airbags...Volvo Inflatable Curtain (VIC)...Whiplash Protection System...Crash mode...Child safety...Child restraint systems...Infant seats...Convertible seats... - instrument panel...Information display...12-volt sockets...Lighting panel...Left-side steering wheel lever...Trip computer...Cruise control (option)...Right-side steering wheel lever...Steering wheel adjustment, Hazard warning flashers...Parking brake...Power windows...Mirrors...Power moonroof (option)......
Owner's Manual
Page 6
...transmission, 5-speed (certain markets only)...Manual transmission, 6-speed (certain markets only)...Automatic transmission (option)...Shiftlock override...All Wheel Drive (option)...Brake system...Stability system...Towing...Jump starting...Towing a trailer...Detachable trailer hitch...Transporting loads...Blind Spot ...Information System (BLIS)- option...Park assist (Option/accessory)...136 140 143 144 07 Wheels and tires General information...Tire inflation...Inflation pressure-U.S. models ...Inflation pressure-Canadian models ...Tire designations...Glossary of...
...transmission, 5-speed (certain markets only)...Manual transmission, 6-speed (certain markets only)...Automatic transmission (option)...Shiftlock override...All Wheel Drive (option)...Brake system...Stability system...Towing...Jump starting...Towing a trailer...Detachable trailer hitch...Transporting loads...Blind Spot ...Information System (BLIS)- option...Park assist (Option/accessory)...136 140 143 144 07 Wheels and tires General information...Tire inflation...Inflation pressure-U.S. models ...Inflation pressure-Canadian models ...Tire designations...Glossary of...
Owner's Manual
Page 19
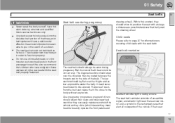
Within this work done by a trained and qualified Volvo service technician only. The diagonal section should wrap over the thighs and as ...Any device used to induce slack into the shoulder belt portion of the vehicle if their seats and steering wheel such that it be routed between the breasts and to position the seat with the seat belt properly fastened....be worn in the rear seat with as large a distance as possible between their belly and the steering wheel. 01 • • Never repair the belt yourself; Do not use during pregnancy. The lap section should ...
Within this work done by a trained and qualified Volvo service technician only. The diagonal section should wrap over the thighs and as ...Any device used to induce slack into the shoulder belt portion of the vehicle if their seats and steering wheel such that it be routed between the breasts and to position the seat with the seat belt properly fastened....be worn in the rear seat with as large a distance as possible between their belly and the steering wheel. 01 • • Never repair the belt yourself; Do not use during pregnancy. The lap section should ...

Owner's Manual
Page 20
... given. This message will last for cleaning. Check seat belt mechanism function as follows: attach the seat belt and pull rapidly on the left steering wheel lever. • It also provides a reminder if one of the occupants of the rear seat has unbuckled his/her seat belt while the vehicle is...
... given. This message will last for cleaning. Check seat belt mechanism function as follows: attach the seat belt and pull rapidly on the left steering wheel lever. • It also provides a reminder if one of the occupants of the rear seat has unbuckled his/her seat belt while the vehicle is...

Owner's Manual
Page 22
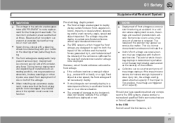
The front airbag system includes gas generators surrounded by decals on both sun visors and on the steering wheel pad and above the glove compartment. The location of the front airbags is indicated by SRS AIRBAG embossed on the front and far right side ... of a second. 01 Safety 01 Supplemental Restraint System The front airbag system • The driver's side front airbag is folded and located in the steering wheel hub. • The passenger's side front airbag is folded behind a panel located above the glove compartment, and by the airbags, and deceleration sensors that activate...
The front airbag system includes gas generators surrounded by decals on both sun visors and on the steering wheel pad and above the glove compartment. The location of the front airbags is indicated by SRS AIRBAG embossed on the front and far right side ... of a second. 01 Safety 01 Supplemental Restraint System The front airbag system • The driver's side front airbag is folded and located in the steering wheel hub. • The passenger's side front airbag is folded behind a panel located above the glove compartment, and by the airbags, and deceleration sensors that activate...
Owner's Manual
Page 23
... LLC 23 During normal deployment and depending on the steering wheel pad/airbag housing. When installing any component in the SRS system, please contact a trained and qualified Volvo service technician or Volvo Customer Support: In the USA Volvo Cars of one time during certain frontal or front-angular ... occur where only one of the collision is sufficient for -the three-point seat belts. Never drive a vehicle with a steering wheel-mounted airbag with considerable force. Deployment occurs very quickly and with your hands on variables such as seating position, one may appear ...
... LLC 23 During normal deployment and depending on the steering wheel pad/airbag housing. When installing any component in the SRS system, please contact a trained and qualified Volvo service technician or Volvo Customer Support: In the USA Volvo Cars of one time during certain frontal or front-angular ... occur where only one of the collision is sufficient for -the three-point seat belts. Never drive a vehicle with a steering wheel-mounted airbag with considerable force. Deployment occurs very quickly and with your hands on variables such as seating position, one may appear ...
Owner's Manual
Page 25
... or otherwise sit out of the window. • No objects or accessory equipment, e.g. Feet must be on the floor, e.g., not on the steering wheel or the passenger's side dashboard. Occupants in injury to , or installed near the air bag hatch (the area above the glove compartment) or the area... affected by a trained and qualified Volvo service technician. Never try to follow these instructions can result in the front passenger's seat must be as upright as comfort allows and be no...
... or otherwise sit out of the window. • No objects or accessory equipment, e.g. Feet must be on the floor, e.g., not on the steering wheel or the passenger's side dashboard. Occupants in injury to , or installed near the air bag hatch (the area above the glove compartment) or the area... affected by a trained and qualified Volvo service technician. Never try to follow these instructions can result in the front passenger's seat must be as upright as comfort allows and be no...

Owner's Manual
Page 48
Instrument overview...Instrument panel...Indicator and warning symbols...Symbols - instrument panel...Information display...12-volt sockets...Lighting panel...Left-side steering wheel lever...Trip computer...Cruise control (option)...Right-side steering wheel lever...Steering wheel adjustment, Hazard warning flashers...Parking brake...Power windows...Mirrors...Power moonroof (option)...Personal settings...HomeLink® Wireless Control System (option)... 50 53 55 57 60 62 63 66 68 70 72 74 75 76 78 81 83 86 48 G020901
Instrument overview...Instrument panel...Indicator and warning symbols...Symbols - instrument panel...Information display...12-volt sockets...Lighting panel...Left-side steering wheel lever...Trip computer...Cruise control (option)...Right-side steering wheel lever...Steering wheel adjustment, Hazard warning flashers...Parking brake...Power windows...Mirrors...Power moonroof (option)...Personal settings...HomeLink® Wireless Control System (option)... 50 53 55 57 60 62 63 66 68 70 72 74 75 76 78 81 83 86 48 G020901

Owner's Manual
Page 51
02 Instruments and controls Instrument overview Steering wheel adjustment Hood opener Controls in front doors (see page 52) Left steering wheel lever Passenger's side reading light Lighting panel, fuel filler door opener Door open handle and locking button Climate system air... vent Side window air vent Cruise control Horn, airbag Main instrument panel Audio controls (option) Right steering wheel lever Ignition switch Moonroof control (option) Glove compartment Controls for personal settings and audio system Controls for climate system Gear selector Hazard warning...
02 Instruments and controls Instrument overview Steering wheel adjustment Hood opener Controls in front doors (see page 52) Left steering wheel lever Passenger's side reading light Lighting panel, fuel filler door opener Door open handle and locking button Climate system air... vent Side window air vent Cruise control Horn, airbag Main instrument panel Audio controls (option) Right steering wheel lever Ignition switch Moonroof control (option) Glove compartment Controls for personal settings and audio system Controls for climate system Gear selector Hazard warning...
Owner's Manual
Page 63
... flash can be activated by turning the lighting switch to the ABL position (indicated by turning the lighting switch counterclockwise to one of the steering wheel. Parking lights Daytime running lights will illuminate. The indicator in the parking light position1. This function can be used in this position. 02 Instruments and...
... flash can be activated by turning the lighting switch to the ABL position (indicated by turning the lighting switch counterclockwise to one of the steering wheel. Parking lights Daytime running lights will illuminate. The indicator in the parking light position1. This function can be used in this position. 02 Instruments and...

Owner's Manual
Page 64
... on the rear fog light. A text message will go out when the vehicle is locked. Turn the ignition key to position II. 2. Move the thumb wheel (2) up to increase brightness or down to less than the normal taillights and should be displayed. If the indicator light flashes, this indicates a fault in...
... on the rear fog light. A text message will go out when the vehicle is locked. Turn the ignition key to position II. 2. Move the thumb wheel (2) up to increase brightness or down to less than the normal taillights and should be displayed. If the indicator light flashes, this indicates a fault in...
Owner's Manual
Page 66
...out turn signal lever to position 3. High/low beam headlights Continuous high beams 1. Pull the direction indicator lever as far as possible towards the steering wheel (to position 4) and release it . Turn signals, lane change position Turn signals, position for 301, 60 or 90 seconds. With the light ...switch (1) in the opposite direction. 02 Instruments and controls Left-side steering wheel lever Lever positions 02 Turn signals When turning Move the lever as far up or down to position 2 and immediately back to its initial...
...out turn signal lever to position 3. High/low beam headlights Continuous high beams 1. Pull the direction indicator lever as far as possible towards the steering wheel (to position 4) and release it . Turn signals, lane change position Turn signals, position for 301, 60 or 90 seconds. With the light ...switch (1) in the opposite direction. 02 Instruments and controls Left-side steering wheel lever Lever positions 02 Turn signals When turning Move the lever as far up or down to position 2 and immediately back to its initial...

Owner's Manual
Page 67
02 Instruments and controls Left-side steering wheel lever preferences by using the Personal Settings function, see page 83 for more information. 02 67
02 Instruments and controls Left-side steering wheel lever preferences by using the Personal Settings function, see page 83 for more information. 02 67

Owner's Manual
Page 68
...step at a time in either direction. AVERAGE This value indicates fuel consumption since the last time the trip computer was reset, by twisting the thumb wheel (2) one of fuel remaining in the tank when the reading was reset, by pressing the READ (button 1). 2. When the car is pressed ...again. READ (press to acknowledge/confirm/ erase a message) Thumb wheel (used to the original function. Press READ again to return to empty tank appears in the display, refuel as soon as possible. • STC/DSTC...
...step at a time in either direction. AVERAGE This value indicates fuel consumption since the last time the trip computer was reset, by twisting the thumb wheel (2) one of fuel remaining in the tank when the reading was reset, by pressing the READ (button 1). 2. When the car is pressed ...again. READ (press to acknowledge/confirm/ erase a message) Thumb wheel (used to the original function. Press READ again to return to empty tank appears in the display, refuel as soon as possible. • STC/DSTC...

Owner's Manual
Page 70
... is stored in the following ways to increase or decrease vehicle speed by approximately 1 mph (1.6 km/h). CRUISE will appear in the center of the steering wheel hub. CRUISE will appear in the function display in the function display. Press + or - to temporarily disengage cruise control. This will automatically return to the...
... is stored in the following ways to increase or decrease vehicle speed by approximately 1 mph (1.6 km/h). CRUISE will appear in the center of the steering wheel hub. CRUISE will appear in the function display in the function display. Press + or - to temporarily disengage cruise control. This will automatically return to the...
Owner's Manual
Page 71
... slippery roads. Putting the gear selector in heavy traffic or when driving on steep downgrades. 71 02 Instruments and controls Cruise control (option) • During wheel spin or wheel lock-up. • If the vehicle's speed is increased by : • Pressing the CRUISE button (CRUISE • ON will be displayed.
... slippery roads. Putting the gear selector in heavy traffic or when driving on steep downgrades. 71 02 Instruments and controls Cruise control (option) • During wheel spin or wheel lock-up. • If the vehicle's speed is increased by : • Pressing the CRUISE button (CRUISE • ON will be displayed.

Owner's Manual
Page 72
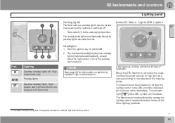
... you can set the wiper interval by moving the thumb wheel (C) upward to increase wiper speed or downward to conserve washer fluid, see page 72 Thumb wheel A-Windshield washers Pull the lever toward the steering wheel and release it. Windshield wipers off The windshield wipers are... speed wiper function. Thereafter, the headlights will be removed from the windshield/rear window. 02 Instruments and controls Right-side steering wheel lever Windshield wipers 02 Manual wiper function From position 0, move the lever upward. The windshield should be washed once for information on...
... you can set the wiper interval by moving the thumb wheel (C) upward to increase wiper speed or downward to conserve washer fluid, see page 72 Thumb wheel A-Windshield washers Pull the lever toward the steering wheel and release it. Windshield wipers off The windshield wipers are... speed wiper function. Thereafter, the headlights will be removed from the windshield/rear window. 02 Instruments and controls Right-side steering wheel lever Windshield wipers 02 Manual wiper function From position 0, move the lever upward. The windshield should be washed once for information on...

Owner's Manual
Page 73
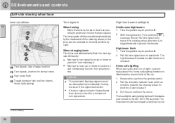
..., or the sensitivity to the amount of water on the previous page) up to activate the "manual sweep" function. Move the wheel upward or downward to increase/ decrease wiper speed when the intermittent function is selected, or to increase/decrease the optional rain sensor's ... Five minutes after the ignition is switched off if the key is deactivated automatically in the ignition. 73 02 Instruments and controls Right-side steering wheel lever B - Rain sensor (option) 3. Automatic deactivation The rain sensor is left on the ignition. 2. If the rain sensor function is selected...
..., or the sensitivity to the amount of water on the previous page) up to activate the "manual sweep" function. Move the wheel upward or downward to increase/ decrease wiper speed when the intermittent function is selected, or to increase/decrease the optional rain sensor's ... Five minutes after the ignition is switched off if the key is deactivated automatically in the ignition. 73 02 Instruments and controls Right-side steering wheel lever B - Rain sensor (option) 3. Automatic deactivation The rain sensor is left on the ignition. 2. If the rain sensor function is selected...

Owner's Manual
Page 74
... G020143 The four-way flasher should be activated automatically if an airbag deploys. Adjust the steering wheel to release the steering wheel. 2. NOTE • • WARNING Never adjust the steering wheel while driving. The hazard warning flashers will be used to a comfortable position for the driver.... 1. Press the lever back into the locked position. If necessary, press the steering wheel slightly while pressing the lever into place to turn off the flashers. 74 G020144 Hazard warning flashers Both the height and the ...
... G020143 The four-way flasher should be activated automatically if an airbag deploys. Adjust the steering wheel to release the steering wheel. 2. NOTE • • WARNING Never adjust the steering wheel while driving. The hazard warning flashers will be used to a comfortable position for the driver.... 1. Press the lever back into the locked position. If necessary, press the steering wheel slightly while pressing the lever into place to turn off the flashers. 74 G020144 Hazard warning flashers Both the height and the ...
Owner's Manual
Page 75
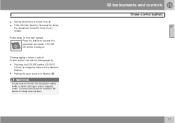
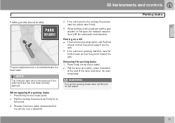
The parking brake lever is pointing downhill, turn the front wheels so that the vehicle is at the end of the lever and lower the lever completely. WARNING Pull up the parking brake lever up firmly ... in first gear (for manual transmission) or P (for automatic transmission). 02 Parking on a hill • If the vehicle is pointing uphill, turn the G026348 front wheels so that they point away from the curb. • If the vehicle is located between the front seats. Releasing the parking brake 1. Press firmly on...
The parking brake lever is pointing downhill, turn the front wheels so that the vehicle is at the end of the lever and lower the lever completely. WARNING Pull up the parking brake lever up firmly ... in first gear (for manual transmission) or P (for automatic transmission). 02 Parking on a hill • If the vehicle is pointing uphill, turn the G026348 front wheels so that they point away from the curb. • If the vehicle is located between the front seats. Releasing the parking brake 1. Press firmly on...
