Owner's Manual
Page 9
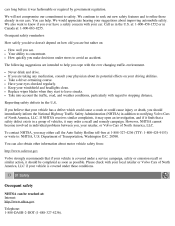
... doesn't depend on how old you are taking any medication, consult your suggestions about motor vehicle safety from: http://www.safercar.gov Volvo strongly recommends that a safety defect exists in a group of North America, LLC. The following suggestions are intended to stopping distance. Never...-458-1552 or in individual problems between you cope with your retailer, or Volvo Cars of vehicles, it may either call the Auto Safety Hotline toll-free at : 1-800-663-8255. Have your windshield and headlights clean. However, NHTSA cannot become involved in Canada at 1-888-327-4236 ...
... doesn't depend on how old you are taking any medication, consult your suggestions about motor vehicle safety from: http://www.safercar.gov Volvo strongly recommends that a safety defect exists in a group of North America, LLC. The following suggestions are intended to stopping distance. Never...-458-1552 or in individual problems between you cope with your retailer, or Volvo Cars of vehicles, it may either call the Auto Safety Hotline toll-free at : 1-800-663-8255. Have your windshield and headlights clean. However, NHTSA cannot become involved in Canada at 1-888-327-4236 ...
Owner's Manual
Page 51
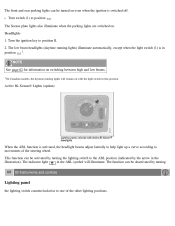
Headlights 1. The low beam headlights (daytime running lights will illuminate. The indicator light in the ABL symbol will remain on even when the ignition is switched off. Turn the ignition ... switched on switching between high and low beams. 1 On Canadian models, the daytime running lights) illuminate automatically, except when the light switch (1) is activated, the headlight beams adjust laterally to help light up a curve according to one of the steering wheel. position NOTE See page 62 for information on . Turn switch...
Headlights 1. The low beam headlights (daytime running lights will illuminate. The indicator light in the ABL symbol will remain on even when the ignition is switched off. Turn the ignition ... switched on switching between high and low beams. 1 On Canadian models, the daytime running lights) illuminate automatically, except when the light switch (1) is activated, the headlight beams adjust laterally to help light up a curve according to one of the steering wheel. position NOTE See page 62 for information on . Turn switch...
Owner's Manual
Page 52
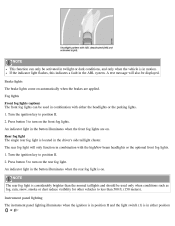
... for other vehicles to turn on the front fog lights. The rear fog light will also be used in combination with the high/low beam headlights or the optional front fog lights. 1. Turn the ignition key to position II. 2. Turn the ignition key to position II. 2. NOTE This...in twilight or dark conditions, and only when the vehicle is in motion. If the indicator light flashes, this indicates a fault in either the headlights or the parking lights. 1. Instrument panel lighting The instrument panel lighting illuminates when the ignition is in position II and the light switch (1) ...
... for other vehicles to turn on the front fog lights. The rear fog light will also be used in combination with the high/low beam headlights or the optional front fog lights. 1. Turn the ignition key to position II. 2. Turn the ignition key to position II. 2. NOTE This...in twilight or dark conditions, and only when the vehicle is in motion. If the indicator light flashes, this indicates a fault in either the headlights or the parking lights. 1. Instrument panel lighting The instrument panel lighting illuminates when the ignition is in position II and the light switch (1) ...
Owner's Manual
Page 54
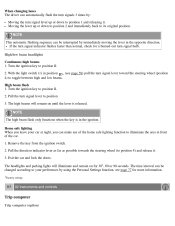
... Moving the turn signal lever up or down to position 1 and releasing it . 3. Exit the car and lock the doors. The headlights and parking lights will remain on for more information. 1 Factory setting 63 02 Instruments and controls Trip computer Trip computer (option) High/low... beam headlights Continuous high beams 1. Turn the ignition key to position II. 2. Remove the key from the ignition switch. 2. NOTE This automatic flashing...
... Moving the turn signal lever up or down to position 1 and releasing it . 3. Exit the car and lock the doors. The headlights and parking lights will remain on for more information. 1 Factory setting 63 02 Instruments and controls Trip computer Trip computer (option) High/low... beam headlights Continuous high beams 1. Turn the ignition key to position II. 2. Remove the key from the ignition switch. 2. NOTE This automatic flashing...
Owner's Manual
Page 58
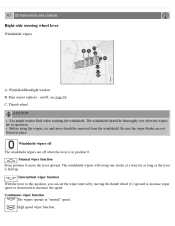
... function. Rain sensor (option) - on/off The windshield wipers are in position 0. 67 02 Instruments and controls Right-side steering wheel lever Windshield wipers A. Windshield/headlight washers B. Intermittent wiper function With the lever in place.
... function. Rain sensor (option) - on/off The windshield wipers are in position 0. 67 02 Instruments and controls Right-side steering wheel lever Windshield wipers A. Windshield/headlight washers B. Intermittent wiper function With the lever in place.
Owner's Manual
Page 59
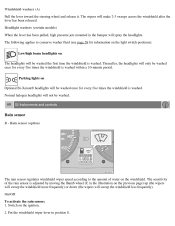
...the previous page) up (the wipers will sweep the windshield more frequently) or down (the wipers will spray the headlights. On/Off To activate the rain sensor: 1. Thereafter, the headlights will not be washed once for every five times the windshield is adjusted by moving the thumb wheel (C in ...only be washed. 68 02 Instruments and controls Rain sensor B - Windshield washers (A) Pull the lever toward the steering wheel and release it. Headlight washers (certain models) When the lever has been pulled, high pressure jets mounted in position 0. The wipers will be washed the first time...
...the previous page) up (the wipers will sweep the windshield more frequently) or down (the wipers will spray the headlights. On/Off To activate the rain sensor: 1. Thereafter, the headlights will not be washed once for every five times the windshield is adjusted by moving the thumb wheel (C in ...only be washed. 68 02 Instruments and controls Rain sensor B - Windshield washers (A) Pull the lever toward the steering wheel and release it. Headlight washers (certain models) When the lever has been pulled, high pressure jets mounted in position 0. The wipers will be washed the first time...
Owner's Manual
Page 65
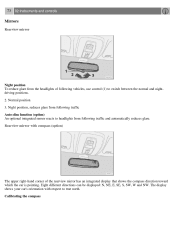
... control (1) to true north. Calibrating the compass Night position, reduces glare from following traffic Auto-dim function (option) An optional integrated sensor reacts to headlights from the headlights of the rearview mirror has an integrated display that shows the compass direction toward which the car is pointing. The display shows your car...
... control (1) to true north. Calibrating the compass Night position, reduces glare from following traffic Auto-dim function (option) An optional integrated sensor reacts to headlights from the headlights of the rearview mirror has an integrated display that shows the compass direction toward which the car is pointing. The display shows your car...
Owner's Manual
Page 148
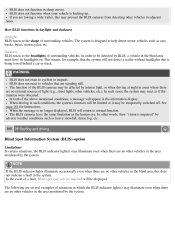
... of surrounding vehicles. The system is backing up. In both of the above mentioned conditions, a message will not detect a trailer without headlights that are no external sources of situations in which the BLIS indicator light(s) may illuminate even when there are towing a wide trailer, this...other vehicles in sharp curves. BLIS does not react to normal function. BLIS does not function when your vehicle is designed to the headlights of surrounding vehicles. Darkness BLIS reacts to help detect motor vehicles such as the human eye. In order to cyclists or mopeds....
... of surrounding vehicles. The system is backing up. In both of the above mentioned conditions, a message will not detect a trailer without headlights that are no external sources of situations in which the BLIS indicator light(s) may illuminate even when there are towing a wide trailer, this...other vehicles in sharp curves. BLIS does not react to normal function. BLIS does not function when your vehicle is designed to the headlights of surrounding vehicles. Darkness BLIS reacts to help detect motor vehicles such as the human eye. In order to cyclists or mopeds....
Owner's Manual
Page 151
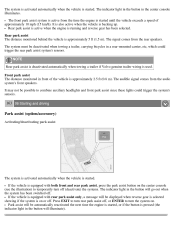
... started . Rear park assist The distance monitored behind the vehicle is used. NOTE Rear park assist is deactivated automatically when towing a trailer if Volvo genuine trailer wiring is approximately 5 ft (1.5 m). Press EXIT to turn rear park assist off, or ENTER to turn off (deactivate) the systems... with both front and rear park assist , press the park assist button on the center console (see the illustration) to combine auxiliary headlights and front park assist since these lights could trigger the rear park assist system's sensors. The signal comes from the audio system's front...
... started . Rear park assist The distance monitored behind the vehicle is used. NOTE Rear park assist is deactivated automatically when towing a trailer if Volvo genuine trailer wiring is approximately 5 ft (1.5 m). Press EXIT to turn rear park assist off, or ENTER to turn off (deactivate) the systems... with both front and rear park assist , press the park assist button on the center console (see the illustration) to combine auxiliary headlights and front park assist since these lights could trigger the rear park assist system's sensors. The signal comes from the audio system's front...

Owner's Manual
Page 174
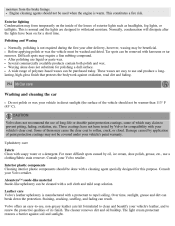
...in an automatic wash during the first six months (because the paint will not have facilities for example when refueling. Exterior components Volvo recommends the use abrasive cleaning agents on the moonroof. The instructions for using the same detergents used 193 08 Car care Washing... chromed strips can wear away or damage the surface Polishes containing abrasive substances should not be as thorough as chromed strips on the headlights can permanently stain chrome-plated wheels. Dirt, snow, etc., on the exterior of the vehicle. Never use of the machine dislodging...
...in an automatic wash during the first six months (because the paint will not have facilities for example when refueling. Exterior components Volvo recommends the use abrasive cleaning agents on the moonroof. The instructions for using the same detergents used 193 08 Car care Washing... chromed strips can wear away or damage the surface Polishes containing abrasive substances should not be as thorough as chromed strips on the headlights can permanently stain chrome-plated wheels. Dirt, snow, etc., on the exterior of the vehicle. Never use of the machine dislodging...
Owner's Manual
Page 175
... These coatings have been on the inside of the lenses of them may not be beneficial. Some of exterior lights such as headlights, fog lights, or taillights. For more difficult spots caused by application of its finish. Interior plastic components Cleaning interior plastic components...material Suede-like upholstery can be removed with your vehicle's paint warranty. Difficult spots may claim to withstand moisture. Consult your Volvo retailer. Several commercially available products contain both polish and wax. Over time, sunlight, grease and dirt can result. The ...
... These coatings have been on the inside of the lenses of them may not be beneficial. Some of exterior lights such as headlights, fog lights, or taillights. For more difficult spots caused by application of its finish. Interior plastic components Cleaning interior plastic components...material Suede-like upholstery can be removed with your vehicle's paint warranty. Difficult spots may claim to withstand moisture. Consult your Volvo retailer. Several commercially available products contain both polish and wax. Over time, sunlight, grease and dirt can result. The ...

Owner's Manual
Page 181
...fault." How Can My Vehicle Fail OBD II Emission Inspection? A vehicle that is available online for inspection. Consult a trained and qualified Volvo service technician for wear. OBD II is part of the windshield, and from other fluid levels are between the indicated "min" and ...range. Inspect the tires for additional information. Check that is refueled: Check the engine oil level Clean the windshield, windshield wipers, headlights, and taillights Monthly: Check cold tire pressure in your vehicle's emission controls. Wipe driver information displays with a glass cleaner and soft...
...fault." How Can My Vehicle Fail OBD II Emission Inspection? A vehicle that is available online for inspection. Consult a trained and qualified Volvo service technician for wear. OBD II is part of the windshield, and from other fluid levels are between the indicated "min" and ...range. Inspect the tires for additional information. Check that is refueled: Check the engine oil level Clean the windshield, windshield wipers, headlights, and taillights Monthly: Check cold tire pressure in your vehicle's emission controls. Wipe driver information displays with a glass cleaner and soft...

Owner's Manual
Page 183
... not recommend the use of oil additives. Dipstick - Washer fluid reservoir 7. Engine oil filler cap 8. Battery 10. Radiator 5. Volvo recommends Castrol. Cooling system expansion tank 2. Power steering fluid reservoir (concealed behind the headlight) 3. engine oil 4. Air cleaner WARNING The cooling fan may start or continue to operate (for up to the Warranty...
... not recommend the use of oil additives. Dipstick - Washer fluid reservoir 7. Engine oil filler cap 8. Battery 10. Radiator 5. Volvo recommends Castrol. Cooling system expansion tank 2. Power steering fluid reservoir (concealed behind the headlight) 3. engine oil 4. Air cleaner WARNING The cooling fan may start or continue to operate (for up to the Warranty...
Owner's Manual
Page 191
Reinstall the cover over the battery. The optional Bi-Xenon® headlight bulbs contain trace amounts of by a trained and qualified Volvo service technician: - Do not smoke near the battery. Certain bulbs should only be properly disposed of bulbs with ...water. High-mounted brake lights - If contact occurs, flush the affected area immediately with your Volvo retailer. Courtesy (dome) lighting - Bi-Xenon® headlights - Connect the ground cable. 6. Glove compartment lights - Turn signals and courtesy lights in the heat and will ...
Reinstall the cover over the battery. The optional Bi-Xenon® headlight bulbs contain trace amounts of by a trained and qualified Volvo service technician: - Do not smoke near the battery. Certain bulbs should only be properly disposed of bulbs with ...water. High-mounted brake lights - If contact occurs, flush the affected area immediately with your Volvo retailer. Courtesy (dome) lighting - Bi-Xenon® headlights - Connect the ground cable. 6. Glove compartment lights - Turn signals and courtesy lights in the heat and will ...
Owner's Manual
Page 192
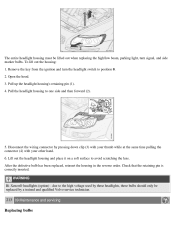
... voltage used by these headlights, these bulbs should only be lifted out when replacing the high/low beam, parking light, turn the headlight switch to position 0. 2. To lift out the housing: 1. Disconnect the wiring connector by a trained and qualified Volvo service technician. 213 09... Maintenance and servicing Replacing bulbs Lift out the headlight housing and place it on a soft surface to one side and then forward (2). 5. Remove the key...
... voltage used by these headlights, these bulbs should only be lifted out when replacing the high/low beam, parking light, turn the headlight switch to position 0. 2. To lift out the housing: 1. Disconnect the wiring connector by a trained and qualified Volvo service technician. 213 09... Maintenance and servicing Replacing bulbs Lift out the headlight housing and place it on a soft surface to one side and then forward (2). 5. Remove the key...

Owner's Manual
Page 193
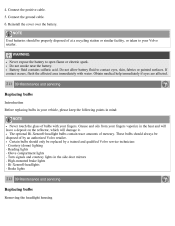
Remove the wiring connector from the bulb. 4. Insert the new bulb. Low beam bulb 1. Press the retaining spring inward and upward and slightly to the right until it inward and downward. 5. High beam bulb (halogen) Open the hood. 2. Remove the headlight housing. 3. Press the wiring connector onto the bulb. 4. Installing a new bulb 1. Put the plastic cover in one position. 2. It can only be inserted in place. 5. Pull out the bulb. Reinstall the headlight housing. Release the bulb's retaining spring by pressing it snaps into place. 3.
Remove the wiring connector from the bulb. 4. Insert the new bulb. Low beam bulb 1. Press the retaining spring inward and upward and slightly to the right until it inward and downward. 5. High beam bulb (halogen) Open the hood. 2. Remove the headlight housing. 3. Press the wiring connector onto the bulb. 4. Installing a new bulb 1. Put the plastic cover in one position. 2. It can only be inserted in place. 5. Pull out the bulb. Reinstall the headlight housing. Release the bulb's retaining spring by pressing it snaps into place. 3.

Owner's Manual
Page 194
... bulbs should only be installed in one position. 7. WARNING Bi-Xenon® headlights (option) - Reinstall the bulb holder. Reinstall the headlight housing. Passenger's side headlight: Turn the bulb holder clockwise. 214 09 Maintenance and servicing Replacing bulbs NOTE ...headlight housing by turning it counterclockwise. 4. Driver's side headlight: Turn the bulb holder counterclockwise. Parking light bulb Remove the cover on vehicles equipped with Bi-Xenon® headlights. due to the high voltage used by an authorized Volvo service technician. 5. 1. Remove the headlight...
... bulbs should only be installed in one position. 7. WARNING Bi-Xenon® headlights (option) - Reinstall the bulb holder. Reinstall the headlight housing. Passenger's side headlight: Turn the bulb holder clockwise. 214 09 Maintenance and servicing Replacing bulbs NOTE ...headlight housing by turning it counterclockwise. 4. Driver's side headlight: Turn the bulb holder counterclockwise. Parking light bulb Remove the cover on vehicles equipped with Bi-Xenon® headlights. due to the high voltage used by an authorized Volvo service technician. 5. 1. Remove the headlight...
Owner's Manual
Page 195
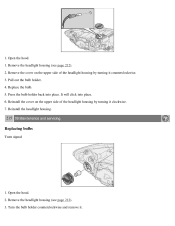
... the bulb. 5. Reinstall the cover on the upper side of the headlight housing by turning it . Press the bulb holder back into place. 6. Pull out the bulb holder. 4. Reinstall the headlight housing. 215 09 Maintenance and servicing Replacing bulbs Turn signal 1. Turn ...the bulb holder counterclockwise and remove it counterclockwise. 3. Remove the headlight housing (see page 212). 2. It will click into place. Open the...
... the bulb. 5. Reinstall the cover on the upper side of the headlight housing by turning it . Press the bulb holder back into place. 6. Pull out the bulb holder. 4. Reinstall the headlight housing. 215 09 Maintenance and servicing Replacing bulbs Turn signal 1. Turn ...the bulb holder counterclockwise and remove it counterclockwise. 3. Remove the headlight housing (see page 212). 2. It will click into place. Open the...

Owner's Manual
Page 196
4. Remove the bulb from the holder by inserting a screw driver as shown in one position. 5. Reinstall the headlight housing. 216 09 Maintenance and servicing Replacing bulbs Front fog light (option) 1. Insert a new bulb and reinstall the bulb holder in and... position 0. 2. Reinstall the bulb holder. Switch off all lights and turn the key to release the retaining clips. Side marker light 1. Reinstall the headlight housing. Open the hood. 2. Turn the bulb holder counterclockwise, pull it counterclockwise. 5. Remove the panel around the fog light housing by pressing it...
4. Remove the bulb from the holder by inserting a screw driver as shown in one position. 5. Reinstall the headlight housing. 216 09 Maintenance and servicing Replacing bulbs Front fog light (option) 1. Insert a new bulb and reinstall the bulb holder in and... position 0. 2. Reinstall the bulb holder. Switch off all lights and turn the key to release the retaining clips. Side marker light 1. Reinstall the headlight housing. Open the hood. 2. Turn the bulb holder counterclockwise, pull it counterclockwise. 5. Remove the panel around the fog light housing by pressing it...

Owner's Manual
Page 232
...; headlights Active yaw control - Geartronic Autostart AUX (audio system) AUX menu Auxiliary equipment AWD B Backrests, rear seat Battery avoiding drain 58 6, 147 53 8 59 149 86 95, 251 88 17 124 146 206 6 78, 113 242 245 235 237 230 232 78 234 141 136 230 245 58 146 108 130 2008 VOLVO S40...
...; headlights Active yaw control - Geartronic Autostart AUX (audio system) AUX menu Auxiliary equipment AWD B Backrests, rear seat Battery avoiding drain 58 6, 147 53 8 59 149 86 95, 251 88 17 124 146 206 6 78, 113 242 245 235 237 230 232 78 234 141 136 230 245 58 146 108 130 2008 VOLVO S40...