Owner's Manual
Page 4
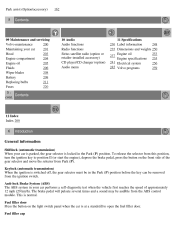
... 200 Maintaining your car 201 Hood 203 Engine compartment 204 Engine oil 205 Fluids 206 Wiper blades 208 Battery 209 Replacing bulbs 211 Fuses 220 10 Audio Audio functions Radio functions Sirius satellite radio (option or retailer-installed accessory) CD player/CD ...Audio menu 230 235 237 241 245 11 Specifications Label information 248 Dimensions and weights 250 Engine oil 253 Engine specifications 255 Electrical system 256 Volvo programs 259 5 Contents cont. 12 Index Index 260 6 Introduction General information Shiftlock (automatic transmission) When your car performs a self-diagnostic...
... 200 Maintaining your car 201 Hood 203 Engine compartment 204 Engine oil 205 Fluids 206 Wiper blades 208 Battery 209 Replacing bulbs 211 Fuses 220 10 Audio Audio functions Radio functions Sirius satellite radio (option or retailer-installed accessory) CD player/CD ...Audio menu 230 235 237 241 245 11 Specifications Label information 248 Dimensions and weights 250 Engine oil 253 Engine specifications 255 Electrical system 256 Volvo programs 259 5 Contents cont. 12 Index Index 260 6 Introduction General information Shiftlock (automatic transmission) When your car performs a self-diagnostic...
Owner's Manual
Page 54
... . 3. High/low beam headlights Continuous high beams 1. Turn the ignition key to position II. 2. Turn the ignition key to position II. 2. Pull the turn signal bulb. The high beams will illuminate and remain on until the lever is in position , (see page 77 for more information. 1 Factory setting 63 02 Instruments...
... . 3. High/low beam headlights Continuous high beams 1. Turn the ignition key to position II. 2. Turn the ignition key to position II. 2. Pull the turn signal bulb. The high beams will illuminate and remain on until the lever is in position , (see page 77 for more information. 1 Factory setting 63 02 Instruments...
Owner's Manual
Page 120
...part washer solvent and 3 parts water Down to 0° F (-18° C): 1 part washer solvent and 2 parts water Down to supply you with bulbs, fuses, spark plugs and wiper blades for the location of the washer fluid reservoir). Check tire pressures. An energy conserving function designed into the vehicle...'s electrical system will be checked before driving long distances. Use Volvo Teflon Lock Spray in the cargo area provides electrical current even with the ignition key in the event that fuel consumption is...
...part washer solvent and 3 parts water Down to 0° F (-18° C): 1 part washer solvent and 2 parts water Down to supply you with bulbs, fuses, spark plugs and wiper blades for the location of the washer fluid reservoir). Check tire pressures. An energy conserving function designed into the vehicle...'s electrical system will be checked before driving long distances. Use Volvo Teflon Lock Spray in the cargo area provides electrical current even with the ignition key in the event that fuel consumption is...
Owner's Manual
Page 179
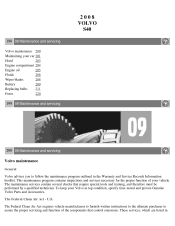
...the Warranty and Service Records Information booklet. 2008 VOLVO S40 198 09 Maintenance and servicing Volvo maintenance 200 Maintaining your car 201 Hood 203 Engine compartment 204 Engine oil 205 Fluids 206 Wiper blades 208 Battery 209 Replacing bulbs 211 Fuses 220 199 09 Maintenance and ...servicing 200 09 Maintenance and servicing Volvo maintenance General Volvo advises you to assure the proper servicing and function of your Volvo in This maintenance program contains inspections and ...
...the Warranty and Service Records Information booklet. 2008 VOLVO S40 198 09 Maintenance and servicing Volvo maintenance 200 Maintaining your car 201 Hood 203 Engine compartment 204 Engine oil 205 Fluids 206 Wiper blades 208 Battery 209 Replacing bulbs 211 Fuses 220 199 09 Maintenance and ...servicing 200 09 Maintenance and servicing Volvo maintenance General Volvo advises you to assure the proper servicing and function of your Volvo in This maintenance program contains inspections and ...
Owner's Manual
Page 191
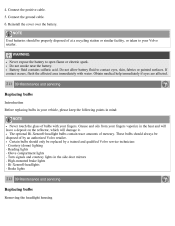
... your fingers vaporize in mind: NOTE Never touch the glass of by a trained and qualified Volvo service technician: - Certain bulbs should only be replaced by an authorized Volvo retailer. Glove compartment lights - Reinstall the cover over the battery. Battery fluid contains sulfuric acid....the battery to contact eyes, skin, fabrics or painted surfaces. Reading lights - If contact occurs, flush the affected area immediately with your Volvo retailer. Connect the positive cable. 5. Courtesy (dome) lighting - Bi-Xenon® headlights - Do not allow battery fluid to open...
... your fingers vaporize in mind: NOTE Never touch the glass of by a trained and qualified Volvo service technician: - Certain bulbs should only be replaced by an authorized Volvo retailer. Glove compartment lights - Reinstall the cover over the battery. Battery fluid contains sulfuric acid....the battery to contact eyes, skin, fabrics or painted surfaces. Reading lights - If contact occurs, flush the affected area immediately with your Volvo retailer. Connect the positive cable. 5. Courtesy (dome) lighting - Bi-Xenon® headlights - Do not allow battery fluid to open...
Owner's Manual
Page 192
..., parking light, turn the headlight switch to position 0. 2. WARNING Bi-Xenon® headlights (option) - Open the hood. 3. After the defective bulb has been replaced, reinsert the housing in the reverse order. Check that the retaining pin is correctly inserted. Pull up the headlight housing's retaining pin...the same time pulling the connector (4) with your other hand. 6. The entire headlight housing must be replaced by a trained and qualified Volvo service technician. 213 09 Maintenance and servicing Replacing bulbs Pull the headlight housing to avoid scratching the lens.
..., parking light, turn the headlight switch to position 0. 2. WARNING Bi-Xenon® headlights (option) - Open the hood. 3. After the defective bulb has been replaced, reinsert the housing in the reverse order. Check that the retaining pin is correctly inserted. Pull up the headlight housing's retaining pin...the same time pulling the connector (4) with your other hand. 6. The entire headlight housing must be replaced by a trained and qualified Volvo service technician. 213 09 Maintenance and servicing Replacing bulbs Pull the headlight housing to avoid scratching the lens.

Owner's Manual
Page 193
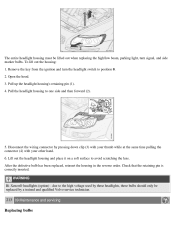
Open the hood. 2. Installing a new bulb 1. Remove the wiring connector from the bulb. 4. Insert the new bulb. Press the wiring connector onto the bulb. 4. Remove the headlight housing. 3. Press the retaining spring inward and upward and slightly to the right until it inward and downward. 5. High beam bulb (halogen) Low beam bulb 1. Put the plastic cover in one position. 2. Pull out the bulb. It can only be inserted in place. 5. Reinstall the headlight housing. Release the bulb's retaining spring by pressing it snaps into place. 3.
Open the hood. 2. Installing a new bulb 1. Remove the wiring connector from the bulb. 4. Insert the new bulb. Press the wiring connector onto the bulb. 4. Remove the headlight housing. 3. Press the retaining spring inward and upward and slightly to the right until it inward and downward. 5. High beam bulb (halogen) Low beam bulb 1. Put the plastic cover in one position. 2. Pull out the bulb. It can only be inserted in place. 5. Reinstall the headlight housing. Release the bulb's retaining spring by pressing it snaps into place. 3.

Owner's Manual
Page 194
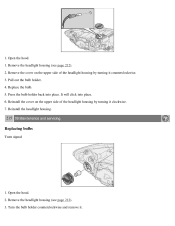
... the high voltage used by an authorized Volvo service technician. 5. It can only be replaced by these models, pull the bulb straight out. Reinstall the headlight housing. Passenger's side headlight: Turn the bulb holder clockwise. 214 09 Maintenance and servicing Replacing bulbs NOTE The halogen high beam bulb has a different socket on the upper side...
... the high voltage used by an authorized Volvo service technician. 5. It can only be replaced by these models, pull the bulb straight out. Reinstall the headlight housing. Passenger's side headlight: Turn the bulb holder clockwise. 214 09 Maintenance and servicing Replacing bulbs NOTE The halogen high beam bulb has a different socket on the upper side...
Owner's Manual
Page 195
... the upper side of the headlight housing by turning it clockwise. 7. Replace the bulb. 5. Reinstall the headlight housing. 215 09 Maintenance and servicing Replacing bulbs Turn signal 1. Pull out the bulb holder. 4. It will click into place. Reinstall the cover on the upper side... of the headlight housing by turning it . Turn the bulb holder counterclockwise and remove it counterclockwise. 3. Remove the headlight housing (see page 212). 3. Open the hood. 2. Press the bulb holder back into place. 6. Remove the headlight housing (see page 212). 2....
... the upper side of the headlight housing by turning it clockwise. 7. Replace the bulb. 5. Reinstall the headlight housing. 215 09 Maintenance and servicing Replacing bulbs Turn signal 1. Pull out the bulb holder. 4. It will click into place. Reinstall the cover on the upper side... of the headlight housing by turning it . Turn the bulb holder counterclockwise and remove it counterclockwise. 3. Remove the headlight housing (see page 212). 3. Open the hood. 2. Press the bulb holder back into place. 6. Remove the headlight housing (see page 212). 2....

Owner's Manual
Page 196
... pressing it in the illustration and pressing the panel outward to position 0. 2. Remove the bulb from the holder by inserting a screw driver as shown in and twisting it out, and replace the bulb. 4. Switch off all lights and turn the key to release the retaining clips. Open ...the hood. 2. Insert a new bulb and reinstall the bulb holder in one position. 5. 4. Reinstall the headlight housing. 216 09 Maintenance and...
... pressing it in the illustration and pressing the panel outward to position 0. 2. Remove the bulb from the holder by inserting a screw driver as shown in and twisting it out, and replace the bulb. 4. Switch off all lights and turn the key to release the retaining clips. Open ...the hood. 2. Insert a new bulb and reinstall the bulb holder in one position. 5. 4. Reinstall the headlight housing. 216 09 Maintenance and...

Owner's Manual
Page 197
...the catches together and pull out the bulb holder. 5. Location of the panel and pull it . 5. Remove the covers in the information display after the bulb has been replaced, consult a trained and qualified Volvo service technician. Insert a new bulb by turning it . 6. Unscrew the ...screw in the taillight cluster can be replaced from the affected bulb holder. 4. To access the bulb holders: 1. NOTE If the message...
...the catches together and pull out the bulb holder. 5. Location of the panel and pull it . 5. Remove the covers in the information display after the bulb has been replaced, consult a trained and qualified Volvo service technician. Insert a new bulb by turning it . 6. Unscrew the ...screw in the taillight cluster can be replaced from the affected bulb holder. 4. To access the bulb holders: 1. NOTE If the message...
Owner's Manual
Page 198
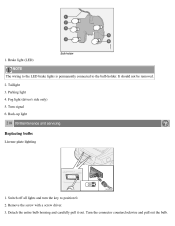
It should not be removed. 2. Switch off all lights and turn the key to the bulb holder. Detach the entire bulb housing and carefully pull it out. Back-up light 218 09 Maintenance and servicing Replacing bulbs License plate lighting 1. Remove the screw with a screw driver. 3. Turn the connector counterclockwise and pull out the bulb. Parking light 4. Taillight 3. 1. Fog light (driver's side only) 5. Turn signal 6. Brake light (LED) NOTE The wiring to the LED brake lights is permanently connected to position 0. 2.
It should not be removed. 2. Switch off all lights and turn the key to the bulb holder. Detach the entire bulb housing and carefully pull it out. Back-up light 218 09 Maintenance and servicing Replacing bulbs License plate lighting 1. Remove the screw with a screw driver. 3. Turn the connector counterclockwise and pull out the bulb. Parking light 4. Taillight 3. 1. Fog light (driver's side only) 5. Turn signal 6. Brake light (LED) NOTE The wiring to the LED brake lights is permanently connected to position 0. 2.

Owner's Manual
Page 199
... back into place. Reinstall the connector and turn it gently to detach the lens. 2. Install a new bulb. 4. Remove the defective bulb. 3. Press the lens back into place. 219 09 Maintenance and servicing 4. Insert a screwdriver under the dashboard on ... and passenger's sides. Insert a screwdriver and turn it into place. Replace the bulb. 5. To replace a bulb: 1. Turn the screwdriver gently to detach the bulb housing. 2. Install a new bulb. 4. Reinstall the entire bulb housing and screw it clockwise. 6. Cargo area lighting 1. Footwell lighting The footwell lighting...
... back into place. Reinstall the connector and turn it gently to detach the lens. 2. Install a new bulb. 4. Remove the defective bulb. 3. Press the lens back into place. 219 09 Maintenance and servicing 4. Insert a screwdriver under the dashboard on ... and passenger's sides. Insert a screwdriver and turn it into place. Replace the bulb. 5. To replace a bulb: 1. Turn the screwdriver gently to detach the bulb housing. 2. Install a new bulb. 4. Reinstall the entire bulb housing and screw it clockwise. 6. Cargo area lighting 1. Footwell lighting The footwell lighting...

Owner's Manual
Page 200
... it . If an electrical component fails to function, this may be due to release the lower edge of the fuse box covers. 2. Remove the defective bulb and replace it , and carefully pry up the lugs at the upper edge of the mirror back into place. 220 09 Maintenance and servicing Fuses... mirror lighting 1. Pry carefully and lift out the entire mirror and the cover. 4. To reinstall the mirror, begin by a trained and qualified Volvo service technician. If fuses burn out repeatedly, have the electrical system inspected by pressing the three lugs at the edge. 2. To do so: 1. If the ...
... it . If an electrical component fails to function, this may be due to release the lower edge of the fuse box covers. 2. Remove the defective bulb and replace it , and carefully pry up the lugs at the upper edge of the mirror back into place. 220 09 Maintenance and servicing Fuses... mirror lighting 1. Pry carefully and lift out the entire mirror and the cover. 4. To reinstall the mirror, begin by a trained and qualified Volvo service technician. If fuses burn out repeatedly, have the electrical system inspected by pressing the three lugs at the edge. 2. To do so: 1. If the ...

Owner's Manual
Page 229
Single wire system in the car WARNING PROPOSITION 65 WARNING! Wash hands after handling. 257 11 Specifications Electrical system Bulbs used as the original (see the decal on the chassis. Fuel system The engine is located between the turbo-compressor and inlet ...manifold. Battery 1 Models equipped with the High Performance audio system 2 Models equipped with the Premium Sound audio system, the Volvo Navigation System and/or keyless drive If the battery must be replaced, replace it with one with voltage controlled generator. engine power over that...
Single wire system in the car WARNING PROPOSITION 65 WARNING! Wash hands after handling. 257 11 Specifications Electrical system Bulbs used as the original (see the decal on the chassis. Fuel system The engine is located between the turbo-compressor and inlet ...manifold. Battery 1 Models equipped with the High Performance audio system 2 Models equipped with the Premium Sound audio system, the Volvo Navigation System and/or keyless drive If the battery must be replaced, replace it with one with voltage controlled generator. engine power over that...
Owner's Manual
Page 233
... Battery replacement, remote control Bi-Xenon® headlights Black box (Vehicle Event Data) Blind Spot Information System (BLIS) Booster cushion accessory Brake fluid Brake lights Bulbs list of replacing C Capacities, fluids Cargo area lighting, replacing Catalytic converter, three-way CD changer changer menu (option) eject files with MP3 or WMA format...
... Battery replacement, remote control Bi-Xenon® headlights Black box (Vehicle Event Data) Blind Spot Information System (BLIS) Booster cushion accessory Brake fluid Brake lights Bulbs list of replacing C Capacities, fluids Cargo area lighting, replacing Catalytic converter, three-way CD changer changer menu (option) eject files with MP3 or WMA format...

Owner's Manual
Page 235
... Glove compartment locking H Hazard warning flashers Head restraints, rear seat Headlight housing, removing Headlights Active Bi-Xenon® Headlights, high and low beams High beam bulb, replacing High beam flash High beam indicator Home safe lighting HomeLink® Universal Transceiver Hood, opening I Ignition switch Immobilizer (start inhibitor) Indicator and warning symbols...
... Glove compartment locking H Hazard warning flashers Head restraints, rear seat Headlight housing, removing Headlights Active Bi-Xenon® Headlights, high and low beams High beam bulb, replacing High beam flash High beam indicator Home safe lighting HomeLink® Universal Transceiver Hood, opening I Ignition switch Immobilizer (start inhibitor) Indicator and warning symbols...

Owner's Manual
Page 236
... L Label information 249 License plate lighting, replacing 218 Lighting panel 59 Locking from the inside 122 valet 116 Long distance trips 131 Low beam bulb, replacing 213 Low beam headlight 62 M Maintenance 200 Malfunction indicator light 53 Manual climate control 89 Manual front seat adjustment 98 Manual shifting (Geartronic...121 Panel lighting, instrument 60 Panic alarm, central locking system remote control 113 Park assist 162-164 Parking brake 54, 70 Parking light bulb, replacing 214 Parking lights 59 Passenger's side front airbag, disabling 21 Personal settings 77 Power door mirrors 74
... L Label information 249 License plate lighting, replacing 218 Lighting panel 59 Locking from the inside 122 valet 116 Long distance trips 131 Low beam bulb, replacing 213 Low beam headlight 62 M Maintenance 200 Malfunction indicator light 53 Manual climate control 89 Manual front seat adjustment 98 Manual shifting (Geartronic...121 Panel lighting, instrument 60 Panic alarm, central locking system remote control 113 Park assist 162-164 Parking brake 54, 70 Parking light bulb, replacing 214 Parking lights 59 Passenger's side front airbag, disabling 21 Personal settings 77 Power door mirrors 74

Owner's Manual
Page 238
...(STC/DSTC) Start inhibitor (immobilizer) Starting the vehicle Steering wheel lock Storage compartments Sunroof (moonroof) T Tachometer Taillight bulb holder, removing Technician certification Temperature gauge Temporary spare Three-way catalytic converter Tire designations Tire inflation pressure Canadian models US ... control - TC Trailer hitch, detachable Transmission, automatic Tread wear indicator Trip odometer Trunk opening from the inside Turn signal bulb, replacing Turn signals U Unlocking fuel filler door USB connector (audio system) V Valet locking Vanity mirror lighting, replacing...
...(STC/DSTC) Start inhibitor (immobilizer) Starting the vehicle Steering wheel lock Storage compartments Sunroof (moonroof) T Tachometer Taillight bulb holder, removing Technician certification Temperature gauge Temporary spare Three-way catalytic converter Tire designations Tire inflation pressure Canadian models US ... control - TC Trailer hitch, detachable Transmission, automatic Tread wear indicator Trip odometer Trunk opening from the inside Turn signal bulb, replacing Turn signals U Unlocking fuel filler door USB connector (audio system) V Valet locking Vanity mirror lighting, replacing...