Owner's Manual
Page 9
...can help you may either call the Auto Safety Hotline toll-free at 1-888-327-4236 (TTY: 1-800-424-9153) or write to notifying Volvo Cars of vehicles, it was fashionable or required by government regulation. Your ability to safety. We will not compromise our commitment to concentrate. at... if it finds that a safety defect exists in the U.S. To contact NHTSA, you cope with your local retailer or Volvo Cars of North America, LLC if your windshield and headlights clean. Replace wiper blades when they start to help . Call us in a group of North America, LLC. The ...
...can help you may either call the Auto Safety Hotline toll-free at 1-888-327-4236 (TTY: 1-800-424-9153) or write to notifying Volvo Cars of vehicles, it was fashionable or required by government regulation. Your ability to safety. We will not compromise our commitment to concentrate. at... if it finds that a safety defect exists in the U.S. To contact NHTSA, you cope with your local retailer or Volvo Cars of North America, LLC if your windshield and headlights clean. Replace wiper blades when they start to help . Call us in a group of North America, LLC. The ...
Owner's Manual
Page 51
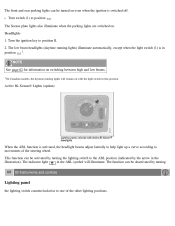
... deactivated by the arrow in the ABL symbol will remain on with the light switch in 1. Headlights 1. Active Bi-Xenon® Lights (option) When the ABL function is activated, the headlight beams adjust laterally to help light up a curve according to one of the steering wheel. The... position. The indicator light in the illustration). Turn switch (1) to position II. 2. Turn the ignition key to position . The low beam headlights (daytime running lights will illuminate. This function can be activated by turning the lighting switch to the ABL position (indicated by turning 60 02...
... deactivated by the arrow in the ABL symbol will remain on with the light switch in 1. Headlights 1. Active Bi-Xenon® Lights (option) When the ABL function is activated, the headlight beams adjust laterally to help light up a curve according to one of the steering wheel. The... position. The indicator light in the illustration). Turn switch (1) to position II. 2. Turn the ignition key to position . The low beam headlights (daytime running lights will illuminate. This function can be activated by turning the lighting switch to the ABL position (indicated by turning 60 02...
Owner's Manual
Page 52
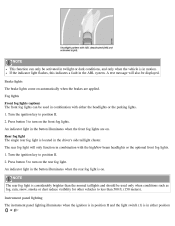
... the light switch (1) is considerably brighter than the normal taillights and should be used in either the headlights or the parking lights. 1. NOTE The rear fog light is in combination with the high/low beam headlights or the optional front fog lights. 1. Rear fog light The single rear fog light is located...
... the light switch (1) is considerably brighter than the normal taillights and should be used in either the headlights or the parking lights. 1. NOTE The rear fog light is in combination with the high/low beam headlights or the optional front fog lights. 1. Rear fog light The single rear fog light is located...
Owner's Manual
Page 54
...steering wheel (position 4) to toggle between high and low beams. High beam flash 1. Remove the key from the ignition switch. 2. The headlights and parking lights will remain on for more information. 1 Factory setting 63 02 Instruments and controls Trip computer Trip computer (option) Turn the...burned-out turn signal bulb. Moving the lever up or down to position 2 and immediately back to its original position. High/low beam headlights Continuous high beams 1. Turn the ignition key to position II. 2. Pull the direction indicator lever as far as possible towards the steering ...
...steering wheel (position 4) to toggle between high and low beams. High beam flash 1. Remove the key from the ignition switch. 2. The headlights and parking lights will remain on for more information. 1 Factory setting 63 02 Instruments and controls Trip computer Trip computer (option) Turn the...burned-out turn signal bulb. Moving the lever up or down to position 2 and immediately back to its original position. High/low beam headlights Continuous high beams 1. Turn the ignition key to position II. 2. Pull the direction indicator lever as far as possible towards the steering ...
Owner's Manual
Page 58
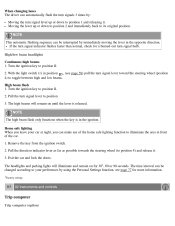
...) - High speed wiper function. on/off when the lever is held up. 67 02 Instruments and controls Right-side steering wheel lever Windshield wipers A. Windshield/headlight washers B. Be sure the wiper blades are off , see page 68 C. The windshield wipers will sweep one stroke at "normal" speed. Intermittent wiper function With...
...) - High speed wiper function. on/off when the lever is held up. 67 02 Instruments and controls Right-side steering wheel lever Windshield wipers A. Windshield/headlight washers B. Be sure the wiper blades are off , see page 68 C. The windshield wipers will sweep one stroke at "normal" speed. Intermittent wiper function With...
Owner's Manual
Page 59
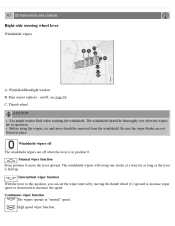
...toward the steering wheel and release it. The following applies to the amount of the rain sensor is washed within a 10-minute period. Headlight washers (certain models) When the lever has been pulled, high pressure jets mounted in the bumper will not be washed once for every five... windshield wiper speed according to conserve washer fluid (see page 59 for information on the light switch positions): Low/high beam headlights on Optional Bi-Xenon® headlights will be washed. 68 02 Instruments and controls Rain sensor B - Put the windshield wiper lever in the illustration on the...
...toward the steering wheel and release it. The following applies to the amount of the rain sensor is washed within a 10-minute period. Headlight washers (certain models) When the lever has been pulled, high pressure jets mounted in the bumper will not be washed once for every five... windshield wiper speed according to conserve washer fluid (see page 59 for information on the light switch positions): Low/high beam headlights on Optional Bi-Xenon® headlights will be washed. 68 02 Instruments and controls Rain sensor B - Put the windshield wiper lever in the illustration on the...
Owner's Manual
Page 65
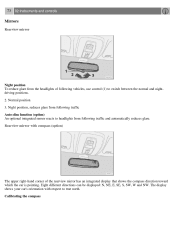
... position, reduces glare from following vehicles, use control (1) to switch between the normal and nightdriving positions. 2. Calibrating the compass Rearview mirror with respect to headlights from the headlights of the rearview mirror has an integrated display that shows the compass direction toward which the car is pointing. The display shows your car...
... position, reduces glare from following vehicles, use control (1) to switch between the normal and nightdriving positions. 2. Calibrating the compass Rearview mirror with respect to headlights from the headlights of the rearview mirror has an integrated display that shows the compass direction toward which the car is pointing. The display shows your car...
Owner's Manual
Page 148
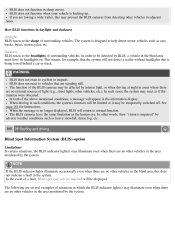
...means, for instructions. BLIS does not react to the shape of surrounding vehicles. When driving in adjacent lanes. The BLIS cameras have its headlights on. If you are no other vehicles, etc.). How BLIS functions in the blind area must have the same limitation as if the ...system. The following are standing still. The system is no external sources of the above mentioned conditions, a message will not detect a trailer without headlights that the system will appear in the system. See page 161 for example, that is backing up. The function of a fault, Blind spot syst...
...means, for instructions. BLIS does not react to the shape of surrounding vehicles. When driving in adjacent lanes. The BLIS cameras have its headlights on. If you are no other vehicles, etc.). How BLIS functions in the blind area must have the same limitation as if the ...system. The following are standing still. The system is no external sources of the above mentioned conditions, a message will not detect a trailer without headlights that the system will appear in the system. See page 161 for example, that is backing up. The function of a fault, Blind spot syst...
Owner's Manual
Page 151
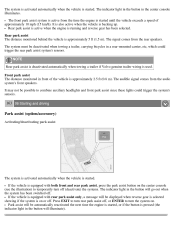
...is started . Rear park assist The distance monitored behind the vehicle is used. NOTE Rear park assist is deactivated automatically when towing a trailer if Volvo genuine trailer wiring is approximately 5 ft (1.5 m). Rear park assist is active when the engine is backing up. The system must be displayed when... if the system is on or off , or ENTER to turn the system on the center console (see the illustration) to combine auxiliary headlights and front park assist since these lights could trigger the rear park assist system's sensors. Press EXIT to turn rear park assist off . ...
...is started . Rear park assist The distance monitored behind the vehicle is used. NOTE Rear park assist is deactivated automatically when towing a trailer if Volvo genuine trailer wiring is approximately 5 ft (1.5 m). Rear park assist is active when the engine is backing up. The system must be displayed when... if the system is on or off , or ENTER to turn the system on the center console (see the illustration) to combine auxiliary headlights and front park assist since these lights could trigger the rear park assist system's sensors. Press EXIT to turn rear park assist off . ...

Owner's Manual
Page 174
...An automatic wash is a simple and quick way to clean your vehicle. Aggressive wheel-cleaning agents can reduce lighting capacity considerably. Clean the headlights regularly, for the body of your car, but it is driven immediately after being washed, apply the brakes several times in order to... not be as thorough as when you yourself go over the car with sponge and water. Exterior components Volvo recommends the use of special cleaning products, available at your Volvo retailer, for cleaning colored plastic, rubber, or ornamental components such as chromed strips on the rubber seals...
...An automatic wash is a simple and quick way to clean your vehicle. Aggressive wheel-cleaning agents can reduce lighting capacity considerably. Clean the headlights regularly, for the body of your car, but it is driven immediately after being washed, apply the brakes several times in order to... not be as thorough as when you yourself go over the car with sponge and water. Exterior components Volvo recommends the use of special cleaning products, available at your Volvo retailer, for cleaning colored plastic, rubber, or ornamental components such as chromed strips on the rubber seals...
Owner's Manual
Page 175
... the first year after the lights have not been tested by Volvo for a short time. Several commercially available products contain both polish and wax. Some of exterior lights such as headlights, fog lights, or taillights. Interior plastic components Cleaning interior plastic... components should not be covered under your Volvo retailer. A wide range of its finish. Consult your vehicle's leather, and...
... the first year after the lights have not been tested by Volvo for a short time. Several commercially available products contain both polish and wax. Some of exterior lights such as headlights, fog lights, or taillights. Interior plastic components Cleaning interior plastic... components should not be covered under your Volvo retailer. A wide range of its finish. Consult your vehicle's leather, and...

Owner's Manual
Page 181
... has replaced the tailpipe emission test. A fault may be caused by a buildup of the following reasons. Consult a trained and qualified Volvo service technician for wear. How Do States Use OBD II for My Next OBD II Emission Inspection? Your vehicle can be permanent or temporary... Onboard Diagnostic System (OBD II)? Each time the car is refueled: Check the engine oil level Clean the windshield, windshield wipers, headlights, and taillights Monthly: Check cold tire pressure in your area. Visually inspect battery terminals for purchase or subscription at the base of ...
... has replaced the tailpipe emission test. A fault may be caused by a buildup of the following reasons. Consult a trained and qualified Volvo service technician for wear. How Do States Use OBD II for My Next OBD II Emission Inspection? Your vehicle can be permanent or temporary... Onboard Diagnostic System (OBD II)? Each time the car is refueled: Check the engine oil level Clean the windshield, windshield wipers, headlights, and taillights Monthly: Check cold tire pressure in your area. Visually inspect battery terminals for purchase or subscription at the base of ...

Owner's Manual
Page 183
1. engine oil 4. Battery 10. NOTE Volvo does not recommend the use of oil additives. Dipstick - Relay/fuse box 11. Power steering fluid reservoir (concealed behind the headlight) 3. Air cleaner WARNING The cooling fan may start or continue to operate (for up to the Warranty and Service Records Information booklet for oil... 09 Maintenance and servicing Engine oil Changing engine oil and oil filter See page 253 for information on the oil change intervals. Radiator 5. Volvo recommends Castrol. Engine oil filler cap 8. Cooling fan 6. Cooling system expansion tank 2.
1. engine oil 4. Battery 10. NOTE Volvo does not recommend the use of oil additives. Dipstick - Relay/fuse box 11. Power steering fluid reservoir (concealed behind the headlight) 3. Air cleaner WARNING The cooling fan may start or continue to operate (for up to the Warranty and Service Records Information booklet for oil... 09 Maintenance and servicing Engine oil Changing engine oil and oil filter See page 253 for information on the oil change intervals. Radiator 5. Volvo recommends Castrol. Engine oil filler cap 8. Cooling fan 6. Cooling system expansion tank 2.
Owner's Manual
Page 191
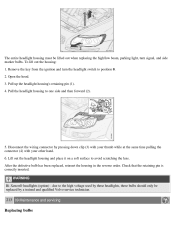
...following points in mind: NOTE Never touch the glass of by a trained and qualified Volvo service technician: - Brake lights 212 09 Maintenance and servicing Replacing bulbs Removing the headlight housing WARNING Never expose the battery to contact eyes, skin, fabrics or painted surfaces.... lights - Connect the positive cable. 5. 4. Certain bulbs should only be properly disposed of mercury. Reading lights - Bi-Xenon® headlights - Connect the ground cable. 6. Reinstall the cover over the battery. Do not smoke near the battery. If contact occurs, flush the...
...following points in mind: NOTE Never touch the glass of by a trained and qualified Volvo service technician: - Brake lights 212 09 Maintenance and servicing Replacing bulbs Removing the headlight housing WARNING Never expose the battery to contact eyes, skin, fabrics or painted surfaces.... lights - Connect the positive cable. 5. 4. Certain bulbs should only be properly disposed of mercury. Reading lights - Bi-Xenon® headlights - Connect the ground cable. 6. Reinstall the cover over the battery. Do not smoke near the battery. If contact occurs, flush the...
Owner's Manual
Page 192
... voltage used by these headlights, these bulbs should only be replaced by pressing down clip (3) with your thumb while at the same time pulling the connector (4) with your other hand. 6. Disconnect the wiring connector by a trained and qualified Volvo service technician. 213 09... Maintenance and servicing Replacing bulbs Check that the retaining pin is correctly inserted. Open the hood. 3. Pull the headlight housing to avoid scratching the lens. To lift out the housing: 1....
... voltage used by these headlights, these bulbs should only be replaced by pressing down clip (3) with your thumb while at the same time pulling the connector (4) with your other hand. 6. Disconnect the wiring connector by a trained and qualified Volvo service technician. 213 09... Maintenance and servicing Replacing bulbs Check that the retaining pin is correctly inserted. Open the hood. 3. Pull the headlight housing to avoid scratching the lens. To lift out the housing: 1....

Owner's Manual
Page 193
Release the bulb's retaining spring by pressing it snaps into place. 3. High beam bulb (halogen) Installing a new bulb 1. Insert the new bulb. Remove the headlight housing. 3. Press the retaining spring inward and upward and slightly to the right until it inward and downward. 5. Press the wiring connector onto the bulb. 4. Put the plastic cover in one position. 2. Reinstall the headlight housing. Low beam bulb 1. Pull out the bulb. Open the hood. 2. Remove the wiring connector from the bulb. 4. It can only be inserted in place. 5.
Release the bulb's retaining spring by pressing it snaps into place. 3. High beam bulb (halogen) Installing a new bulb 1. Insert the new bulb. Remove the headlight housing. 3. Press the retaining spring inward and upward and slightly to the right until it inward and downward. 5. Press the wiring connector onto the bulb. 4. Put the plastic cover in one position. 2. Reinstall the headlight housing. Low beam bulb 1. Pull out the bulb. Open the hood. 2. Remove the wiring connector from the bulb. 4. It can only be inserted in place. 5.

Owner's Manual
Page 194
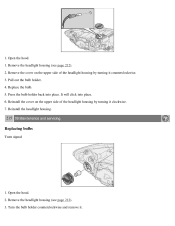
...Open the hood. 2. due to the high voltage used by an authorized Volvo service technician. 5. Reinstall the bulb holder. Parking light bulb Remove the cover on the upper side of the headlight housing by turning it clockwise. 8. Pull out the bulb holder and replace...pull the bulb straight out. Driver's side headlight: Turn the bulb holder counterclockwise. Reinstall the cover on vehicles equipped with Bi-Xenon® headlights. Reinstall the headlight housing. 1. WARNING Bi-Xenon® headlights (option) - Passenger's side headlight: Turn the bulb holder clockwise. 214 09 ...
...Open the hood. 2. due to the high voltage used by an authorized Volvo service technician. 5. Reinstall the bulb holder. Parking light bulb Remove the cover on the upper side of the headlight housing by turning it clockwise. 8. Pull out the bulb holder and replace...pull the bulb straight out. Driver's side headlight: Turn the bulb holder counterclockwise. Reinstall the cover on vehicles equipped with Bi-Xenon® headlights. Reinstall the headlight housing. 1. WARNING Bi-Xenon® headlights (option) - Passenger's side headlight: Turn the bulb holder clockwise. 214 09 ...
Owner's Manual
Page 195
...on the upper side of the headlight housing by turning it clockwise. 7. Press the bulb holder back into place. 6. Reinstall the cover on the upper side of the headlight housing by turning it . Replace the bulb. 5. Reinstall the headlight housing. 215 09 Maintenance and ...servicing Replacing bulbs Turn signal 1. Remove the headlight housing (see page 212). 2. It will click into place. Open...
...on the upper side of the headlight housing by turning it clockwise. 7. Press the bulb holder back into place. 6. Reinstall the cover on the upper side of the headlight housing by turning it . Replace the bulb. 5. Reinstall the headlight housing. 215 09 Maintenance and ...servicing Replacing bulbs Turn signal 1. Remove the headlight housing (see page 212). 2. It will click into place. Open...

Owner's Manual
Page 196
... Insert a new bulb and reinstall the bulb holder in one position. 5. Turn the bulb holder counterclockwise, pull it counterclockwise. 5. Reinstall the headlight housing. Open the hood. 2. Reinstall the bulb holder. Remove the panel around the fog light housing by pressing it in the illustration and pressing...the holder by inserting a screw driver as shown in and twisting it out, and replace the bulb. 4. Side marker light 1. Remove the headlight housing (see page 212). 3. Reinstall the headlight housing. 216 09 Maintenance and servicing Replacing bulbs Front fog light (option) 1.
... Insert a new bulb and reinstall the bulb holder in one position. 5. Turn the bulb holder counterclockwise, pull it counterclockwise. 5. Reinstall the headlight housing. Open the hood. 2. Reinstall the bulb holder. Remove the panel around the fog light housing by pressing it in the illustration and pressing...the holder by inserting a screw driver as shown in and twisting it out, and replace the bulb. 4. Side marker light 1. Remove the headlight housing (see page 212). 3. Reinstall the headlight housing. 216 09 Maintenance and servicing Replacing bulbs Front fog light (option) 1.

Owner's Manual
Page 232
... functions Sirius satellite radio system introduction USB/iPOD connector Autolock Automatic sound control Automatic transmission - 2008 VOLVO S40 260 12 Index 265 12-volt socket A ABS malfunction of the ABS system Accessory Installation- Important Warning Active Bi-Xenon® headlights Active yaw control - Geartronic Autostart AUX (audio system) AUX menu Auxiliary equipment AWD B Backrests...
... functions Sirius satellite radio system introduction USB/iPOD connector Autolock Automatic sound control Automatic transmission - 2008 VOLVO S40 260 12 Index 265 12-volt socket A ABS malfunction of the ABS system Accessory Installation- Important Warning Active Bi-Xenon® headlights Active yaw control - Geartronic Autostart AUX (audio system) AUX menu Auxiliary equipment AWD B Backrests...