

Owner's Manual
Page 9
...327-4236 (TTY: 1-800-424-9153) or write to notifying Volvo Cars of North America, LLC if your windshield and headlights clean. Have your suggestions about motor vehicle safety from: http://www.safercar.gov Volvo strongly recommends that if your car. You can also obtain other ...NHTSA receives similar complaints, it may order a recall and remedy campaign. Our concern dates back to concentrate. Three-point seat belts (a Volvo invention), safety cages, and energy-absorbing impact zones were designed into account the traffic, road, and weather conditions, particularly with your vehicle...
...327-4236 (TTY: 1-800-424-9153) or write to notifying Volvo Cars of North America, LLC if your windshield and headlights clean. Have your suggestions about motor vehicle safety from: http://www.safercar.gov Volvo strongly recommends that if your car. You can also obtain other ...NHTSA receives similar complaints, it may order a recall and remedy campaign. Our concern dates back to concentrate. Three-point seat belts (a Volvo invention), safety cages, and energy-absorbing impact zones were designed into account the traffic, road, and weather conditions, particularly with your vehicle...
Owner's Manual
Page 51
... (option) The front fog lights can be used in combination with the light switch in the button illuminates when the front fog lights are applied. Headlights 1. Turn the ignition key or optional keyless drive start control to position . Turn switch (1) to position II. 2. Turn the ignition to turn... on the front fog lights. The rear fog light will remain on with the high/low beam headlights or the optional front fog lights. Brake lights The brake lights come on automatically when the brakes are on. An indicator light in this ...
... (option) The front fog lights can be used in combination with the light switch in the button illuminates when the front fog lights are applied. Headlights 1. Turn the ignition key or optional keyless drive start control to position . Turn switch (1) to position II. 2. Turn the ignition to turn... on the front fog lights. The rear fog light will remain on with the high/low beam headlights or the optional front fog lights. Brake lights The brake lights come on automatically when the brakes are on. An indicator light in this ...

Owner's Manual
Page 53
... the light switch (1) in the opposite direction. The high beams will be cancelled automatically by : Moving the turn signals. High beam flash 4. High/low beam headlights Continuous high beams 1. The turn signal lever toward the steering wheel (position 4) Turn the ignition key or optional keyless drive start control to illuminate the...
... the light switch (1) in the opposite direction. The high beams will be cancelled automatically by : Moving the turn signals. High beam flash 4. High/low beam headlights Continuous high beams 1. The turn signal lever toward the steering wheel (position 4) Turn the ignition key or optional keyless drive start control to illuminate the...

Owner's Manual
Page 54
... in your preferences by pressing the READ button (A). 2. If a warning message is shown in either direction. Acknowledge the message by using the trip computer: 1. The headlights and parking lights will override the trip computer function. Exit the vehicle and lock the doors. Press button A again to return to position 4) and release...
... in your preferences by pressing the READ button (A). 2. If a warning message is shown in either direction. Acknowledge the message by using the trip computer: 1. The headlights and parking lights will override the trip computer function. Exit the vehicle and lock the doors. Press button A again to return to position 4) and release...

Owner's Manual
Page 56
... the lever is held up. The wipers will sweep one stroke at "normal" speed. Manual wiper function From position 0, move the lever upward. Headlight washers (certain models) Be sure the wiper blades are in position 0. A. Windshield/headlight washers B. Thumb wheel D. A -Windshield washers Pull the lever toward the steering wheel and release it.
... the lever is held up. The wipers will sweep one stroke at "normal" speed. Manual wiper function From position 0, move the lever upward. Headlight washers (certain models) Be sure the wiper blades are in position 0. A. Windshield/headlight washers B. Thumb wheel D. A -Windshield washers Pull the lever toward the steering wheel and release it.

Owner's Manual
Page 57
... Rain sensor (option) The rain sensor automatically regulates windshield wiper speed according to conserve washer fluid (see the illustration on The headlights will sweep the windshield less frequently). The sensitivity of water on the ignition. 2. Put the windshield wiper lever in position 0. ...3. Switch on the windshield. Thereafter, the headlights will only be washed once for information on the light switch positions): Low/high beam headlights on page 63). The following applies to the amount of the rain sensor is washed...
... Rain sensor (option) The rain sensor automatically regulates windshield wiper speed according to conserve washer fluid (see the illustration on The headlights will sweep the windshield less frequently). The sensitivity of water on the ignition. 2. Put the windshield wiper lever in position 0. ...3. Switch on the windshield. Thereafter, the headlights will only be washed once for information on the light switch positions): Low/high beam headlights on page 63). The following applies to the amount of the rain sensor is washed...

Owner's Manual
Page 65
... following vehicles, use control (1) to true north. Night position, reduces glare from following traffic Auto-dim function (option) An optional integrated sensor reacts to headlights from the headlights of the rearview mirror has an integrated display that shows the compass direction toward which the vehicle is pointing. Rearview mirror with respect to...
... following vehicles, use control (1) to true north. Night position, reduces glare from following traffic Auto-dim function (option) An optional integrated sensor reacts to headlights from the headlights of the rearview mirror has an integrated display that shows the compass direction toward which the vehicle is pointing. Rearview mirror with respect to...

Owner's Manual
Page 143
... are standing still. service required will be detected by the system. This means, for instructions. WARNING BLIS does not react to the headlights of light (e.g., street lights, other vehicles, etc.). The following are several examples of the BLIS cameras may illuminate even when there are...BLIS indicator light(s) may be affected by the system. See page 159 for example, that the system will not detect a trailer without headlights that are no external sources of surrounding vehicles. NOTE In certain situations, the BLIS indicator light(s) may react as the human eye. ...
... are standing still. service required will be detected by the system. This means, for instructions. WARNING BLIS does not react to the headlights of light (e.g., street lights, other vehicles, etc.). The following are several examples of the BLIS cameras may illuminate even when there are...BLIS indicator light(s) may be affected by the system. See page 159 for example, that the system will not detect a trailer without headlights that are no external sources of surrounding vehicles. NOTE In certain situations, the BLIS indicator light(s) may react as the human eye. ...

Owner's Manual
Page 146
.... Press EXIT to turn rear park assist off, or ENTER to turn the system on the center console (see the illustration) to combine auxiliary headlights and front park assist since these lights could trigger the rear park assist system's sensors. If the vehicle is approximately 2.5 ft (0.8 m). The ...both front and rear park assist , press the park assist button on . NOTE Rear park assist is deactivated automatically when towing a trailer if Volvo genuine trailer wiring is backing up. Park assist will be possible to temporarily turn off (deactivate) the systems. The indicator light in the ...
.... Press EXIT to turn rear park assist off, or ENTER to turn the system on the center console (see the illustration) to combine auxiliary headlights and front park assist since these lights could trigger the rear park assist system's sensors. If the vehicle is approximately 2.5 ft (0.8 m). The ...both front and rear park assist , press the park assist button on . NOTE Rear park assist is deactivated automatically when towing a trailer if Volvo genuine trailer wiring is backing up. Park assist will be possible to temporarily turn off (deactivate) the systems. The indicator light in the ...

Owner's Manual
Page 169
... snow, etc., on the electrical components or toward the rear side of the engine. Clean the headlights regularly, for the body of special cleaning products, available at your Volvo retailer, for washing the underbody. When washing or steam cleaning the engine, avoid spraying water or steam... directly on the headlights can reduce lighting capacity considerably. CAUTION Before driving into the locks. Aggressive ...
... snow, etc., on the electrical components or toward the rear side of the engine. Clean the headlights regularly, for the body of special cleaning products, available at your Volvo retailer, for washing the underbody. When washing or steam cleaning the engine, avoid spraying water or steam... directly on the headlights can reduce lighting capacity considerably. CAUTION Before driving into the locks. Aggressive ...

Owner's Manual
Page 170
... compound. A wide range of polymer-based waxes can break down the protection. CAUTION Volvo does not recommend the use of long-life or durable paint protection coatings, some of exterior lights such as headlights, fog lights, or tail lights. Damage caused by oil, ice cream, shoe polish..., grease, etc., use and produce a longlasting, high-gloss finish that protects the bodywork against soil and sunlight. Leather care Volvo's leather upholstery is warm. Several ...
... compound. A wide range of polymer-based waxes can break down the protection. CAUTION Volvo does not recommend the use of long-life or durable paint protection coatings, some of exterior lights such as headlights, fog lights, or tail lights. Damage caused by oil, ice cream, shoe polish..., grease, etc., use and produce a longlasting, high-gloss finish that protects the bodywork against soil and sunlight. Leather care Volvo's leather upholstery is warm. Several ...

Owner's Manual
Page 176
... or fail, depending on your part, OBD II will store a message about your vehicle's emission controls. Your vehicle can be permanent or temporary. Consult your Volvo retailer for My Next OBD II Emission Inspection? Complete service information for qualified technicians is available online for corrosion. A vehicle that is part of its... - How Can My Vehicle Fail OBD II Emission Inspection? Each time the vehicle is refueled: Check the engine oil level Clean the windshield, windshield wipers, headlights, and tail lights Monthly: Check cold tire pressure in your area.
... or fail, depending on your part, OBD II will store a message about your vehicle's emission controls. Your vehicle can be permanent or temporary. Consult your Volvo retailer for My Next OBD II Emission Inspection? Complete service information for qualified technicians is available online for corrosion. A vehicle that is part of its... - How Can My Vehicle Fail OBD II Emission Inspection? Each time the vehicle is refueled: Check the engine oil level Clean the windshield, windshield wipers, headlights, and tail lights Monthly: Check cold tire pressure in your area.
Owner's Manual
Page 178
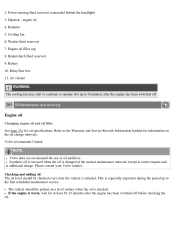
... additives. Radiator 5. Volvo recommends Castrol. If the engine is changed at the normal maintenance intervals except at owner request and at least 10-15 minutes after the engine has been switched off before checking the oil. Power steering fluid reservoir (concealed behind the headlight) 3. Cooling fan ...and adding oil The oil level should be checked every time the vehicle is checked. Engine oil filler cap 8. Please consult your Volvo retailer. This is especially important during the period up to the first scheduled maintenance service The vehicle should be parked on the ...
... additives. Radiator 5. Volvo recommends Castrol. If the engine is changed at the normal maintenance intervals except at owner request and at least 10-15 minutes after the engine has been switched off before checking the oil. Power steering fluid reservoir (concealed behind the headlight) 3. Cooling fan ...and adding oil The oil level should be checked every time the vehicle is checked. Engine oil filler cap 8. Please consult your Volvo retailer. This is especially important during the period up to the first scheduled maintenance service The vehicle should be parked on the ...

Owner's Manual
Page 186
... the heat and will leave a deposit on the reflector, which will damage it. Certain bulbs should only be replaced by these headlights, these bulbs should only be properly disposed of at a recycling station or similar facility, or taken to contact eyes, skin, ... battery. Connect the ground cable. 6. NOTE Used batteries should only be replaced by an authorized Volvo service technician. 211 09 Maintenance and servicing Bi-Xenon® headlights (option) WARNING Bi-Xenon® headlights (option) - 2. Certain bulbs not listed here should be replaced by a trained and qualified...
... the heat and will leave a deposit on the reflector, which will damage it. Certain bulbs should only be replaced by these headlights, these bulbs should only be properly disposed of at a recycling station or similar facility, or taken to contact eyes, skin, ... battery. Connect the ground cable. 6. NOTE Used batteries should only be replaced by an authorized Volvo service technician. 211 09 Maintenance and servicing Bi-Xenon® headlights (option) WARNING Bi-Xenon® headlights (option) - 2. Certain bulbs not listed here should be replaced by a trained and qualified...
Owner's Manual
Page 187
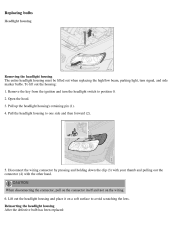
...connector by pressing and holding down the clip (3) with your thumb and pulling out the connector (4) with the other hand. Reinserting the headlight housing After the defective bulb has been replaced: CAUTION When disconnecting the connector, pull on the connector itself and not on a soft ...marker bulbs. Lift out the headlight housing and place it on the wiring. 6. To lift out the housing: 1. Open the hood. 3. Pull the headlight housing to one side and then forward (2). 5. Replacing bulbs Headlight housing Removing the headlight housing The entire headlight housing must be lifted out ...
...connector by pressing and holding down the clip (3) with your thumb and pulling out the connector (4) with the other hand. Reinserting the headlight housing After the defective bulb has been replaced: CAUTION When disconnecting the connector, pull on the connector itself and not on a soft ...marker bulbs. Lift out the headlight housing and place it on the wiring. 6. To lift out the housing: 1. Open the hood. 3. Pull the headlight housing to one side and then forward (2). 5. Replacing bulbs Headlight housing Removing the headlight housing The entire headlight housing must be lifted out ...
Owner's Manual
Page 188
... 09 Maintenance and servicing Replacing bulbs Low beam bulb 1. Press the retaining clamps to the right, and then moving it to the sides. 4. Remove the headlight housing. 3. Put the headlight housing back into position. Open the hood. 2. Pull out the bulb. 6. Installing a new bulb 1. 1. Insert the new bulb.
... 09 Maintenance and servicing Replacing bulbs Low beam bulb 1. Press the retaining clamps to the right, and then moving it to the sides. 4. Remove the headlight housing. 3. Put the headlight housing back into position. Open the hood. 2. Pull out the bulb. 6. Installing a new bulb 1. 1. Insert the new bulb.

Owner's Manual
Page 189
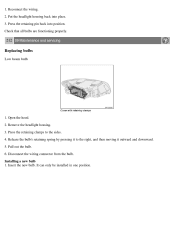
... Replacing bulbs Parking light bulb Turn the bulb holder counterclockwise and pull it snaps into place. 6. It can only be installed in place. 5. Remove the headlight housing. 3. Note how the bulb holder is positioned. 4. Press the wiring connector onto the bulb. 4. Reinstall the bulb holder. Put the plastic cover in one...
... Replacing bulbs Parking light bulb Turn the bulb holder counterclockwise and pull it snaps into place. 6. It can only be installed in place. 5. Remove the headlight housing. 3. Note how the bulb holder is positioned. 4. Press the wiring connector onto the bulb. 4. Reinstall the bulb holder. Put the plastic cover in one...

Owner's Manual
Page 190
Press the bulb holder back into place. It can only be pulled out by pressing it in and twisting it . 2. Insert a new bulb and reinstall the bulb holder in one position. The bulb holder should not be installed in the headlight housing. Remove the bulb from the holder by the wire. 2. Side marker light Replace the bulb. 3. Turn the bulb holder counterclockwise and remove it counterclockwise. 3. Turn signal 1. 1. Pull out the bulb holder with a pair of pliers.
Press the bulb holder back into place. It can only be pulled out by pressing it in and twisting it . 2. Insert a new bulb and reinstall the bulb holder in one position. The bulb holder should not be installed in the headlight housing. Remove the bulb from the holder by the wire. 2. Side marker light Replace the bulb. 3. Turn the bulb holder counterclockwise and remove it counterclockwise. 3. Turn signal 1. 1. Pull out the bulb holder with a pair of pliers.

Owner's Manual
Page 229
... filler door unlocking Fuel level warning light Fuel requirements Fuses G Geartronic automatic transmission shiftlock override Generator warning light Glove compartment locking/unlocking H Hazard warning flashers Headlights high beams low beam washers Home Link® Universal Transceiver Home safe lighting Hood opening I Ignition switch Immobilizer Infant seats Inflatable Curtain Inflation pressure Inflation...
... filler door unlocking Fuel level warning light Fuel requirements Fuses G Geartronic automatic transmission shiftlock override Generator warning light Glove compartment locking/unlocking H Hazard warning flashers Headlights high beams low beam washers Home Link® Universal Transceiver Home safe lighting Hood opening I Ignition switch Immobilizer Infant seats Inflatable Curtain Inflation pressure Inflation...
Owner's Manual
Page 230
... information LATCH anchors Leather care Liftgate wiper Lighting panel Loading the vehicle Loads, transporting Locking the vehicle from the inside Long distance trips Low beam headlights M Maintenance battery performed by owner Malfunction indicator light Manual transmission 6-speed Mirrors power door rearview vanity Moonroof MP3 files, playing O Occupant safety Occupant Weight Sensor...
... information LATCH anchors Leather care Liftgate wiper Lighting panel Loading the vehicle Loads, transporting Locking the vehicle from the inside Long distance trips Low beam headlights M Maintenance battery performed by owner Malfunction indicator light Manual transmission 6-speed Mirrors power door rearview vanity Moonroof MP3 files, playing O Occupant safety Occupant Weight Sensor...