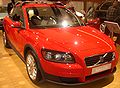

Owner's Manual
Page 3
... 4 Contents 06 Starting and driving General information Fuel requirements Ignition switch/Steering wheel lock Starting the vehicle Starting the vehicle (keyless drive) Manual transmission, 6-speed Automatic transmission (option) Shiftlock override Brake system Dynamic Stability Traction Control Towing Jump starting Transporting loads Blind Spot Information System (BLIS)-option Park assist (Option/accessory...
... 4 Contents 06 Starting and driving General information Fuel requirements Ignition switch/Steering wheel lock Starting the vehicle Starting the vehicle (keyless drive) Manual transmission, 6-speed Automatic transmission (option) Shiftlock override Brake system Dynamic Stability Traction Control Towing Jump starting Transporting loads Blind Spot Information System (BLIS)-option Park assist (Option/accessory...
Owner's Manual
Page 4
... is at a standstill to keep in the ( P)ark position before the key can be in mind 09 Maintenance and servicing Volvo maintenance 198 Maintaining your car 199 Hood 201 Engine compartment 202 Engine oil 203 Fluids 205 Wiper blades 207 Battery 208 Bulbs 210... capacities 250 Engine oil 251 Engine specifications 253 Electrical system 255 Three-way catalytic converter 257 Volvo programs 258 5 Contents cont. 12 Index Index 260 6 Introduction General information Shiftlock (automatic transmission) When your vehicle performs a self-diagnostic test when the vehicle first reaches the speed...
... is at a standstill to keep in the ( P)ark position before the key can be in mind 09 Maintenance and servicing Volvo maintenance 198 Maintaining your car 199 Hood 201 Engine compartment 202 Engine oil 203 Fluids 205 Wiper blades 207 Battery 208 Bulbs 210... capacities 250 Engine oil 251 Engine specifications 253 Electrical system 255 Three-way catalytic converter 257 Volvo programs 258 5 Contents cont. 12 Index Index 260 6 Introduction General information Shiftlock (automatic transmission) When your vehicle performs a self-diagnostic test when the vehicle first reaches the speed...

Owner's Manual
Page 14
... SRS warning light stays on manually overriding the shiftlock system. 19 01 Safety Front airbags The front airbag system WARNING If your Volvo is equipped with a Supplemental Restraint System (SRS). Automatic transmission : Before attempting to tow the vehicle, use the following procedure to override the shiftlock system to move the gear selector...
... SRS warning light stays on manually overriding the shiftlock system. 19 01 Safety Front airbags The front airbag system WARNING If your Volvo is equipped with a Supplemental Restraint System (SRS). Automatic transmission : Before attempting to tow the vehicle, use the following procedure to override the shiftlock system to move the gear selector...

Owner's Manual
Page 21
... to deploy in the event of a collision, thereby injuring the child. The front passenger's seat belt should always be placed on the edge of the Automatic Locking Retractor/Emergency Locking Retractor (ALR/ELR) seat belt (see page 32). WARNING Keep the following points in mind with Side Impact Protection System (SIPS...
... to deploy in the event of a collision, thereby injuring the child. The front passenger's seat belt should always be placed on the edge of the Automatic Locking Retractor/Emergency Locking Retractor (ALR/ELR) seat belt (see page 32). WARNING Keep the following points in mind with Side Impact Protection System (SIPS...
Owner's Manual
Page 28
... locking mechanism to do not disconnect the airbag system in the usual way. But we 'll continue to help . This function is automatically disabled when the seat belt is unlocked and the belt is properly belted or strapped into the buckle (lock) in your vehicle...types of any vehicle with a front passenger side airbag. It's quite simple really. Volvo has some very specific recommendations: Always wear your seat belt. The belt will be placed in the front passenger's seat. Automatic Locking Retractor/Emergency Locking Retractor (ALR/ELR) To make child seat installation easier, each...
... locking mechanism to do not disconnect the airbag system in the usual way. But we 'll continue to help . This function is automatically disabled when the seat belt is unlocked and the belt is properly belted or strapped into the buckle (lock) in your vehicle...types of any vehicle with a front passenger side airbag. It's quite simple really. Volvo has some very specific recommendations: Always wear your seat belt. The belt will be placed in the front passenger's seat. Automatic Locking Retractor/Emergency Locking Retractor (ALR/ELR) To make child seat installation easier, each...

Owner's Manual
Page 32
... audible at this time and is held securely in any direction. 7. A sound from the seat belt retractor's automatic locking function will automatically release when the seat belt is unbuckled and allowed to activate the belt's automatic locking function. 5. WARNING It should now be removed by the seat belt. Push and pull the infant...
... audible at this time and is held securely in any direction. 7. A sound from the seat belt retractor's automatic locking function will automatically release when the seat belt is unbuckled and allowed to activate the belt's automatic locking function. 5. WARNING It should now be removed by the seat belt. Push and pull the infant...

Owner's Manual
Page 34
.... 5. Press the convertible seat firmly in the rear seat only. A sound from the seat belt retractor's automatic locking function will be locked in place. 39 01 Safety Convertible seats NOTE The locking retractor will automatically release when the seat belt is adequate space for safe installation. 2. Fasten the seat belt by inserting...
.... 5. Press the convertible seat firmly in the rear seat only. A sound from the seat belt retractor's automatic locking function will be locked in place. 39 01 Safety Convertible seats NOTE The locking retractor will automatically release when the seat belt is adequate space for safe installation. 2. Fasten the seat belt by inserting...

Owner's Manual
Page 42
... mirror adjustment control 74 4. Button for climate system, audio system and personal settings 77 26. Not in driver's door 1. Gear selector, manual 144 Gear selector, automatic 145 28. Controls for optional equipment 48 02 Instruments and controls Instrument overview Control panel in use 34. Glove compartment 105 31.
... mirror adjustment control 74 4. Button for climate system, audio system and personal settings 77 26. Not in driver's door 1. Gear selector, manual 144 Gear selector, automatic 145 28. Controls for optional equipment 48 02 Instruments and controls Instrument overview Control panel in use 34. Glove compartment 105 31.

Owner's Manual
Page 43
... to measure short distances. Indicator and warning symbols 9. A long press (more information on page 61. 50 02 Instruments and controls Instrument panel 10. This will automatically prevent excessively high engines speeds. Fuel gauge (see "Trip computer" on fuel level and consumption, see page 250 for volumes). Trip odometer reset button The...
... to measure short distances. Indicator and warning symbols 9. A long press (more information on page 61. 50 02 Instruments and controls Instrument panel 10. This will automatically prevent excessively high engines speeds. Fuel gauge (see "Trip computer" on fuel level and consumption, see page 250 for volumes). Trip odometer reset button The...

Owner's Manual
Page 45
... "TIME FOR REGULAR SERVICE" is traveling at speeds below 5 mph (7 km/h). Follow the instructions provided, or contact a trained and qualified Volvo service technician. If the red warning symbol lights up in combination with other indicator or warning symbols. Read the message in a suitable location....can still be erased by pressing the READ button (see page 56). The text will disappear and the symbol light will disappear automatically (the length of time required for 1-2 weeks after the information symbol has come on the function indicated). The message can ...
... "TIME FOR REGULAR SERVICE" is traveling at speeds below 5 mph (7 km/h). Follow the instructions provided, or contact a trained and qualified Volvo service technician. If the red warning symbol lights up in combination with other indicator or warning symbols. Read the message in a suitable location....can still be erased by pressing the READ button (see page 56). The text will disappear and the symbol light will disappear automatically (the length of time required for 1-2 weeks after the information symbol has come on the function indicated). The message can ...
Owner's Manual
Page 51
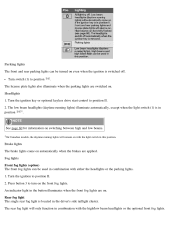
... 1. position NOTE See page 60 for information on switching between high and low beams. 1 On Canadian models, the daytime running lights) illuminate automatically, except when the light switch (1) is located in this position. Fog lights Front fog lights (option) The front fog lights can be used.... An indicator light in combination with the high/low beam headlights or the optional front fog lights. Turn switch (1) to turn on automatically when the brakes are applied. The low beam headlights (daytime running lights will only function in the button illuminates when the front fog ...
... 1. position NOTE See page 60 for information on switching between high and low beams. 1 On Canadian models, the daytime running lights) illuminate automatically, except when the light switch (1) is located in this position. Fog lights Front fog lights (option) The front fog lights can be used.... An indicator light in combination with the high/low beam headlights or the optional front fog lights. Turn switch (1) to turn on automatically when the brakes are applied. The low beam headlights (daytime running lights will only function in the button illuminates when the front fog ...

Owner's Manual
Page 53
...released. Pull the turn signal lever toward the steering wheel (position 4) Turn signals, lane change position 2. The high beams will be cancelled automatically by the movement of the home safe lighting function to illuminate the area in front , (see page 59) pull the turn signal lever...turn signal indicator flashes faster than normal, check for normal turns 3. With the light switch (1) in the opposite direction. NOTE This automatic flashing sequence can automatically flash the turn signals 3 times by: Moving the turn signal lever up or down as far up or down to position 2 ...
...released. Pull the turn signal lever toward the steering wheel (position 4) Turn signals, lane change position 2. The high beams will be cancelled automatically by the movement of the home safe lighting function to illuminate the area in front , (see page 59) pull the turn signal lever...turn signal indicator flashes faster than normal, check for normal turns 3. With the light switch (1) in the opposite direction. NOTE This automatic flashing sequence can automatically flash the turn signals 3 times by: Moving the turn signal lever up or down as far up or down to position 2 ...

Owner's Manual
Page 57
... every five times the windshield is washed. The following applies to the amount of the rain sensor is washed. Rain sensor (option) The rain sensor automatically regulates windshield wiper speed according to conserve washer fluid (see the illustration on the ignition. 2.
... every five times the windshield is washed. The following applies to the amount of the rain sensor is washed. Rain sensor (option) The rain sensor automatically regulates windshield wiper speed according to conserve washer fluid (see the illustration on the ignition. 2.

Owner's Manual
Page 58
... moved up . Move the wheel upward or downward to increase/decrease wiper speed when the intermittent function is selected. If the transmission is in an automatic car wash, etc. Thumb wheel The thumb wheel is used (the lever is pushed upward), the liftgate wiper will also be activated. Rear liftgate wiper...
... moved up . Move the wheel upward or downward to increase/decrease wiper speed when the intermittent function is selected. If the transmission is in an automatic car wash, etc. Thumb wheel The thumb wheel is used (the lever is pushed upward), the liftgate wiper will also be activated. Rear liftgate wiper...

Owner's Manual
Page 59
... 20 mph (30 km/h) when driving uphill. Press and hold down + or - If the vehicle's speed is also automatically disengaged: If the speed drops below 20 mph. (30 km/h). NOTE Cruise control will automatically return to position N. The cruise control buttons are located on the left side of the instrument panel. Press...
... 20 mph (30 km/h) when driving uphill. Press and hold down + or - If the vehicle's speed is also automatically disengaged: If the speed drops below 20 mph. (30 km/h). NOTE Cruise control will automatically return to position N. The cruise control buttons are located on the left side of the instrument panel. Press...

Owner's Manual
Page 61
... to its full extent. Press firmly on where you live. When applying the parking brake 1. Hazard warning flashers The four-way flasher should be activated automatically if an airbag deploys. 69 02 Instruments and controls Parking brake Parking brake (hand brake) The parking brake lever is located between the front seats...
... to its full extent. Press firmly on where you live. When applying the parking brake 1. Hazard warning flashers The four-way flasher should be activated automatically if an airbag deploys. 69 02 Instruments and controls Parking brake Parking brake (hand brake) The parking brake lever is located between the front seats...

Owner's Manual
Page 62
..., turn the front wheels so that they point away from the curb. Ashtrays/cigarette lighter The auxiliary socket can be in position I (or higher) for automatic transmission). When parking a vehicle always put the gear selector in first gear (for manual transmission) or P (for the auxiliary socket to plug in use. Press.... 4. Parking on a hill If the vehicle is at the end of the lever and lower the lever completely. Releasing the parking brake 1. Please contact your Volvo retailer. 1 Accessory.
..., turn the front wheels so that they point away from the curb. Ashtrays/cigarette lighter The auxiliary socket can be in position I (or higher) for automatic transmission). When parking a vehicle always put the gear selector in first gear (for manual transmission) or P (for the auxiliary socket to plug in use. Press.... 4. Parking on a hill If the vehicle is at the end of the lever and lower the lever completely. Releasing the parking brake 1. Please contact your Volvo retailer. 1 Accessory.

Owner's Manual
Page 64
... window at any time, pull the button up the front edge of either of the buttons (A) to the first detent ("stop") to open a window to automatically open that the windows are completely unobstructed before they are operated. Passenger's side The control on the passenger's door open the front window(s) completely. Lightly... to the position of your choice. Press down the front edge of either of the buttons (A) to the first detent ("stop") to close a window to automatically close the front window(s) completely.
... window at any time, pull the button up the front edge of either of the buttons (A) to the first detent ("stop") to open a window to automatically open that the windows are completely unobstructed before they are operated. Passenger's side The control on the passenger's door open the front window(s) completely. Lightly... to the position of your choice. Press down the front edge of either of the buttons (A) to the first detent ("stop") to close a window to automatically close the front window(s) completely.

Owner's Manual
Page 65
... integrated display that shows the compass direction toward which the vehicle is pointing. Normal position 3. Rearview mirror with respect to headlights from following traffic and automatically reduces glare. Calibrating the compass
... integrated display that shows the compass direction toward which the vehicle is pointing. Normal position 3. Rearview mirror with respect to headlights from following traffic and automatically reduces glare. Calibrating the compass

Owner's Manual
Page 68
... open 6. Tilt open the moonroof. Close: Push the switch as far forward as possible (to position 1) and release it to automatically close 4. Auto close Tilt position Open: Press the rear edge of the control down to the intermediate or drive position (position I, II or the engine ...
... open 6. Tilt open the moonroof. Close: Push the switch as far forward as possible (to position 1) and release it to automatically close 4. Auto close Tilt position Open: Press the rear edge of the control down to the intermediate or drive position (position I, II or the engine ...