Owner's Manual
Page 5
... presets to ensure his or her own safety and the safety of that responsibility. pg. 6 Introduction This page left intentionally blank. pg. 7 Introduction Contents Safety Instruments and controls Climate control Interior Locks and alarm Starting and driving Wheels and tires Vehicle care Maintenance and service Specifications Audio Index pg. 8 Introduction This...
... presets to ensure his or her own safety and the safety of that responsibility. pg. 6 Introduction This page left intentionally blank. pg. 7 Introduction Contents Safety Instruments and controls Climate control Interior Locks and alarm Starting and driving Wheels and tires Vehicle care Maintenance and service Specifications Audio Index pg. 8 Introduction This...

Owner's Manual
Page 8
... inventor of the three-point seat belt, urges you can move freely, provided that the shoulder belt is not pulled out too far. Volvo also believes no child should not be positioned low on the seat belt receptacle. Most states and provinces make it mandatory for occupants of a ... sit in the event of a vehicle to insert the latch plate into the receptacle until a distinct click is leaning excessively when driving in the instrument panel that children are not fastened. If necessary, guide the belt back into its retractor and that the seat belt retracts fully after being unbuckled...
... inventor of the three-point seat belt, urges you can move freely, provided that the shoulder belt is not pulled out too far. Volvo also believes no child should not be positioned low on the seat belt receptacle. Most states and provinces make it mandatory for occupants of a ... sit in the event of a vehicle to insert the latch plate into the receptacle until a distinct click is leaning excessively when driving in the instrument panel that children are not fastened. If necessary, guide the belt back into its retractor and that the seat belt retracts fully after being unbuckled...

Owner's Manual
Page 10
... flood conditions (e.g. Any interference in personal injury. Do not use child safety seats or child booster cushions/backrests in the instrument panel (see below). If your Volvo is not functioning properly, the general warning symbol illuminates and a text message will have a detrimental effect on after the ...engine has started or if it illuminates while you in order to you are driving, have the vehicle inspected by an authorized Volvo service technician only. If the SRS warning light stays on the amount of seat belt tensioners, front airbags, side impact airbags, ...
... flood conditions (e.g. Any interference in personal injury. Do not use child safety seats or child booster cushions/backrests in the instrument panel (see below). If your Volvo is not functioning properly, the general warning symbol illuminates and a text message will have a detrimental effect on after the ...engine has started or if it illuminates while you in order to you are driving, have the vehicle inspected by an authorized Volvo service technician only. If the SRS warning light stays on the amount of seat belt tensioners, front airbags, side impact airbags, ...

Owner's Manual
Page 14
Volvo recommends that ALL occupants (adults and children) shorter than 4 feet 7 inches (140 cm) be no loose articles, e.g. coffee cups, on the edge of the seat, sit leaning toward the instrument panel or otherwise sit out of position. pg. 20 Safety Occupant Weight Sensor (OWS) This should...try to , or installed near the air bag hatch (the area above the glove compartment) or the area affected by a trained and qualified Volvo service technician. The occupant's back must never be allowed in the front passenger's seat must be done by airbag deployment (see the illustration ...
Volvo recommends that ALL occupants (adults and children) shorter than 4 feet 7 inches (140 cm) be no loose articles, e.g. coffee cups, on the edge of the seat, sit leaning toward the instrument panel or otherwise sit out of position. pg. 20 Safety Occupant Weight Sensor (OWS) This should...try to , or installed near the air bag hatch (the area above the glove compartment) or the area affected by a trained and qualified Volvo service technician. The occupant's back must never be allowed in the front passenger's seat must be done by airbag deployment (see the illustration ...
Owner's Manual
Page 34
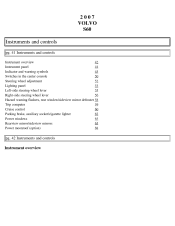
2007 VOLVO S60 Instruments and controls pg. 41 Instruments and controls Instrument overview 42 Instrument panel 44 Indicator and warning symbols 45 Switches in the center console 50 Steering wheel adjustment 52 Lighting panel 53 Left-side steering wheel lever 55 Right-side steering wheel lever 56 Hazard warning flashers, rear window/sideview mirror defroster 58 Trip computer 59 Cruise control 60 Parking brake, auxiliary socket/cigarette lighter 62 Power windows 63 Rearview mirror/sideview mirrors 65 Power moonroof (option) 68 pg. 42 Instruments and controls Instrument overview
2007 VOLVO S60 Instruments and controls pg. 41 Instruments and controls Instrument overview 42 Instrument panel 44 Indicator and warning symbols 45 Switches in the center console 50 Steering wheel adjustment 52 Lighting panel 53 Left-side steering wheel lever 55 Right-side steering wheel lever 56 Hazard warning flashers, rear window/sideview mirror defroster 58 Trip computer 59 Cruise control 60 Parking brake, auxiliary socket/cigarette lighter 62 Power windows 63 Rearview mirror/sideview mirrors 65 Power moonroof (option) 68 pg. 42 Instruments and controls Instrument overview

Owner's Manual
Page 35
Horn 7 7. Headlights/Parking lights/switch for unlocking fuel filler door 54 3. Turn signals/High/low beams 53 5. Parking brake (hand brake) 62 Rear fog light 54 4. Instrument panel 44 8. Windshield wipers 56 10. Front fog lights 54 2. pg. 43 Instruments and controls Instrument overview 1. Cruise control 60 6. Audio controls in steering wheel 218 9.
Horn 7 7. Headlights/Parking lights/switch for unlocking fuel filler door 54 3. Turn signals/High/low beams 53 5. Parking brake (hand brake) 62 Rear fog light 54 4. Instrument panel 44 8. Windshield wipers 56 10. Front fog lights 54 2. pg. 43 Instruments and controls Instrument overview 1. Cruise control 60 6. Audio controls in steering wheel 218 9.

Owner's Manual
Page 36
Glove compartment 17. Odometer/Trip odometer/ Cruise control indicator 21. Turn signal indicators 23. Fuel gauge 26. Instrument lighting 29. Interior lighting 33. Moonroof control 34. Panel vents 18. Temperature gauge 20. Text window Center console switches 12. Lighting panel 31. Climate ... 48 44 44 44 44 44 44 44 45 73 54 53 84 84 68 12 65 100 64 63 67 121 pg. 44 Instruments and controls Instrument panel 1. right/left 2. Audio system 14. 12 V socket 15. Text window 19. Indicator and warning symbols 27. Seat belt reminder 35. Rearview mirror ...
Glove compartment 17. Odometer/Trip odometer/ Cruise control indicator 21. Turn signal indicators 23. Fuel gauge 26. Instrument lighting 29. Interior lighting 33. Moonroof control 34. Panel vents 18. Temperature gauge 20. Text window Center console switches 12. Lighting panel 31. Climate ... 48 44 44 44 44 44 44 44 45 73 54 53 84 84 68 12 65 100 64 63 67 121 pg. 44 Instruments and controls Instrument panel 1. right/left 2. Audio system 14. 12 V socket 15. Text window 19. Indicator and warning symbols 27. Seat belt reminder 35. Rearview mirror ...

Owner's Manual
Page 37
... thousands of fuel remaining in the red section. At low speeds or when the vehicle is on the button. 5. Indicator and warning symbols pg. 45 Instruments and controls Indicator and warning symbols The indicator and warning symbols light up when you turn the ignition key to set button Turn the button...
... thousands of fuel remaining in the red section. At low speeds or when the vehicle is on the button. 5. Indicator and warning symbols pg. 45 Instruments and controls Indicator and warning symbols The indicator and warning symbols light up when you turn the ignition key to set button Turn the button...

Owner's Manual
Page 38
...braking, stop immediately, open the hood and check the brake fluid level in center of the instrument panel This symbol shines as possible. Yellow symbol - Have the system(s) inspected by a trained and qualified Volvo service technician as soon as a red or yellow light depending on after two minutes. If ...drive carefully to indicate that the driver has not fastened his/her seat belt. Seat belt reminder This symbol lights up to an authorized Volvo retailer and have the brake system inspected. Supplemental Restraint System SRS If this light comes on while the vehicle is being driven, or ...
...braking, stop immediately, open the hood and check the brake fluid level in center of the instrument panel This symbol shines as possible. Yellow symbol - Have the system(s) inspected by a trained and qualified Volvo service technician as soon as a red or yellow light depending on after two minutes. If ...drive carefully to indicate that the driver has not fastened his/her seat belt. Seat belt reminder This symbol lights up to an authorized Volvo retailer and have the brake system inspected. Supplemental Restraint System SRS If this light comes on while the vehicle is being driven, or ...

Owner's Manual
Page 39
...could hurt fuel economy, emission cleanliness, and driveability. See page 123 for additional information. Have the vehicle towed to the nearest authorized Volvo retailer. Stability Traction Control (STC)1 system or Dynamic Stability Traction Control (DSTC) system 2 If the fluid level is below the MIN... could even damage other components in the text window: DO NOT DRIVE. R-models are equipped with this warning light. pg. 47 Instruments and controls Indicator and warning symbols Anti-lock brake system ABS If the warning light comes on when the parking brake (hand brake)...
...could hurt fuel economy, emission cleanliness, and driveability. See page 123 for additional information. Have the vehicle towed to the nearest authorized Volvo retailer. Stability Traction Control (STC)1 system or Dynamic Stability Traction Control (DSTC) system 2 If the fluid level is below the MIN... could even damage other components in the text window: DO NOT DRIVE. R-models are equipped with this warning light. pg. 47 Instruments and controls Indicator and warning symbols Anti-lock brake system ABS If the warning light comes on when the parking brake (hand brake)...

Owner's Manual
Page 40
...the message will be returned to erase the warning message. If a warning message is actively working to stabilize the vehicle. pg. 49 Instruments and controls Indicator and warning symbols Message Meaning The text window can access the function of your choice. Press button A to memory) by... pressing button A (see illustration). pg. 48 Instruments and controls Indicator and warning symbols Messages in the text window When a warning light in the text window. See page 125 for more ...
...the message will be returned to erase the warning message. If a warning message is actively working to stabilize the vehicle. pg. 49 Instruments and controls Indicator and warning symbols Message Meaning The text window can access the function of your choice. Press button A to memory) by... pressing button A (see illustration). pg. 48 Instruments and controls Indicator and warning symbols Messages in the text window When a warning light in the text window. See page 125 for more ...
Owner's Manual
Page 41
...Volvo service technician for 2 minutes each time the vehicle is started until reset by the servicing SERVICE retailer. SERVICE This message will be displayed at the next scheduled maintenance service. See page STOP 175. 1 3 ENGINE OIL LEVEL LOW - Yellow warning symbol, see page 45. pg. 50 Instruments... OIL LEVEL LOW Stop as soon as possible and switch off . SERVICE Take your owner's manual. See page 125 for inspection at your Volvo retailer. See page MANUAL 1 175. 3 STC/DSTC SPIN The stability system's spin control function has been turned off the engine, check ...
...Volvo service technician for 2 minutes each time the vehicle is started until reset by the servicing SERVICE retailer. SERVICE This message will be displayed at the next scheduled maintenance service. See page STOP 175. 1 3 ENGINE OIL LEVEL LOW - Yellow warning symbol, see page 45. pg. 50 Instruments... OIL LEVEL LOW Stop as soon as possible and switch off . SERVICE Take your owner's manual. See page 125 for inspection at your Volvo retailer. See page MANUAL 1 175. 3 STC/DSTC SPIN The stability system's spin control function has been turned off the engine, check ...

Owner's Manual
Page 43
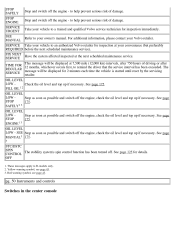
...). Active Bi-Xenon headlights (ABL) - Temporarily disconnecting the alarm sensors (option) See page 104 for cigarette lighters, which are available at your Volvo retailer. The ignition key must be in position 1 (or higher) for more details. 12 volt socket This 12 volt socket can be displayed ... is turning. See also page 53. option The beams of ABL headlights adjust laterally to help light up and "VALET LOCK pg. 51 Instruments and controls Switches in the center console ON" will be turned off (deactivated) by pressing the button. NOTE: The auxiliary sockets can be...
...). Active Bi-Xenon headlights (ABL) - Temporarily disconnecting the alarm sensors (option) See page 104 for cigarette lighters, which are available at your Volvo retailer. The ignition key must be in position 1 (or higher) for more details. 12 volt socket This 12 volt socket can be displayed ... is turning. See also page 53. option The beams of ABL headlights adjust laterally to help light up and "VALET LOCK pg. 51 Instruments and controls Switches in the center console ON" will be turned off (deactivated) by pressing the button. NOTE: The auxiliary sockets can be...

Owner's Manual
Page 44
Headlight/parking light switch 2. Instrument panel lighting 5. Pull down the lever on the left of the steering wheel can be adjusted to a comfortable position for the driver. Check that the ... the ignition is locked in the new position. Headlights WARNING! Front fog lights 3. Both the height and the reach of the steering column. pg. 53 Instruments and controls Lighting panel 1.
Headlight/parking light switch 2. Instrument panel lighting 5. Pull down the lever on the left of the steering wheel can be adjusted to a comfortable position for the driver. Check that the ... the ignition is locked in the new position. Headlights WARNING! Front fog lights 3. Both the height and the reach of the steering column. pg. 53 Instruments and controls Lighting panel 1.

Owner's Manual
Page 45
... the light switch (1) is started and can be deactivated/ reactivated by pressing the ABL button (see the right-pointing beam in this position. pg. 54 Instruments and controls Lighting panel Fog lights Front fog lights (option) The front fog lights can be used only when conditions such as fog, rain, snow...
... the light switch (1) is started and can be deactivated/ reactivated by pressing the ABL button (see the right-pointing beam in this position. pg. 54 Instruments and controls Lighting panel Fog lights Front fog lights (option) The front fog lights can be used only when conditions such as fog, rain, snow...
Owner's Manual
Page 46
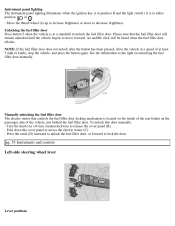
... filler door, or forward to release the cover panel (B). - Fold down to access the electric motor (C). - Instrument panel lighting The instrument panel lighting illuminates when the ignition key is in either position or . - pg. 55 Instruments and controls Left-side steering wheel lever Lever positions Manually unlocking the fuel filler door The electric...
... filler door, or forward to release the cover panel (B). - Fold down to access the electric motor (C). - Instrument panel lighting The instrument panel lighting illuminates when the ignition key is in either position or . - pg. 55 Instruments and controls Left-side steering wheel lever Lever positions Manually unlocking the fuel filler door The electric...

Owner's Manual
Page 47
...The high beams will illuminate and remain on for normal turns 3. Remove the key from the ignition switch. - Factory setting pg. 56 Instruments and controls Right-side steering wheel lever Turn signals, lane change position 2. High beam flash 4. NOTE: This automatic flashing sequence can automatically ...flash the turn signals. Home safe lighting When you leave your vehicle at night, you can be interrupted by an authorized Volvo retailer. 1. The headlights and parking lights will remain on models equipped with the optional Active Bi-Xenon headlights). High/low beam...
...The high beams will illuminate and remain on for normal turns 3. Remove the key from the ignition switch. - Factory setting pg. 56 Instruments and controls Right-side steering wheel lever Turn signals, lane change position 2. High beam flash 4. NOTE: This automatic flashing sequence can automatically ...flash the turn signals. Home safe lighting When you leave your vehicle at night, you can be interrupted by an authorized Volvo retailer. 1. The headlights and parking lights will remain on models equipped with the optional Active Bi-Xenon headlights). High/low beam...

Owner's Manual
Page 49
... rain sensor function is released, at "high" speed. Continuous wiper function. Wipers operate at which time the wipers return to rain sensor mode. pg. 58 Instruments and controls Hazard warning flashers, rear window/sideview mirror defroster Hazard warning flashers The four-way flasher should be damaged. Press the button again to... the lever is left on where you live. The rain sensor should be used to turn off the heating after approximately 12 minutes. pg. 57 Instruments and controls Right-side steering wheel lever CAUTION!
... rain sensor function is released, at "high" speed. Continuous wiper function. Wipers operate at which time the wipers return to rain sensor mode. pg. 58 Instruments and controls Hazard warning flashers, rear window/sideview mirror defroster Hazard warning flashers The four-way flasher should be damaged. Press the button again to... the lever is left on where you live. The rain sensor should be used to turn off the heating after approximately 12 minutes. pg. 57 Instruments and controls Right-side steering wheel lever CAUTION!

Owner's Manual
Page 50
... button A. When the vehicle is displayed in the text window while you are using the trip computer, you to the trip computer function. pg. 59 Instruments and controls Trip computer Trip computer The trip computer stores information gathered from several systems in your vehicle and has four menus that can be...
... button A. When the vehicle is displayed in the text window while you are using the trip computer, you to the trip computer function. pg. 59 Instruments and controls Trip computer Trip computer The trip computer stores information gathered from several systems in your vehicle and has four menus that can be...

Owner's Manual
Page 51
..., button C). Current speed in system memory until the RESET (button C) is switched off, information on Canadian models. 2. pg. 60 Instruments and controls Cruise control Cruise control The cruise control panel is located on the left side of the steering wheel hub and may vary slightly... km/h to set the vehicle's speed. CRUISE will be displayed in the information window in the instrument panel. CRUISE-ON will be displayed in the information window in the instrument panel. NOTE: This does not set the current speed. Engaging cruise control Press the CRUISE button...
..., button C). Current speed in system memory until the RESET (button C) is switched off, information on Canadian models. 2. pg. 60 Instruments and controls Cruise control Cruise control The cruise control panel is located on the left side of the steering wheel hub and may vary slightly... km/h to set the vehicle's speed. CRUISE will be displayed in the information window in the instrument panel. CRUISE-ON will be displayed in the information window in the instrument panel. NOTE: This does not set the current speed. Engaging cruise control Press the CRUISE button...
