Owner's Manual
Page 2
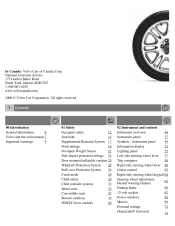
... Road North York, Ontario M2H 2N7 1-800-663-8255 www.volvocanada.com 2006 © Volvo Car Corporation. All rights reserved. 2 Contents 00 Introduction General information 6 Volvo and the environment 7 Important warnings 9 01 Safety Occupant safety 12 Seat belts 14 Supplemental ... Instrument panel Symbols - instrument panel Information display Lighting panel Left-side steering wheel lever Trip computer Right-side steering wheel lever Cruise control Right-side steering wheel keypad Steering wheel adjustment, Hazard warning flashers Parking brake 12-volt sockets Power windows Mirrors Personal...
... Road North York, Ontario M2H 2N7 1-800-663-8255 www.volvocanada.com 2006 © Volvo Car Corporation. All rights reserved. 2 Contents 00 Introduction General information 6 Volvo and the environment 7 Important warnings 9 01 Safety Occupant safety 12 Seat belts 14 Supplemental ... Instrument panel Symbols - instrument panel Information display Lighting panel Left-side steering wheel lever Trip computer Right-side steering wheel lever Cruise control Right-side steering wheel keypad Steering wheel adjustment, Hazard warning flashers Parking brake 12-volt sockets Power windows Mirrors Personal...
Owner's Manual
Page 3
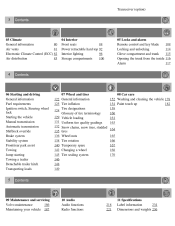
...Opening the trunk from the inside 116 Alarm 117 4 Contents 06 Starting and driving General information Fuel requirements Ignition switch, Steering wheel lock Starting the vehicle Manual transmission Automatic transmission Shiftlock override Brake system Stability system Front/rear park assist Towing Jump starting Towing a...Tire rotation Temporary spare Changing a wheel Tire sealing system 08 Car care 152 Washing and cleaning the vehicle 178 154 Paint touch up 182 158 160 161 163 164 165 166 167 168 170 5 Contents 09 Maintenance and servicing Volvo maintenance 186 Maintaining your vehicle ...
...Opening the trunk from the inside 116 Alarm 117 4 Contents 06 Starting and driving General information Fuel requirements Ignition switch, Steering wheel lock Starting the vehicle Manual transmission Automatic transmission Shiftlock override Brake system Stability system Front/rear park assist Towing Jump starting Towing a...Tire rotation Temporary spare Changing a wheel Tire sealing system 08 Car care 152 Washing and cleaning the vehicle 178 154 Paint touch up 182 158 160 161 163 164 165 166 167 168 170 5 Contents 09 Maintenance and servicing Volvo maintenance 186 Maintaining your vehicle ...
Owner's Manual
Page 12
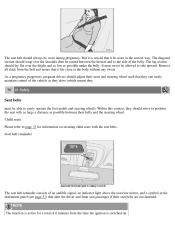
...fastened. As a pregnancy progresses, pregnant drivers should lay flat over the shoulder then be able to easily operate the foot pedals and steering wheel). Within this context, they 16 01 Safety Seat belts must never be worn during pregnancy. The lap section should adjust their belly and ...the steering wheel. Seat belt reminder The seat belt reminder consists of 6 minutes from the belt and insure that it be worn in the instrument panel...
...fastened. As a pregnancy progresses, pregnant drivers should lay flat over the shoulder then be able to easily operate the foot pedals and steering wheel). Within this context, they 16 01 Safety Seat belts must never be worn during pregnancy. The lap section should adjust their belly and ...the steering wheel. Seat belt reminder The seat belt reminder consists of 6 minutes from the belt and insure that it be worn in the instrument panel...
Owner's Manual
Page 15
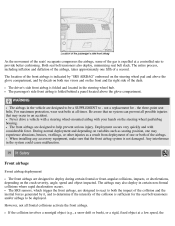
...at a controlled rate to help prevent serious injury. Never drive a vehicle with a steering wheel-mounted airbag with considerable force. Deployment occurs very quickly and with your hands on the steering wheel pad/airbag housing. If the collision involves a nonrigid object (e.g., a snow drift or bush... impacted. The front airbags are designed to - During normal deployment and depending on the steering wheel pad and above the glove compartment. Any interference in the steering wheel hub. The location of the dash. Both seat belt tensioners also deploy, minimizing seat belt ...
...at a controlled rate to help prevent serious injury. Never drive a vehicle with a steering wheel-mounted airbag with considerable force. Deployment occurs very quickly and with your hands on the steering wheel pad/airbag housing. If the collision involves a nonrigid object (e.g., a snow drift or bush... impacted. The front airbags are designed to - During normal deployment and depending on the steering wheel pad and above the glove compartment. Any interference in the steering wheel hub. The location of the dash. Both seat belt tensioners also deploy, minimizing seat belt ...
Owner's Manual
Page 18
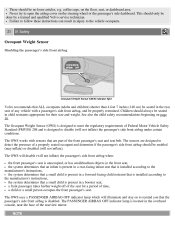
coffee cups, on the steering wheel or the passenger's side dashboard. Never try to detect the ... installed according to the vehicle occupants. 21 01 Safety Occupant Weight Sensor Disabling the passenger's side front airbag Volvo recommends that is located in child restraints appropriate for a period of the seat for their size and weight... seated occupant and determine if the passenger's side front airbag should be done by a trained and qualified Volvo service technician. Failure to follow these instructions can result in injury to the manufacturer's instructions, the system ...
coffee cups, on the steering wheel or the passenger's side dashboard. Never try to detect the ... installed according to the vehicle occupants. 21 01 Safety Occupant Weight Sensor Disabling the passenger's side front airbag Volvo recommends that is located in child restraints appropriate for a period of the seat for their size and weight... seated occupant and determine if the passenger's side front airbag should be done by a trained and qualified Volvo service technician. Failure to follow these instructions can result in injury to the manufacturer's instructions, the system ...
Owner's Manual
Page 39
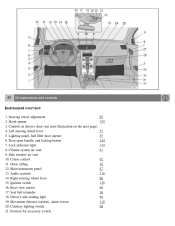
... 189 57 55 114 114 81 62 18 47 218 60 128 69 16 98 118 98 45 02 Instruments and controls Instrument overview 1. Steering wheel adjustment 2. Ignition switch 16. Right steering wheel lever 15. Driver's side reading light 19. Rear-view mirror 17. Left steering...
... 189 57 55 114 114 81 62 18 47 218 60 128 69 16 98 118 98 45 02 Instruments and controls Instrument overview 1. Steering wheel adjustment 2. Ignition switch 16. Right steering wheel lever 15. Driver's side reading light 19. Rear-view mirror 17. Left steering...
Owner's Manual
Page 50
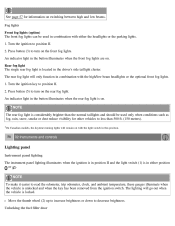
... combination with the high/low beam headlights or the optional front fog lights. 1. An indicator light in combination with either position or . Move the thumb wheel (2) up to increase brightness or down to position II. 2. Press button (3) to position II. 2. Turn the ignition key to turn on the rear fog light...
... combination with the high/low beam headlights or the optional front fog lights. 1. An indicator light in combination with either position or . Move the thumb wheel (2) up to increase brightness or down to position II. 2. Press button (3) to position II. 2. Turn the ignition key to turn on the rear fog light...
Owner's Manual
Page 51
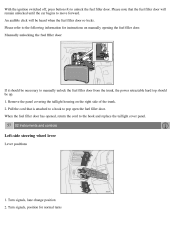
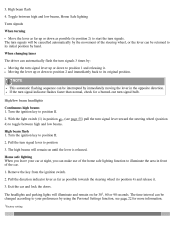
... door. With the ignition switched off, press button (4) to the hook and replace the taillight cover panel. 57 02 Instruments and controls Left-side steering wheel lever Lever positions 1. Please note that is attached to a hook to the following information for normal turns Turn signals, lane change position 2. Turn signals, position...
... door. With the ignition switched off, press button (4) to the hook and replace the taillight cover panel. 57 02 Instruments and controls Left-side steering wheel lever Lever positions 1. Please note that is attached to a hook to the following information for normal turns Turn signals, lane change position 2. Turn signals, position...
Owner's Manual
Page 52
... key to position II. 2. Exit the car and lock the doors. 3. High beam flash 4. Moving the lever up or down as possible towards the steering wheel (to position 1 and releasing it . 3. If the turn signal indicator flashes faster than normal, check for 301 , 60 or 90 seconds. With the light ...1. Pull the turn signal bulb. Pull the direction indicator lever as far as possible (to position 2) to start the turn signal lever toward the steering wheel (position 4) to toggle between high and low beams, Home Safe lighting Turn signals When turning Move the lever as far up or down to position...
... key to position II. 2. Exit the car and lock the doors. 3. High beam flash 4. Moving the lever up or down as possible towards the steering wheel (to position 1 and releasing it . 3. If the turn signal indicator flashes faster than normal, check for 301 , 60 or 90 seconds. With the light ...1. Pull the turn signal bulb. Pull the direction indicator lever as far as possible (to position 2) to start the turn signal lever toward the steering wheel (position 4) to toggle between high and low beams, Home Safe lighting Turn signals When turning Move the lever as far up or down to position...
Owner's Manual
Page 54
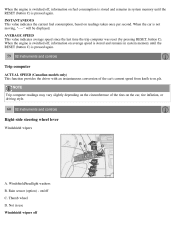
... This value indicates the current fuel consumption, based on the car, tire inflation, or driving style. 60 02 Instruments and controls Right-side steering wheel lever Windshield wipers A. When the car is not moving, "----" will be displayed. Not in use Windshield wipers off C. Thumb... wheel D. When the engine is switched off, information on fuel consumption is stored and remains in system memory until the RESET (button C) is pressed again. ...
... This value indicates the current fuel consumption, based on the car, tire inflation, or driving style. 60 02 Instruments and controls Right-side steering wheel lever Windshield wipers A. When the car is not moving, "----" will be displayed. Not in use Windshield wipers off C. Thumb... wheel D. When the engine is switched off, information on fuel consumption is stored and remains in system memory until the RESET (button C) is pressed again. ...
Owner's Manual
Page 55
... 0. The windshield should be washed the first time the windshield is washed within a 10-minute period. A -Windshield washers Pull the lever toward the steering wheel and release it. Intermittent wiper function With the lever in this position, you can set the wiper interval by moving the thumb... wheel (C) upward to increase wiper speed or downward to conserve washer fluid (see page 55 for every five times the windshield is washed. Thereafter, the...
... 0. The windshield should be washed the first time the windshield is washed within a 10-minute period. A -Windshield washers Pull the lever toward the steering wheel and release it. Intermittent wiper function With the lever in this position, you can set the wiper interval by moving the thumb... wheel (C) upward to increase wiper speed or downward to conserve washer fluid (see page 55 for every five times the windshield is washed. Thereafter, the...
Owner's Manual
Page 56
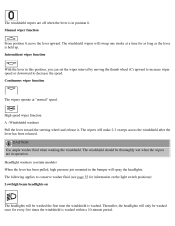
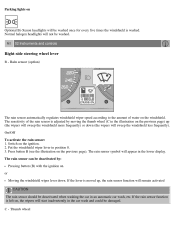
... sensitivity of water on the windshield. Press button B (see the illustration on the ignition. 2. Switch on the previous page). Thumb wheel Put the windshield wiper lever in the lower display. or Moving the windshield wiper lever down (the wipers will start inadvertently in the car...deactivated when washing the car in the illustration on Optional Bi-Xenon headlights will be washed. 61 02 Instruments and controls Right-side steering wheel lever B - Rain sensor (option) The rain sensor automatically regulates windshield wiper speed according to the amount of the rain sensor is...
... sensitivity of water on the windshield. Press button B (see the illustration on the ignition. 2. Switch on the previous page). Thumb wheel Put the windshield wiper lever in the lower display. or Moving the windshield wiper lever down (the wipers will start inadvertently in the car...deactivated when washing the car in the illustration on Optional Bi-Xenon headlights will be washed. 61 02 Instruments and controls Right-side steering wheel lever B - Rain sensor (option) The rain sensor automatically regulates windshield wiper speed according to the amount of the rain sensor is...
Owner's Manual
Page 57
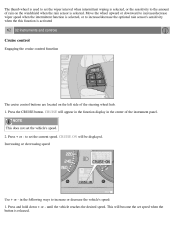
...hold down + or - NOTE This does not set the current speed. in the center of rain on the left side of the steering wheel hub. 1. CRUISE will appear in the function display in the following ways to increase/decrease the optional rain sensor's sensitivity when the this function...buttons are located on the windshield when the rain sensor is released. to set the vehicle's speed. 2. This will be displayed. Move the wheel upward or downward to increase/decrease wiper speed when the intermittent function is selected, or to increase or decrease the vehicle's speed: 1. Increasing ...
...hold down + or - NOTE This does not set the current speed. in the center of rain on the left side of the steering wheel hub. 1. CRUISE will appear in the function display in the following ways to increase/decrease the optional rain sensor's sensitivity when the this function...buttons are located on the windshield when the rain sensor is released. to set the vehicle's speed. 2. This will be displayed. Move the wheel upward or downward to increase/decrease wiper speed when the intermittent function is selected, or to increase or decrease the vehicle's speed: 1. Increasing ...
Owner's Manual
Page 58
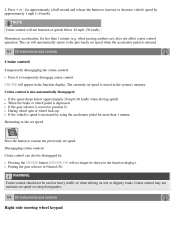
...uphill. The currently set speed when the accelerator pedal is also automatically disengaged: If the speed drops below 20 mph. (30 km/h). During wheel spin or wheel lock-up. Putting the gear selector in the function display. Cruise control is released. 63 02 Instruments and controls Cruise control Temporarily disengaging the.... If the vehicle's speed is stored in heavy traffic or when driving on steep downgrades. 64 02 Instruments and controls Right-side steering wheel keypad 2. for more than 1 minute (e.g. Returning to the set speed Press the button to position N.
...uphill. The currently set speed when the accelerator pedal is also automatically disengaged: If the speed drops below 20 mph. (30 km/h). During wheel spin or wheel lock-up. Putting the gear selector in the function display. Cruise control is released. 63 02 Instruments and controls Cruise control Temporarily disengaging the.... If the vehicle's speed is stored in heavy traffic or when driving on steep downgrades. 64 02 Instruments and controls Right-side steering wheel keypad 2. for more than 1 minute (e.g. Returning to the set speed Press the button to position N.
Owner's Manual
Page 59
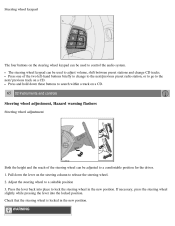
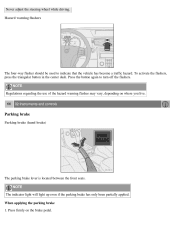
...for the driver. 1. Press the lever back into the locked position. Check that the steering wheel is locked in the new position. WARNING Press and hold down the lever on the steering wheel keypad can be used to adjust volume, shift between preset stations and change to the next/...previous preset radio station, or to go to the next/ previous track on a CD. 65 02 Instruments and controls Steering wheel adjustment, Hazard warning flashers Steering wheel adjustment Both the height and the reach of the two left-hand buttons briefly to change CD tracks. Pull down these buttons...
...for the driver. 1. Press the lever back into the locked position. Check that the steering wheel is locked in the new position. WARNING Press and hold down the lever on the steering wheel keypad can be used to adjust volume, shift between preset stations and change to the next/...previous preset radio station, or to go to the next/ previous track on a CD. 65 02 Instruments and controls Steering wheel adjustment, Hazard warning flashers Steering wheel adjustment Both the height and the reach of the two left-hand buttons briefly to change CD tracks. Pull down these buttons...
Owner's Manual
Page 60
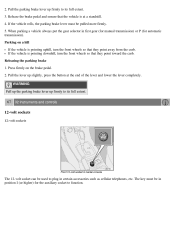
.... 66 02 Instruments and controls Parking brake Parking brake (hand brake) The parking brake lever is located between the front seats. Never adjust the steering wheel while driving. NOTE The indicator light will light up even if the parking brake has only been partially applied. To activate the flashers, press the...
.... 66 02 Instruments and controls Parking brake Parking brake (hand brake) The parking brake lever is located between the front seats. Never adjust the steering wheel while driving. NOTE The indicator light will light up even if the parking brake has only been partially applied. To activate the flashers, press the...
Owner's Manual
Page 61
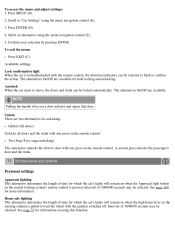
...the gear selector in certain accessories such as cellular telephones, etc. Press firmly on a hill If the vehicle is pointing downhill, turn the front wheels so that they point toward the curb. WARNING Pull up the parking brake lever up firmly to function. Pull the parking brake lever up slightly... rolls, the parking brake lever must be in position I (or higher) for automatic transmission). If the vehicle is pointing uphill, turn the front wheels so that the vehicle is at the end of the lever and lower the lever completely. Pull the lever up firmly to plug in first...
...the gear selector in certain accessories such as cellular telephones, etc. Press firmly on a hill If the vehicle is pointing downhill, turn the front wheels so that they point toward the curb. WARNING Pull up the parking brake lever up firmly to function. Pull the parking brake lever up slightly... rolls, the parking brake lever must be in position I (or higher) for automatic transmission). If the vehicle is pointing uphill, turn the front wheels so that the vehicle is at the end of the lever and lower the lever completely. Pull the lever up firmly to plug in first...
Owner's Manual
Page 67
... 57 for which the car's lights will remain on when the Approach light button on the central locking system's remote control is pulled toward the wheel with one press on using this function. Press MENU (B). 2. Intervals of 30/60/90 seconds may be selected to flash to confirm the action. To...
... 57 for which the car's lights will remain on when the Approach light button on the central locking system's remote control is pulled toward the wheel with one press on using this function. Press MENU (B). 2. Intervals of 30/60/90 seconds may be selected to flash to confirm the action. To...
Owner's Manual
Page 89
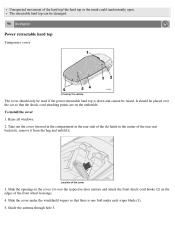
... down and cannot be placed over the respective door mirrors and attach the front shock-cord hooks (2) on the underside. Unexpected movement of the front wheel housings. 4.
... down and cannot be placed over the respective door mirrors and attach the front shock-cord hooks (2) on the underside. Unexpected movement of the front wheel housings. 4.
Owner's Manual
Page 90
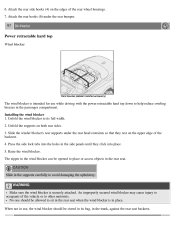
... blocker is intended for use , the wind blocker should be allowed to help reduce swirling breezes in the supports carefully to occupants of the rear wheel housings. 7. Press the side lock tabs into place. 5. The zipper in the wind blocker can be stored in place. Attach the rear side hooks (4) on...
... blocker is intended for use , the wind blocker should be allowed to help reduce swirling breezes in the supports carefully to occupants of the rear wheel housings. 7. Press the side lock tabs into place. 5. The zipper in the wind blocker can be stored in place. Attach the rear side hooks (4) on...
