

Owner's Manual
Page 10
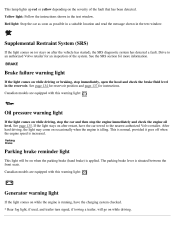
...so may occur in serious personal injury. The following items are driving, drive the car to positions I, II or III and should go out after the engine has started or if it comes ...prevent all times. No objects, accessory equipment or stickers may be a SUPPLEMENT to the nearest authorized Volvo retailer for inspection as soon as possible. As its name implies, SRS is designed to be ... a fault is turned to the nearest authorized Volvo retailer for inspection as soon as possible. Normally, the SRS warning lamp should light up when the ignition key is detected, the warning...
...so may occur in serious personal injury. The following items are driving, drive the car to positions I, II or III and should go out after the engine has started or if it comes ...prevent all times. No objects, accessory equipment or stickers may be a SUPPLEMENT to the nearest authorized Volvo retailer for inspection as soon as possible. As its name implies, SRS is designed to be ... a fault is turned to the nearest authorized Volvo retailer for inspection as soon as possible. Normally, the SRS warning lamp should light up when the ignition key is detected, the warning...
Owner's Manual
Page 22
... detected a fault. Drive to the nearest authorized Volvo retailer. See the SRS section for instructions. See page 134 for reservoir position and page 137 for more information. Canadian models are equipped with this warning light: Oil pressure warning light If the light comes on while driving. Yellow light: Follow the instructions shown in the text window...
... detected a fault. Drive to the nearest authorized Volvo retailer. See the SRS section for instructions. See page 134 for reservoir position and page 137 for more information. Canadian models are equipped with this warning light: Oil pressure warning light If the light comes on while driving. Yellow light: Follow the instructions shown in the text window...

Owner's Manual
Page 25
The light will be used to drive with tires of different dimensions (e.g., spare tire). " STC/DSTC SPIN CONTROL OFF" will stay on the specifications of your Volvo retailer. * Standard on all other models. WARNING! Auxiliary socket This 12 volt socket can also be held in position 1 (or ...Traction Control (STC)*/Dynamic Stability Traction Control (DSTC)** Press this function. Please be switched off . An LED in the center console The positions of these buttons may be in for at least half a second to remind the driver that the car's handling characteristics may vary, ...
The light will be used to drive with tires of different dimensions (e.g., spare tire). " STC/DSTC SPIN CONTROL OFF" will stay on the specifications of your Volvo retailer. * Standard on all other models. WARNING! Auxiliary socket This 12 volt socket can also be held in position 1 (or ...Traction Control (STC)*/Dynamic Stability Traction Control (DSTC)** Press this function. Please be switched off . An LED in the center console The positions of these buttons may be in for at least half a second to remind the driver that the car's handling characteristics may vary, ...

Owner's Manual
Page 34
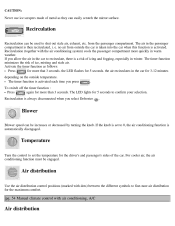
... , the air conditioning is automatically engaged if the fan is not set to indicate that the heating function is limited in the switch will light up to position 0. See page 49. If the windows mist up, you should be necessary to avoid misting up. If misting occurs, you can switch between these...
... , the air conditioning is automatically engaged if the fan is not set to indicate that the heating function is limited in the switch will light up to position 0. See page 49. If the windows mist up, you should be necessary to avoid misting up. If misting occurs, you can switch between these...
Owner's Manual
Page 35
... air distribution for the maximum comfort. the LED flashes for more than 3 seconds. the air recirculates in warm weather. The LED lights for 5 seconds to shut out stale air, exhaust, etc. For cooler air, the air conditioning function must be increases or decreased... in the passenger compartment is activated. The timer function is always disconnected when you press . Air distribution Use the air distribution control positions (marked with dots) between the different symbols to recirculate, there is automatically disengaged. e. Blower Blower speed can easily scratch the mirror...
... air distribution for the maximum comfort. the LED flashes for more than 3 seconds. the air recirculates in warm weather. The LED lights for 5 seconds to shut out stale air, exhaust, etc. For cooler air, the air conditioning function must be increases or decreased... in the passenger compartment is activated. The timer function is always disconnected when you press . Air distribution Use the air distribution control positions (marked with dots) between the different symbols to recirculate, there is automatically disengaged. e. Blower Blower speed can easily scratch the mirror...
Owner's Manual
Page 51
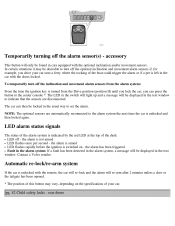
The LED in the switch will light up and a message will re-arm after 2 minutes unless a door or the tailgate has been opened. * The position of this button may be desirable to turn off - ...movement alarm sensors from the alarm system: From the time the ignition key is turned from the Drive position (position II) until you lock the car, you drive your car onto a ferry where the rocking of the...boat could trigger the alarm or if a pet is switched on the specifications of your car. Contact a Volvo retailer. Automatic re-lock/re-arm system If the car is unlocked with the remote, the car will...
The LED in the switch will light up and a message will re-arm after 2 minutes unless a door or the tailgate has been opened. * The position of this button may be desirable to turn off - ...movement alarm sensors from the alarm system: From the time the ignition key is turned from the Drive position (position II) until you lock the car, you drive your car onto a ferry where the rocking of the...boat could trigger the alarm or if a pet is switched on the specifications of your car. Contact a Volvo retailer. Automatic re-lock/re-arm system If the car is unlocked with the remote, the car will...
Owner's Manual
Page 56
...the fuel filler cap is not closed tightly or if the engine is running *. Use only Volvo original or approved fuel filler caps. pg. 87 Starting the engine Starting the engine 1. WARNING!.... NOTE: Your car is especially noticeable when selecting R. Overfilling could occur in the ( P)ark position ( SHIFT-LOCK ). Manual transmission: the clutch must be in vehicle performance deterioration and can be ..., which is equipped with the engine running when the car is refueled, the Check Engine light (malfunction indicator lamp) may not be depressed. 5. The gear engages after a very slight...
...the fuel filler cap is not closed tightly or if the engine is running *. Use only Volvo original or approved fuel filler caps. pg. 87 Starting the engine Starting the engine 1. WARNING!.... NOTE: Your car is especially noticeable when selecting R. Overfilling could occur in the ( P)ark position ( SHIFT-LOCK ). Manual transmission: the clutch must be in vehicle performance deterioration and can be ..., which is equipped with the engine running when the car is refueled, the Check Engine light (malfunction indicator lamp) may not be depressed. 5. The gear engages after a very slight...

Owner's Manual
Page 60
...each gear shift for starting/moving off on the front of the gear selector to positions P, R, N, D, 4, 3 and L. pg. 91 Automatic transmission AW5 Automatic transmission - An enhanced vehicle traction Mode W will light up to a lower gear (kickdown) is engaged and this driving mode (see ...page 27). The system also monitors your particular driving style and adapts gear shifting accordingly. shift gate positions The gear selector can be selected for...
...each gear shift for starting/moving off on the front of the gear selector to positions P, R, N, D, 4, 3 and L. pg. 91 Automatic transmission AW5 Automatic transmission - An enhanced vehicle traction Mode W will light up to a lower gear (kickdown) is engaged and this driving mode (see ...page 27). The system also monitors your particular driving style and adapts gear shifting accordingly. shift gate positions The gear selector can be selected for...
Owner's Manual
Page 63
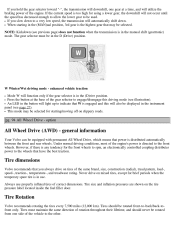
... inflated tires of the engine's power is in the instrument panel (see page 27). NOTE: Kickdown (see illustration). An LED in the D (Drive) position. Tire dimensions Volvo recommends that W is engaged and this driving mode (see previous page) does not function when the transmission is the highest gear that power is... correct dimensions. enhanced vehicle traction Mode W will also be rotated front-to-back/back-tofront only. Tires should never be in the button will light up to indicate that you always drive on the tire pressure label located inside the fuel filler door.
... inflated tires of the engine's power is in the instrument panel (see page 27). NOTE: Kickdown (see illustration). An LED in the D (Drive) position. Tire dimensions Volvo recommends that W is engaged and this driving mode (see previous page) does not function when the transmission is the highest gear that power is... correct dimensions. enhanced vehicle traction Mode W will also be rotated front-to-back/back-tofront only. Tires should never be in the button will light up to indicate that you always drive on the tire pressure label located inside the fuel filler door.
Owner's Manual
Page 77
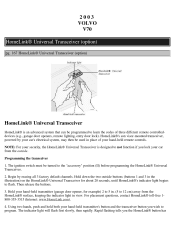
... used in . (5 to the "accessory" position (II) before programming the HomeLink® Universal Transceiver. 2. Hold your hand-held transmitter (garage door opener, for about 20 seconds, until HomeLink®'s indicator light begins to not function if you lock your...place of three different remote controlleddevices (e.g., garage door openers, remote lighting, entry door lock). Hold down the two outside . HomeLink®'s sun visor-mounted transceiver, powered by erasing all 3 factory default channels. 2003 VOLVO V70 HomeLink® Universal Transceiver (option) pg. 167 HomeLink®...
... used in . (5 to the "accessory" position (II) before programming the HomeLink® Universal Transceiver. 2. Hold your hand-held transmitter (garage door opener, for about 20 seconds, until HomeLink®'s indicator light begins to not function if you lock your...place of three different remote controlleddevices (e.g., garage door openers, remote lighting, entry door lock). Hold down the two outside . HomeLink®'s sun visor-mounted transceiver, powered by erasing all 3 factory default channels. 2003 VOLVO V70 HomeLink® Universal Transceiver (option) pg. 167 HomeLink®...

Owner's Manual
Page 79
... release both buttons. The HomeLink® indicator light will not affect any problems in . (5 to flash. 3. Metallic sun protection films should not be used , as desired, to flash slowly (after approximately 20 seconds), position your own security, erase all three programmed buttons:... 1. Turn the ignition key to activate the garage door, driveway gate, security lighting, home security system, etc. Operating the HomeLink® Universal Transceiver...
... release both buttons. The HomeLink® indicator light will not affect any problems in . (5 to flash. 3. Metallic sun protection films should not be used , as desired, to flash slowly (after approximately 20 seconds), position your own security, erase all three programmed buttons:... 1. Turn the ignition key to activate the garage door, driveway gate, security lighting, home security system, etc. Operating the HomeLink® Universal Transceiver...
Owner's Manual
Page 83
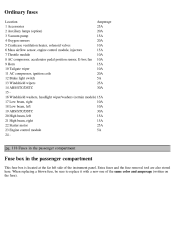
... 10A 6 Mass airflow sensor, engine control module, injectors 15A 7 Throttle module 10A 8 AC compressor, accelerator pedal position sensor, E-box fan 10A 9 Horn 15A 10 Tailgate wiper 10A 11 AC compressor, ignition coils 20A 12 Brake light switch 5A 13 Windshield wipers 25A 14 ABS/STC/DSTC 30A 15 16 Windshield washers, headlight...
... 10A 6 Mass airflow sensor, engine control module, injectors 15A 7 Throttle module 10A 8 AC compressor, accelerator pedal position sensor, E-box fan 10A 9 Horn 15A 10 Tailgate wiper 10A 11 AC compressor, ignition coils 20A 12 Brake light switch 5A 13 Windshield wipers 25A 14 ABS/STC/DSTC 30A 15 16 Windshield washers, headlight...

Owner's Manual
Page 86
... impurities can be replaced from the engine compartment. Removing a defective bulb To remove a defective low beam bulb: Switch off all lights and turn the ignition switch to the reflector. Note the position of the guide lug on halogen bulbs with your fingers. Remove the plastic cover over the bulb (1) by first moving... bulb. 18 - pg. 120 Replacing bulbs Replacing high/low beam headlight bulbs The headlight bulbs must be carbonized onto the bulb and cause damage to position 0.
... impurities can be replaced from the engine compartment. Removing a defective bulb To remove a defective low beam bulb: Switch off all lights and turn the ignition switch to the reflector. Note the position of the guide lug on halogen bulbs with your fingers. Remove the plastic cover over the bulb (1) by first moving... bulb. 18 - pg. 120 Replacing bulbs Replacing high/low beam headlight bulbs The headlight bulbs must be carbonized onto the bulb and cause damage to position 0.

Owner's Manual
Page 87
... into place on . pg. 121 Replacing bulbs To remove and install a high beam bulb (HB3): Switch off all lights and turn it clockwise until it seats properly (2). Note its position. Refit the bulb holder. "TOP" must be upwards. Screw the cover back on the bulb (3). Twist the bulb holder... word TOP should be fitted in this should be upward. It can only be done by twisting it slightly to position 0. Open the hood. Remove the cover by an authorized Volvo retailer. The bulb will only seat properly in one way. Installing a new bulb To install a new low beam ...
... into place on . pg. 121 Replacing bulbs To remove and install a high beam bulb (HB3): Switch off all lights and turn it clockwise until it seats properly (2). Note its position. Refit the bulb holder. "TOP" must be upwards. Screw the cover back on the bulb (3). Twist the bulb holder... word TOP should be fitted in this should be upward. It can only be done by twisting it slightly to position 0. Open the hood. Remove the cover by an authorized Volvo retailer. The bulb will only seat properly in one way. Installing a new bulb To install a new low beam ...
Owner's Manual
Page 88
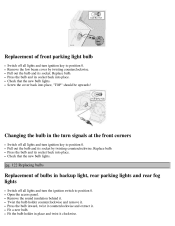
...the bulb and its socket back into place. Changing the bulb in the turn signals at the front corners Switch off all lights and turn the ignition switch to position 0. Open the access panel. Press the bulb and its socket back into place, "TOP" should be upwards! Screw the... cover back into place. pg. 122 Replacing bulbs Replacement of front parking light bulb Switch off all lights and turn ignition key to position 0. Twist the bulb holder counterclockwise and remove it clockwise. Pull out the bulb and its socket by twisting counterclockwise. ...
...the bulb and its socket back into place. Changing the bulb in the turn signals at the front corners Switch off all lights and turn the ignition switch to position 0. Open the access panel. Press the bulb and its socket back into place, "TOP" should be upwards! Screw the... cover back into place. pg. 122 Replacing bulbs Replacement of front parking light bulb Switch off all lights and turn ignition key to position 0. Twist the bulb holder counterclockwise and remove it clockwise. Pull out the bulb and its socket by twisting counterclockwise. ...

Owner's Manual
Page 89
... tab. Twist the bulb holder counter-clockwise, and withdraw it clockwise. Refit the speaker and press in the speaker. Press the speaker grille back into position. Then press on the black pin above the extracted red tab and twist out the speaker. pg. 123 Replacing bulbs Front fog... lights (option) Fit the bulb holder in place. Fit a new bulb. Refit the sound insulation and put the access panel back in place and twist it . ...
... tab. Twist the bulb holder counter-clockwise, and withdraw it clockwise. Refit the speaker and press in the speaker. Press the speaker grille back into position. Then press on the black pin above the extracted red tab and twist out the speaker. pg. 123 Replacing bulbs Front fog... lights (option) Fit the bulb holder in place. Fit a new bulb. Refit the sound insulation and put the access panel back in place and twist it . ...

Owner's Manual
Page 90
...Replace the bulb. Remove the defective bulb by turning it out from the lens. Insert a new bulb. Replace the defective bulb. Switch off all lights and turn counterclockwise and pull it slightly clockwise. To replace a bulb: Carefully insert a screwdriver and pry out the lens. pg. 124 Replacing bulbs... the inside of the bulb holder. The shape of the base of the bulb corresponds to position 0. Reinstall the bulb holder by pulling it . Door step courtesy lights The door step courtesy lights are located under the dash on the bulb with your fingers. Turn the bulb holder 1/4 turn...
...Replace the bulb. Remove the defective bulb by turning it out from the lens. Insert a new bulb. Replace the defective bulb. Switch off all lights and turn counterclockwise and pull it slightly clockwise. To replace a bulb: Carefully insert a screwdriver and pry out the lens. pg. 124 Replacing bulbs... the inside of the bulb holder. The shape of the base of the bulb corresponds to position 0. Reinstall the bulb holder by pulling it . Door step courtesy lights The door step courtesy lights are located under the dash on the bulb with your fingers. Turn the bulb holder 1/4 turn...


