
Owner's Manual
Page 13
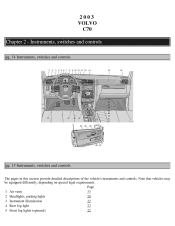
Note that vehicles may be equipped differently, depending on special legal requirements. 2003 VOLVO C70 Chapter 2 - Instruments, switches and controls pg. 14 Instruments, switches and controls pg. 15 Instruments, switches and controls The pages in this section provide detailed descriptions of the vehicle's instruments and controls. Page 1 Air vents 33 2 Headlights, parking lights 20 3 Instrument illumination 22 4 Rear fog light 22 5 Front fog lights (optional) 22
Note that vehicles may be equipped differently, depending on special legal requirements. 2003 VOLVO C70 Chapter 2 - Instruments, switches and controls pg. 14 Instruments, switches and controls pg. 15 Instruments, switches and controls The pages in this section provide detailed descriptions of the vehicle's instruments and controls. Page 1 Air vents 33 2 Headlights, parking lights 20 3 Instrument illumination 22 4 Rear fog light 22 5 Front fog lights (optional) 22

Owner's Manual
Page 19
...If the light remains on at 7,500 mile (12,000 km) intervals, after 750 hours of driving or after start until reset by an authorized Volvo retailer. Check the fuse and bulb. Fault in ETC (Electronic Throttle Control system) If this lamp comes on, there is a fault in the engine...lights when the brake pedal is depressed. See sections "Replacing bulbs" and "fuses. The light will be inspected by the servicing retailer. If the headlight switch is in the position all lights will come on after a defective outside bulb has been replaced, the corresponding bulb on again. Switch the ...
...If the light remains on at 7,500 mile (12,000 km) intervals, after 750 hours of driving or after start until reset by an authorized Volvo retailer. Check the fuse and bulb. Fault in ETC (Electronic Throttle Control system) If this lamp comes on, there is a fault in the engine...lights when the brake pedal is depressed. See sections "Replacing bulbs" and "fuses. The light will be inspected by the servicing retailer. If the headlight switch is in the position all lights will come on after a defective outside bulb has been replaced, the corresponding bulb on again. Switch the ...

Owner's Manual
Page 20
...direction indicator lever towards the steering wheel and release it there. Turn signals 1 Lane change position. In maneuvers such as when using the headlight flasher function). Move the lever towards the steering wheel. * See page 26 for 30 seconds to light your car at night, you can... beams and vice versa by moving the turn signal lever to the first stop and holding it . The headlight high beam will be switched on (headlights off ). With the headlight switch in position screw (A) in position Switch from the ignition switch. the parking lights will cause the turn...
...direction indicator lever towards the steering wheel and release it there. Turn signals 1 Lane change position. In maneuvers such as when using the headlight flasher function). Move the lever towards the steering wheel. * See page 26 for 30 seconds to light your car at night, you can... beams and vice versa by moving the turn signal lever to the first stop and holding it . The headlight high beam will be switched on (headlights off ). With the headlight switch in position screw (A) in position Switch from the ignition switch. the parking lights will cause the turn...

Owner's Manual
Page 21
... second. 2 "Single sweep" position: The switch returns automatically when released. 3 Wipers, normal speed 4 Wipers, high speed 5 Windshield wiper/washer, headlight wiper/washer The wipers will make 23 sweeps across the windshield and headlights (certain models) after the lever is left in the ignition lock and the front door on , daytime running . Starting...
... second. 2 "Single sweep" position: The switch returns automatically when released. 3 Wipers, normal speed 4 Wipers, high speed 5 Windshield wiper/washer, headlight wiper/washer The wipers will make 23 sweeps across the windshield and headlights (certain models) after the lever is left in the ignition lock and the front door on , daytime running . Starting...

Owner's Manual
Page 22
...The rear fog light (located in the driver's side tail light cluster) is one rear fog light only, located in combination with the low beam headlights. 4 - For the rear fog light to less than 500 ft (150 meters). Space for optional equipment Contents | Top of other vehicles to ...function, the low beam headlights must be switched on. * By design, there is considerably brighter than the normal tail lights and should be used only when the atmospheric conditions...
...The rear fog light (located in the driver's side tail light cluster) is one rear fog light only, located in combination with the low beam headlights. 4 - For the rear fog light to less than 500 ft (150 meters). Space for optional equipment Contents | Top of other vehicles to ...function, the low beam headlights must be switched on. * By design, there is considerably brighter than the normal tail lights and should be used only when the atmospheric conditions...

Owner's Manual
Page 52
... down on the silver catch (located in the reverse order. Replace the entire unit in the space between the inside of the fender and the headlight unit) to release the lamp housing from the lamp housing. Slide the lens forward and pull out the rear edge. 2. Remove the bulb from the...
... down on the silver catch (located in the reverse order. Replace the entire unit in the space between the inside of the fender and the headlight unit) to release the lamp housing from the lamp housing. Slide the lens forward and pull out the rear edge. 2. Remove the bulb from the...

Owner's Manual
Page 53
...cover. 2. Press the retaining clamp back into position. 7. Press the wire catches on the cover should snap into position. High beam Low beam headlight bulb (A) replacement 1. Grease, oil or any other impurities can be up when the cover is reinstalled. A - Reinsert the bulb and connector... ) together and push out (2) to use bulbs of the connector. 4. Press the wire catches on halogen bulbs with your fingers. High beam headlight bulb (B) replacement 1. Caution: Do not touch the glass on the retaining clamp (1 in inset illustration above ) together and push out (2) to...
...cover. 2. Press the retaining clamp back into position. 7. Press the wire catches on the cover should snap into position. High beam Low beam headlight bulb (A) replacement 1. Grease, oil or any other impurities can be up when the cover is reinstalled. A - Reinsert the bulb and connector... ) together and push out (2) to use bulbs of the connector. 4. Press the wire catches on halogen bulbs with your fingers. High beam headlight bulb (B) replacement 1. Caution: Do not touch the glass on the retaining clamp (1 in inset illustration above ) together and push out (2) to...

Owner's Manual
Page 73
... system 12 Volt, negative ground. Single-wire system with chassis and engine used as recommended on the tire information label. Your Volvo retailer can possibly lead to failure resulting in this matter. Vehicle loading The tires on your car beyond the indicated limits. Generator...utmost importance that old batteries are subject to specifications at all normal loads when inflated as conductors. current 120 A Bulbs Bulb Headlights High beam Low beam Front parking lights/turn signals Turn signals, rear Side direction indicators Tail lights Brake lights Backup lights US ...
... system 12 Volt, negative ground. Single-wire system with chassis and engine used as recommended on the tire information label. Your Volvo retailer can possibly lead to failure resulting in this matter. Vehicle loading The tires on your car beyond the indicated limits. Generator...utmost importance that old batteries are subject to specifications at all normal loads when inflated as conductors. current 120 A Bulbs Bulb Headlights High beam Low beam Front parking lights/turn signals Turn signals, rear Side direction indicators Tail lights Brake lights Backup lights US ...

Owner's Manual
Page 79
... correct code. Enter the code again once this waiting period: the battery must be connected the ignition key must be turned on Make sure the headlights are turned off ). Press the button slightly longer to use. B - "OFF" is displayed. If you enter an incorrect code you must be turned to ...switch on " is displayed and the set will lock and remain locked for information on turning the headlights off to help prevent battery drain (please refer to page 20 for two hours. On/off . During this time has elapsed. Volume control If ...
... correct code. Enter the code again once this waiting period: the battery must be connected the ignition key must be turned on Make sure the headlights are turned off ). Press the button slightly longer to use. B - "OFF" is displayed. If you enter an incorrect code you must be turned to ...switch on " is displayed and the set will lock and remain locked for information on turning the headlights off to help prevent battery drain (please refer to page 20 for two hours. On/off . During this time has elapsed. Volume control If ...

Owner's Manual
Page 91
... light - opening 37, 62 opening manually 101, 102 Generator 17, 130 H Hand brake 30 Handling 68 Hazard warning flashers 23 Headlight wiper blades - replacing 95 G Gas tank cover - replacing 100 Headlights 20 Heated front seats 30 Heated side-view mirrors 23 Heating 35 Heating and air conditioning 33 High beams 17 Hoisting...
... light - opening 37, 62 opening manually 101, 102 Generator 17, 130 H Hand brake 30 Handling 68 Hazard warning flashers 23 Headlight wiper blades - replacing 95 G Gas tank cover - replacing 100 Headlights 20 Heated front seats 30 Heated side-view mirrors 23 Heating 35 Heating and air conditioning 33 High beams 17 Hoisting...
