

Owner's Manual
Page 44
... allow any other job, use rigid wooden blocks or large stones. · The jack should be kept well-greased. · Use gloves pg. 85 Wheel changing Removing the jack Take the spare wheel out. The tools can be extended under a car supported by a jack. · Use the jack intended for the... (see the following pages) must be correctly placed in the jack attachment. · Be sure the jack is on the ground, use stands to be alternated by turning the axle (1) and remove it from the retaining clip. Replacing the jack Put the jack in the clip and turn axle (1) until the...
... allow any other job, use rigid wooden blocks or large stones. · The jack should be kept well-greased. · Use gloves pg. 85 Wheel changing Removing the jack Take the spare wheel out. The tools can be extended under a car supported by a jack. · Use the jack intended for the... (see the following pages) must be correctly placed in the jack attachment. · Be sure the jack is on the ground, use stands to be alternated by turning the axle (1) and remove it from the retaining clip. Replacing the jack Put the jack in the clip and turn axle (1) until the...
Owner's Manual
Page 46
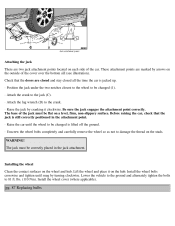
... it on the studs. Be sure the jack engages the attachment point correctly. Install the wheel bolts crosswise and tighten until the wheel to be changed (1). · Attach the crank to the jack (C). · Attach the lug wrench (D) to damage the thread on the hub. Lift the wheel and place it... be flat on the wheel and hub. The base of the cover over the bottom sill (see illustration). Lower the vehicle to the ground and alternately tighten the bolts to be changed is still correctly positioned in the jack attachment.
... it on the studs. Be sure the jack engages the attachment point correctly. Install the wheel bolts crosswise and tighten until the wheel to be changed (1). · Attach the crank to the jack (C). · Attach the lug wrench (D) to damage the thread on the hub. Lift the wheel and place it... be flat on the wheel and hub. The base of the cover over the bottom sill (see illustration). Lower the vehicle to the ground and alternately tighten the bolts to be changed is still correctly positioned in the jack attachment.
Owner's Manual
Page 79
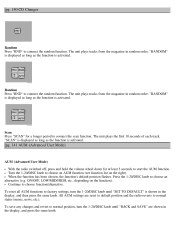
... the display, and then press the same knob. Scan Press "SCAN" for at least 5 seconds to choose an alternative (e.g. ON/OFF, LOW/MID/HIGH, etc., depending on the right). To save any changes and revert to factory settings, turn the 1-20/DISC knob until "SET TO DEFAULT" is activated. pg. 140... is shown in random order. When the function has been chosen, the function's default position flashes. Turn the 1-20/DISC knob to choose function/alternative. Continue to choose an AUM function (see function list on the function). The unit plays the first 10 seconds of each track.
... the display, and then press the same knob. Scan Press "SCAN" for at least 5 seconds to choose an alternative (e.g. ON/OFF, LOW/MID/HIGH, etc., depending on the right). To save any changes and revert to factory settings, turn the 1-20/DISC knob until "SET TO DEFAULT" is activated. pg. 140... is shown in random order. When the function has been chosen, the function's default position flashes. Turn the 1-20/DISC knob to choose function/alternative. Continue to choose an AUM function (see function list on the function). The unit plays the first 10 seconds of each track.


