

Owner's Manual
Page 14
Note that vehicles may be equipped differently, depending on special legal requirements. 1 Air vents 2 Headlights, parking lights 3 Instrument illumination 4 Rear fog light 5 Front fog lights (optional) 33 20 22 22 22 2000 VOLVO C70 Chapter 2 - Instruments, switches and controls pg. 14 Instruments, switches and controls pg. 15 Instruments, switches and controls The pages in this section provide detailed descriptions of the vehicle's instruments and controls.
Note that vehicles may be equipped differently, depending on special legal requirements. 1 Air vents 2 Headlights, parking lights 3 Instrument illumination 4 Rear fog light 5 Front fog lights (optional) 33 20 22 22 22 2000 VOLVO C70 Chapter 2 - Instruments, switches and controls pg. 14 Instruments, switches and controls pg. 15 Instruments, switches and controls The pages in this section provide detailed descriptions of the vehicle's instruments and controls.

Owner's Manual
Page 20
.... Check the fuse and bulb. Should the warning light come on if any of the following bulbs are defective: · one of the low beam headlights · one of the tail lights · one of driving or after 12 months, whichever occurs first. Drive to flash, this means that the ...See the SRS section for an inspection of Page Contents | Top of the system. If the warning lamp begins to an authorized Volvo retailer for more information. Contact Your Volvo retailer. The light will stay on after start until reset by the servicing retailer. The lamp will light up when the Winter...
.... Check the fuse and bulb. Should the warning light come on if any of the following bulbs are defective: · one of the low beam headlights · one of the tail lights · one of driving or after 12 months, whichever occurs first. Drive to flash, this means that the ...See the SRS section for an inspection of Page Contents | Top of the system. If the warning lamp begins to an authorized Volvo retailer for more information. Contact Your Volvo retailer. The light will stay on after start until reset by the servicing retailer. The lamp will light up when the Winter...
Owner's Manual
Page 45
... into the holder and reinstall the unit in the space between the inside of the car, use . From the front of the fender and the headlight unit) to press down on the silver catch (located in the reverse order. Leave the connector with its wires in use a screwdriver to release the...
... into the holder and reinstall the unit in the space between the inside of the car, use . From the front of the fender and the headlight unit) to press down on the silver catch (located in the reverse order. Leave the connector with its wires in use a screwdriver to release the...

Owner's Manual
Page 46
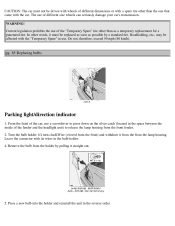
... toward you, turn the bulb holder 1/4 turn (the wires should not be disconnected from the holder) and pull out the bulb holder from the headlight housing. 3. Replace the entire unit in inset illustration above) together and push out (2) to release the bulb and connector from the lens unit. .... Pull the bulb out of the connector. 4. Insert a new bulb into place. 5. Side direction indicator 1. pg. 86 Replacing bulbs Low beam headlight bulb (A) replacement 1. Press the wire catches on the retaining clamp (1 in the reverse order. Pull out the entire lens/bulb unit. 3.
... toward you, turn the bulb holder 1/4 turn (the wires should not be disconnected from the holder) and pull out the bulb holder from the headlight housing. 3. Replace the entire unit in inset illustration above) together and push out (2) to release the bulb and connector from the lens unit. .... Pull the bulb out of the connector. 4. Insert a new bulb into place. 5. Side direction indicator 1. pg. 86 Replacing bulbs Low beam headlight bulb (A) replacement 1. Press the wire catches on the retaining clamp (1 in the reverse order. Pull out the entire lens/bulb unit. 3.

Owner's Manual
Page 47
... Lateral headlight adjustment should snap into position. 7. High beam headlight bulb (B) replacement 1. Press the retaining clamp back into the headlight housing. Contents | Top of the connector. 4. Headlight adjustment The height of the headlight beams can be seen by an authorized Volvo retailer. To adjust the headlights: ... guide lug must be adjusted according to ensure proper positioning. 6. 5. Press the wire catches on the lower edge of the headlight lens. · Turn the height adjustment knob until the bubble in the trunk or rear seat, or when towing a trailer...
... Lateral headlight adjustment should snap into position. 7. High beam headlight bulb (B) replacement 1. Press the retaining clamp back into the headlight housing. Contents | Top of the connector. 4. Headlight adjustment The height of the headlight beams can be seen by an authorized Volvo retailer. To adjust the headlights: ... guide lug must be adjusted according to ensure proper positioning. 6. 5. Press the wire catches on the lower edge of the headlight lens. · Turn the height adjustment knob until the bubble in the trunk or rear seat, or when towing a trailer...

Owner's Manual
Page 66
pg. 127 Specifications Dimensions and weights - Volvo C 70 Length 185.8 in. (472 cm) current 100 A Bulbs Bulb US no. Generator Rated output 1400 W Max. Headlights High beam H7 Low beam H7 Front parking lights/turn signals 3357NA Turn signals, rear Side direction indicators Tail lights 67 Brake lights 1156 Backup ...
pg. 127 Specifications Dimensions and weights - Volvo C 70 Length 185.8 in. (472 cm) current 100 A Bulbs Bulb US no. Generator Rated output 1400 W Max. Headlights High beam H7 Low beam H7 Front parking lights/turn signals 3357NA Turn signals, rear Side direction indicators Tail lights 67 Brake lights 1156 Backup ...

Owner's Manual
Page 72
... set by pressing one AM waveband. Press the button slightly longer to turn the radio off switch Push the button to switch on turning the headlights off). Enter the code again once this waiting period: · the battery must be connected · the ignition key must be turned to... control Turn the button clockwise to store 2 x 6 FM stations and 6 AM stations in memory. The frequency and waveband is shown on Make sure the headlights are two FM wavebands and one of the waveband selector buttons. NOTE: There are turned off to help prevent battery drain (please refer to position...
... set by pressing one AM waveband. Press the button slightly longer to turn the radio off switch Push the button to switch on turning the headlights off). Enter the code again once this waiting period: · the battery must be connected · the ignition key must be turned to... control Turn the button clockwise to store 2 x 6 FM stations and 6 AM stations in memory. The frequency and waveband is shown on Make sure the headlights are two FM wavebands and one of the waveband selector buttons. NOTE: There are turned off to help prevent battery drain (please refer to position...

Owner's Manual
Page 82
... lights Front fog lights Front seats Front seats - heated Front seats - replacing G Gas tank cover - replacing Headlights Heated front seats Heated side-view mirrors Heating Heating and air conditioning High beams Hoisting the car HomeLink® Hood...51 21 Engine compartment Engine oil Engine oil - opening opening manually Generator Generator warning light H Hand brake Handling Hazard warning flashers Headlight adjustment Headlight wiper blades - memory function Front suspension Fuel gauge Fuel level Fuel requirements Fuel system Fuel tank cover - opening opening manually ...
... lights Front fog lights Front seats Front seats - heated Front seats - replacing G Gas tank cover - replacing Headlights Heated front seats Heated side-view mirrors Heating Heating and air conditioning High beams Hoisting the car HomeLink® Hood...51 21 Engine compartment Engine oil Engine oil - opening opening manually Generator Generator warning light H Hand brake Handling Hazard warning flashers Headlight adjustment Headlight wiper blades - memory function Front suspension Fuel gauge Fuel level Fuel requirements Fuel system Fuel tank cover - opening opening manually ...
