
Owners Manual
Page 30
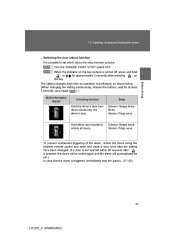
...'s door. STEP 2 When the indicator on 1 Before driving The setting changes each time an operation is preformed, as shown below. (When changing the setting continuously, release the buttons, wait for approximately 5 seconds while pressing on the key surface is turned off, press and hold or the key. Exterior: Beeps twice Interior...
...'s door. STEP 2 When the indicator on 1 Before driving The setting changes each time an operation is preformed, as shown below. (When changing the setting continuously, release the buttons, wait for approximately 5 seconds while pressing on the key surface is turned off, press and hold or the key. Exterior: Beeps twice Interior...
Owners Manual
Page 41
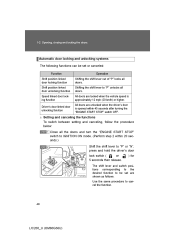
... the vehicle speed is opened within 20 seconds.) Shift the shift lever to "P" or "N", press and hold the driver's door lock switch ( or 5 seconds then release. ) for STEP 2 The shift lever and switch positions corresponding to the desired function to IGNITION ON mode. (Perform step 2 within 45 seconds after turning the...
... the vehicle speed is opened within 20 seconds.) Shift the shift lever to "P" or "N", press and hold the driver's door lock switch ( or 5 seconds then release. ) for STEP 2 The shift lever and switch positions corresponding to the desired function to IGNITION ON mode. (Perform step 2 within 45 seconds after turning the...
Owners Manual
Page 42
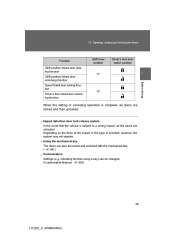
n Using the mechanical key The doors can be locked and unlocked with the mechanical key. (→P. 641) n Customization Settings (e.g. n Impact detection door lock release system In the event that the vehicle is complete, all the doors are locked and then unlocked. 1-2. Opening, closing and locking the doors Function Shift ...
n Using the mechanical key The doors can be locked and unlocked with the mechanical key. (→P. 641) n Customization Settings (e.g. n Impact detection door lock release system In the event that the vehicle is complete, all the doors are locked and then unlocked. 1-2. Opening, closing and locking the doors Function Shift ...
Owners Manual
Page 57
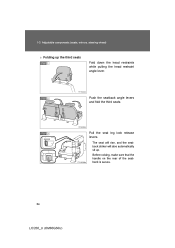
Adjustable components (seats, mirrors, steering wheel) n Folding up . The seat will rise, and the seatback striker will also automatically sit up the third seats STEP 1 Fold down the head restraints while pulling the head restraint angle lever. STEP 3 Pull the seat leg lock release levers. Before raising, make sure that the handle on the rear of the seatback is secure. 64 L/C200_U (OM60G36U) 1-3. ITY13C022 STEP 2 Push the seatback angle levers and fold the third seats.
Adjustable components (seats, mirrors, steering wheel) n Folding up . The seat will rise, and the seatback striker will also automatically sit up the third seats STEP 1 Fold down the head restraints while pulling the head restraint angle lever. STEP 3 Pull the seat leg lock release levers. Before raising, make sure that the handle on the rear of the seatback is secure. 64 L/C200_U (OM60G36U) 1-3. ITY13C022 STEP 2 Push the seatback angle levers and fold the third seats.
Owners Manual
Page 58
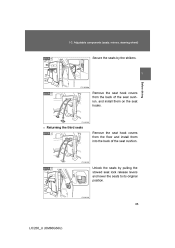
ITY13C030 n Returning the third seats STEP 1 Remove the seat hook covers from the back of the seat cushion, and install them into the back of the seat cushion. STEP 2 Unlock the seats by the strikers. 1 Before driving STEP 5 Remove the seat hook covers from the floor and install them on the seat hooks. 1-3. Adjustable components (seats, mirrors, steering wheel) STEP 4 Secure the seats by pulling the stowed seat lock release levers and lower the seats to its original position. 65 L/C200_U (OM60G36U)
ITY13C030 n Returning the third seats STEP 1 Remove the seat hook covers from the back of the seat cushion, and install them into the back of the seat cushion. STEP 2 Unlock the seats by the strikers. 1 Before driving STEP 5 Remove the seat hook covers from the floor and install them on the seat hooks. 1-3. Adjustable components (seats, mirrors, steering wheel) STEP 4 Secure the seats by pulling the stowed seat lock release levers and lower the seats to its original position. 65 L/C200_U (OM60G36U)

Owners Manual
Page 65
Lock release button Angle adjustment Second seats Vertical adjustment Up Pull the head restraint up or down while pressing the lock release button. Down Press and hold the lock release button when lowering the head restraint. 1-3. Adjustable components (seats, mirrors, steering wheel) Head restraints Head restraints are provided for all seats. Front seats Vertical adjustment Up Down Push the head restraint up . Lock release button 72 L/C200_U (OM60G36U)
Lock release button Angle adjustment Second seats Vertical adjustment Up Pull the head restraint up or down while pressing the lock release button. Down Press and hold the lock release button when lowering the head restraint. 1-3. Adjustable components (seats, mirrors, steering wheel) Head restraints Head restraints are provided for all seats. Front seats Vertical adjustment Up Down Push the head restraint up . Lock release button 72 L/C200_U (OM60G36U)
Owners Manual
Page 67
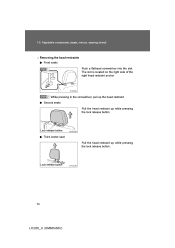
STEP 2 While pressing in the screwdriver, pull up while pressing the lock release button. Lock release button 74 L/C200_U (OM60G36U) Second seats Pull the head restraint up the head restraint. Adjustable components (seats, mirrors, steering wheel) n Removing the head restraints Front seats STEP 1 Push a flathead screwdriver into the slot. Lock release button Third center seat Pull the head restraint up while pressing the lock release button. The slot is located on the right side of the right head restraint anchor. 1-3.
STEP 2 While pressing in the screwdriver, pull up while pressing the lock release button. Lock release button 74 L/C200_U (OM60G36U) Second seats Pull the head restraint up the head restraint. Adjustable components (seats, mirrors, steering wheel) n Removing the head restraints Front seats STEP 1 Push a flathead screwdriver into the slot. Lock release button Third center seat Pull the head restraint up while pressing the lock release button. The slot is located on the right side of the right head restraint anchor. 1-3.
Owners Manual
Page 69
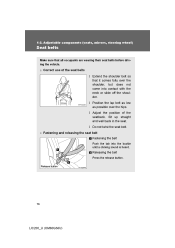
... seat belt Fastening the belt Push the tab into contact with the neck or slide off the shoulder. Releasing the belt Press the release button. Release button 76 L/C200_U (OM60G36U) l Adjust the position of the seat belts l Extend the shoulder belt so that all occupants are wearing their seat belts before ...
... seat belt Fastening the belt Push the tab into contact with the neck or slide off the shoulder. Releasing the belt Press the release button. Release button 76 L/C200_U (OM60G36U) l Adjust the position of the seat belts l Extend the shoulder belt so that all occupants are wearing their seat belts before ...
Owners Manual
Page 70
L/C200_U (OM60G36U) S PRES NTER CE Buckle A ITI13C190 77 1-3. Adjustable components (seats, mirrors, steering wheel) n Fastening and releasing the third center seat belt STEP 1 Pull out the tab 1 Before driving ITY13C120 STEP 2 Tab B Push tab B into buckle B until a clicking sound is heard Buckle B STEP 3 Tab A Release button Push tab A into buckle A until a clicking sound is heard To release, push the release button on buckle A.
L/C200_U (OM60G36U) S PRES NTER CE Buckle A ITI13C190 77 1-3. Adjustable components (seats, mirrors, steering wheel) n Fastening and releasing the third center seat belt STEP 1 Pull out the tab 1 Before driving ITY13C120 STEP 2 Tab B Push tab B into buckle B until a clicking sound is heard Buckle B STEP 3 Tab A Release button Push tab A into buckle A until a clicking sound is heard To release, push the release button on buckle A.
Owners Manual
Page 71
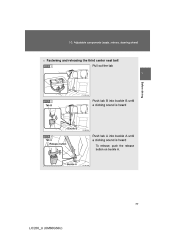
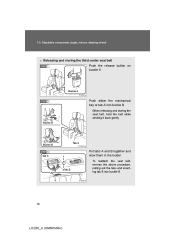
1-3. Adjustable components (seats, mirrors, steering wheel) n Releasing and storing the third center seat belt STEP 1 Push the release button on buckle A Buckle A STEP 2 Push either the mechanical key or tab A into buckle B When releasing and storing the seat belt, hold the belt while winding it back gently Buckle B Buckle B STEP 3 Tab A Tab A Put tabs A and B together and stow them in the holder To reattach the seat belt, reverse the above procedure, pulling out the tabs and inserting tab B into buckle B Tab B 78 L/C200_U (OM60G36U)
1-3. Adjustable components (seats, mirrors, steering wheel) n Releasing and storing the third center seat belt STEP 1 Push the release button on buckle A Buckle A STEP 2 Push either the mechanical key or tab A into buckle B When releasing and storing the seat belt, hold the belt while winding it back gently Buckle B Buckle B STEP 3 Tab A Tab A Put tabs A and B together and stow them in the holder To reattach the seat belt, reverse the above procedure, pulling out the tabs and inserting tab B into buckle B Tab B 78 L/C200_U (OM60G36U)
Owners Manual
Page 74
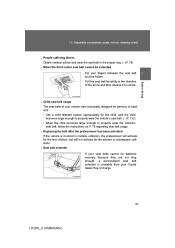
... suffering illness Obtain medical advice and wear the seat belt in the direction of the arrow and then release it to unlock. 1 Before driving n Child seat belt usage The seat belts of your Toyota dealer free of adult size. n Replacing the belt after the pretensioner has been activated If the vehicle is...
... suffering illness Obtain medical advice and wear the seat belt in the direction of the arrow and then release it to unlock. 1 Before driving n Child seat belt usage The seat belts of your Toyota dealer free of adult size. n Replacing the belt after the pretensioner has been activated If the vehicle is...
Owners Manual
Page 76
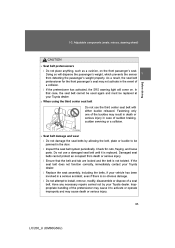
... that the belt and tab are locked and the belt is not twisted. If the seat belt does not function correctly, immediately contact your Toyota dealer. l If the pretensioner has activated, the SRS warning light will disperse the passenger's weight, which prevents the sensor from death or ...serious injury. Do not use the third center seat belt with either buckle released. l Replace the seat assembly, including the belts, if your Toyota dealer. Have any necessary repairs carried out by allowing the belt, plate or buckle to activate or operate ...
... that the belt and tab are locked and the belt is not twisted. If the seat belt does not function correctly, immediately contact your Toyota dealer. l If the pretensioner has activated, the SRS warning light will disperse the passenger's weight, which prevents the sensor from death or ...serious injury. Do not use the third center seat belt with either buckle released. l Replace the seat assembly, including the belts, if your Toyota dealer. Have any necessary repairs carried out by allowing the belt, plate or buckle to activate or operate ...
Owners Manual
Page 77
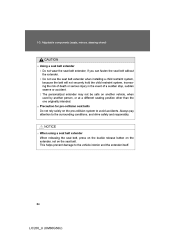
... death or serious injury in the event of a sudden stop, sudden swerve or accident. NOTICE n When using a seat belt extender When releasing the seat belt, press on the buckle release button on the extender, not on another vehicle, when used by another person, or at a different seating position other than the one...
... death or serious injury in the event of a sudden stop, sudden swerve or accident. NOTICE n When using a seat belt extender When releasing the seat belt, press on the buckle release button on the extender, not on another vehicle, when used by another person, or at a different seating position other than the one...
Owners Manual
Page 87
... the one -touch closing position once again. Continue holding the switch for a further 2 seconds after performing the above , initialize the function by your Toyota dealer. If you release the switch while the window is turned to close normally If the jam protection function is operating abnormally and a window cannot be closed , perform...
... the one -touch closing position once again. Continue holding the switch for a further 2 seconds after performing the above , initialize the function by your Toyota dealer. If you release the switch while the window is turned to close normally If the jam protection function is operating abnormally and a window cannot be closed , perform...
Owners Manual
Page 93
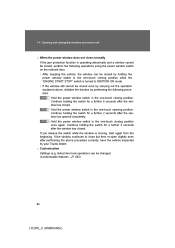
After releasing your hand, the cap will turn it until a clicking sound is heard. n Fuel types Use unleaded gasoline. (Octane Rating 87 [Research Octane Number 91] or higher) 100 L/C200_U (OM60G36U) Refueling Closing the fuel tank cap When replacing the fuel tank cap, turn slightly to the opposite direction. 1-5.
After releasing your hand, the cap will turn it until a clicking sound is heard. n Fuel types Use unleaded gasoline. (Octane Rating 87 [Research Octane Number 91] or higher) 100 L/C200_U (OM60G36U) Refueling Closing the fuel tank cap When replacing the fuel tank cap, turn slightly to the opposite direction. 1-5.
Owners Manual
Page 137
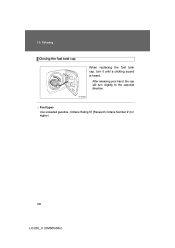
Child restraint systems with a seat belt Press the buckle release button and fully retract the seat belt. Outside ITY17C055 Center STEP 1 Lower the head restraint to the upmost position. Adjust the head restraint to the lowest position. ITY17C099 144 L/C200_U (OM60G36U) 1-7. Safety information Removing a child restraint system installed with a top tether strap STEP 1 Secure the child restraint system using a seat belt or LATCH anchors, and do the following.
Child restraint systems with a seat belt Press the buckle release button and fully retract the seat belt. Outside ITY17C055 Center STEP 1 Lower the head restraint to the upmost position. Adjust the head restraint to the lowest position. ITY17C099 144 L/C200_U (OM60G36U) 1-7. Safety information Removing a child restraint system installed with a top tether strap STEP 1 Secure the child restraint system using a seat belt or LATCH anchors, and do the following.

Owners Manual
Page 142
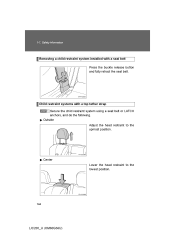
2-1. With the shift lever in "D", push the brake pedal. Shift the shift lever to accelerate the vehicle. Release the parking brake. 150 L/C200_U (OM60G36U) when parking on a steep incline STEP 1 STEP 2 STEP 3 Firmly set the parking brake. STEP 5 Starting on...the engine (→P. 162) n Driving STEP 1 With the brake pedal depressed, shift the shift lever to "D". (→P. 166) Release the parking brake. (→P. 172) STEP 2 STEP 3 Gradually release the brake pedal and gently push the accelerator pedal to "P". Set the parking brake. Lock the door, making sure that you...
2-1. With the shift lever in "D", push the brake pedal. Shift the shift lever to accelerate the vehicle. Release the parking brake. 150 L/C200_U (OM60G36U) when parking on a steep incline STEP 1 STEP 2 STEP 3 Firmly set the parking brake. STEP 5 Starting on...the engine (→P. 162) n Driving STEP 1 With the brake pedal depressed, shift the shift lever to "D". (→P. 166) Release the parking brake. (→P. 172) STEP 2 STEP 3 Gradually release the brake pedal and gently push the accelerator pedal to "P". Set the parking brake. Lock the door, making sure that you...
Owners Manual
Page 143
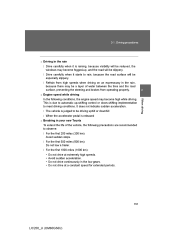
... to rain, because the road surface will be reduced, the windows may become high while driving. When driving 2 151 L/C200_U (OM60G36U) This is released n Breaking in your new Toyota To extend the life of the vehicle, the following conditions, the engine speed may be a layer of water between the tires and the...
... to rain, because the road surface will be reduced, the windows may become high while driving. When driving 2 151 L/C200_U (OM60G36U) This is released n Breaking in your new Toyota To extend the life of the vehicle, the following conditions, the engine speed may be a layer of water between the tires and the...
Owners Manual
Page 155
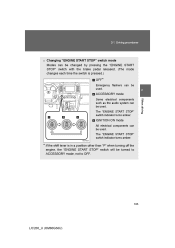
... be used . Driving procedures n Changing "ENGINE START STOP" switch mode Modes can be changed by pressing the "ENGINE START STOP" switch with the brake pedal released. (The mode changes each time the switch is in a position other than "P" when turning off the engine, the "ENGINE START STOP" switch will be turned...
... be used . Driving procedures n Changing "ENGINE START STOP" switch mode Modes can be changed by pressing the "ENGINE START STOP" switch with the brake pedal released. (The mode changes each time the switch is in a position other than "P" when turning off the engine, the "ENGINE START STOP" switch will be turned...
Owners Manual
Page 156
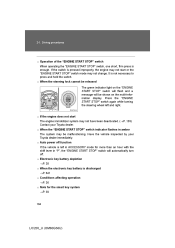
... press is not necessary to press and hold the switch. n When the steering lock cannot be released The green indicator light on the multi-information display. Have the vehicle inspected by your Toyota dealer. It is enough. If the switch is pressed improperly, the engine may not start The engine...be malfunctioning. n When the "ENGINE START STOP" switch indicator flashes in amber The system may not have been deactivated. (→P. 103) Contact your Toyota dealer immediately. n Electronic key battery depletion →P. 38 n When the electronic key battery is left and right.
... press is not necessary to press and hold the switch. n When the steering lock cannot be released The green indicator light on the multi-information display. Have the vehicle inspected by your Toyota dealer. It is enough. If the switch is pressed improperly, the engine may not start The engine...be malfunctioning. n When the "ENGINE START STOP" switch indicator flashes in amber The system may not have been deactivated. (→P. 103) Contact your Toyota dealer immediately. n Electronic key battery depletion →P. 38 n When the electronic key battery is left and right.
