

Owners Manual
Page 33
1. When you release the button, the player will be selected. The audio system turns on in the slot, "CD" cannot be displayed. INFORMATION or to scroll to ● ...
1. When you release the button, the player will be selected. The audio system turns on in the slot, "CD" cannot be displayed. INFORMATION or to scroll to ● ...

Owners Manual
Page 35
When you release the button, the player will start playing from the beginning. The player will start playing the selected file from that position. 1. AUDIO SYSTEM OPERATION PLAYING A ...
When you release the button, the player will start playing from the beginning. The player will start playing the selected file from that position. 1. AUDIO SYSTEM OPERATION PLAYING A ...

Owners Manual
Page 38
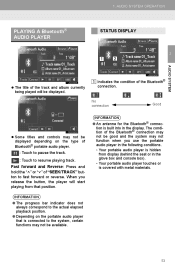
.... INFORMATION or to scroll to INFORMATION ● If no iPod is not displayed on the iPod and songs in a JPEG format can be displayed you release the button, the player will be changed to fast forward or reverse. INFORMATION ● The progress bar indicator does not always correspond to resume playing...
.... INFORMATION or to scroll to INFORMATION ● If no iPod is not displayed on the iPod and songs in a JPEG format can be displayed you release the button, the player will be changed to fast forward or reverse. INFORMATION ● The progress bar indicator does not always correspond to resume playing...

Owners Manual
Page 42
... A USB MEMORY "SEEK/TRACK" button: Press the " " or " " of the file and folder currently being played will start playing from the list display. When you release the button, the player will be used for selection from that position. Also, the knob can be displayed. : Touch to pause the file. : Touch to...
... A USB MEMORY "SEEK/TRACK" button: Press the " " or " " of the file and folder currently being played will start playing from the list display. When you release the button, the player will be used for selection from that position. Also, the knob can be displayed. : Touch to pause the file. : Touch to...
Owners Manual
Page 49
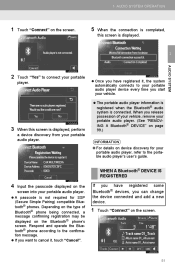
...'s guide. If you have registered it , touch "Cancel". When you start your portable audio player, refer to your portable audio player device every time you release possession of Bluetooth® phone being connected, a message confirming registration may be displayed on the screen. 51 If you can change the device connected and...
...'s guide. If you have registered it , touch "Cancel". When you start your portable audio player, refer to your portable audio player device every time you release possession of Bluetooth® phone being connected, a message confirming registration may be displayed on the screen. 51 If you can change the device connected and...
Owners Manual
Page 51
... controls may not be available. 53 The condition of the Bluetooth® connection may not be good and the system may not function when you release the button, the player will be displayed depending on the portable audio player that position. 1. When you use the portable audio player in the display...
... controls may not be available. 53 The condition of the Bluetooth® connection may not be good and the system may not function when you release the button, the player will be displayed depending on the portable audio player that position. 1. When you use the portable audio player in the display...
Owners Manual
Page 54
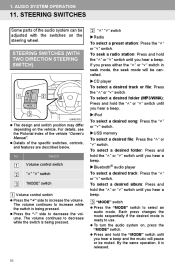
... is ready to increase the volume. To turn the audio system on the vehicle. Each press changes the mode sequentially if the desired mode is released. 56 1.
... is ready to increase the volume. To turn the audio system on the vehicle. Each press changes the mode sequentially if the desired mode is released. 56 1.

Owners Manual
Page 56
Each press changes the mode sequentially if the desired mode is released. Back switch Press the back switch to return to use. When in radio mode, pressing the enter switch returns to the preset screen. To turn ...
Each press changes the mode sequentially if the desired mode is released. Back switch Press the back switch to return to use. When in radio mode, pressing the enter switch returns to the preset screen. To turn ...
Owners Manual
Page 68
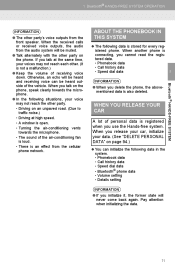
... other party. • Driving on the phone. When the received calls or received voice outputs, the audio from the front speaker. WHEN YOU RELEASE YOUR CAR A lot of receiving voice down. 1. ABOUT THE PHONEBOOK IN THIS SYSTEM The following data in the system. • Phonebook data... Call history data • Speed dial data • Bluetooth® phone data • Volume setting • Details setting INFORMATION ● If you release your car, initialize your voices may not reach the other . (It is not a malfunction.) ● Keep the volume of personal data is registered ...
... other party. • Driving on the phone. When the received calls or received voice outputs, the audio from the front speaker. WHEN YOU RELEASE YOUR CAR A lot of receiving voice down. 1. ABOUT THE PHONEBOOK IN THIS SYSTEM The following data in the system. • Phonebook data... Call history data • Speed dial data • Bluetooth® phone data • Volume setting • Details setting INFORMATION ● If you release your car, initialize your voices may not reach the other . (It is not a malfunction.) ● Keep the volume of personal data is registered ...

Owners Manual
Page 228
... AND REVERSE 1 Press and hold the " " or " " of the track and disc currently being played will start playing from that position. 1. When the button is released, the player will be selected. Touch "DISC" on in the slot, "DISC" cannot be displayed. INFORMATION ● If no disc is inserted, the title of...
... AND REVERSE 1 Press and hold the " " or " " of the track and disc currently being played will start playing from that position. 1. When the button is released, the player will be selected. Touch "DISC" on in the slot, "DISC" cannot be displayed. INFORMATION ● If no disc is inserted, the title of...

Owners Manual
Page 230
The random mode changes as follows each time the screen button is released, the player will be displayed. : Touch to pause the file. : Touch to resume playing the file. : Repeating the track : OFF (Random mode): Use it to ...
The random mode changes as follows each time the screen button is released, the player will be displayed. : Touch to pause the file. : Touch to resume playing the file. : Repeating the track : OFF (Random mode): Use it to ...

Owners Manual
Page 251
... "MODE" switch. The volume continues to decrease while the switch is ready to increase the volume. The volume continues to increase while the switch is released.
... "MODE" switch. The volume continues to decrease while the switch is ready to increase the volume. The volume continues to increase while the switch is released.

Owners Manual
Page 253
... an audio mode. By the same operation, it is ready to the preset screen. Each press changes the mode sequentially if the desired mode is released.
... an audio mode. By the same operation, it is ready to the preset screen. Each press changes the mode sequentially if the desired mode is released.

Owners Manual
Page 268
... is open. • Turning the air-conditioning vents towards the microphone. ● In the following data is also deleted. WHEN YOU RELEASE YOUR CAR A lot of the vehicle. Pay attention when initializing the data. 159 When the received calls or received voice outputs, the audio... the cellular phone network. If you initialize it, the former state will be heard outside of personal data is registered when you release your car, initialize your voices may not reach the other party's voice outputs from the front speaker. BASIC INFORMATION BEFORE OPERATION INFORMATION...
... is open. • Turning the air-conditioning vents towards the microphone. ● In the following data is also deleted. WHEN YOU RELEASE YOUR CAR A lot of the vehicle. Pay attention when initializing the data. 159 When the received calls or received voice outputs, the audio... the cellular phone network. If you initialize it, the former state will be heard outside of personal data is registered when you release your car, initialize your voices may not reach the other party's voice outputs from the front speaker. BASIC INFORMATION BEFORE OPERATION INFORMATION...
Owners Manual
Page 335
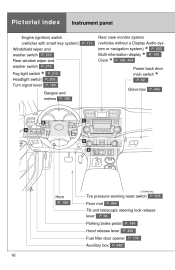
... lever P. 183 Gauges and meters P. 186 Glove box P. 440 Horn P. 185 Tire pressure warning reset switch P. 523 Floor mat P. 464 Tilt and telescopic steering lock release lever P. 94 Parking brake pedal P. 184 Hood release lever P. 499 Fuel filler door opener P. 109 Auxiliary box P. 448 16
... lever P. 183 Gauges and meters P. 186 Glove box P. 440 Horn P. 185 Tire pressure warning reset switch P. 523 Floor mat P. 464 Tilt and telescopic steering lock release lever P. 94 Parking brake pedal P. 184 Hood release lever P. 499 Fuel filler door opener P. 109 Auxiliary box P. 448 16

Owners Manual
Page 359
... be locked again and the alarm will automatically be set.) In case that the alarm is performed, as shown below. (When changing the setting continuously, release the buttons, wait for at least 5 seconds, and repeat step 2.) Multi-information display Unlocking doors Hold the driver's door handle to unlock all doors. 1-2. Hold...
... be locked again and the alarm will automatically be set.) In case that the alarm is performed, as shown below. (When changing the setting continuously, release the buttons, wait for at least 5 seconds, and repeat step 2.) Multi-information display Unlocking doors Hold the driver's door handle to unlock all doors. 1-2. Hold...

Owners Manual
Page 403
Before driving 1 Down Push the head restraint down while pushing the lock release button. Lock release buttons When using the center seat, raise the head restraint from the stowed position. 85 Adjust a ble c om pone nt s (se a t s, m irrors, st e e ring w he e l) H e a d re st ra int s Head restraints are provided for all seats. Front seats Vertical adjustment Up Pull the head restraints up . Down Push the head restraint down while pushing the lock release button. Lock release button Angle adjustment (if equipped) Second seats Up Pull the head restraints up . 1 -3 .
Before driving 1 Down Push the head restraint down while pushing the lock release button. Lock release buttons When using the center seat, raise the head restraint from the stowed position. 85 Adjust a ble c om pone nt s (se a t s, m irrors, st e e ring w he e l) H e a d re st ra int s Head restraints are provided for all seats. Front seats Vertical adjustment Up Pull the head restraints up . Down Push the head restraint down while pushing the lock release button. Lock release button Angle adjustment (if equipped) Second seats Up Pull the head restraints up . 1 -3 .

Owners Manual
Page 421
1-4. If the window continues to close but then re-open slightly even after performing the above procedure correctly, have the vehicle inspected by your Toyota dealer. 1 CAUTION Opening and closing the windows and moon roof If you release the switch while the window is moving, start again from the beginning.
1-4. If the window continues to close but then re-open slightly even after performing the above procedure correctly, have the vehicle inspected by your Toyota dealer. 1 CAUTION Opening and closing the windows and moon roof If you release the switch while the window is moving, start again from the beginning.

Owners Manual
Page 428
Closing the fuel tank cap When replacing the fuel tank cap, turn it will turn slightly in the opposite direction. Once the cap is released, it until a clicking sound is heard. Refueling STEP 3 Hang the fuel tank cap on the back of the fuel filler door. 1-5.
Closing the fuel tank cap When replacing the fuel tank cap, turn it will turn slightly in the opposite direction. Once the cap is released, it until a clicking sound is heard. Refueling STEP 3 Hang the fuel tank cap on the back of the fuel filler door. 1-5.

Owners Manual
Page 473
Safety information Removing a child restraint installed with a seat belt Push the buckle release button and fully retract the seat belt. 1 Before driving Child restraint systems with a top tether strap (second seat only) STEP 1 Secure the child restraint using the seat belt or lower anchors, and adjust the head restraint to the upmost position. 155 1-7.
Safety information Removing a child restraint installed with a seat belt Push the buckle release button and fully retract the seat belt. 1 Before driving Child restraint systems with a top tether strap (second seat only) STEP 1 Secure the child restraint using the seat belt or lower anchors, and adjust the head restraint to the upmost position. 155 1-7.
