
Owners Manual
Page 24
... signal is indeed (an analog and) a digital station. Your radio product has a special receiver which allows it to receive digital broadcasts (where available) in a gray color indicating the station is acquired, the logo will be displayed on the text screen. 1 Touch "HD Radio" to a digital signal within 5 seconds. The "HD)" logo...
... signal is indeed (an analog and) a digital station. Your radio product has a special receiver which allows it to receive digital broadcasts (where available) in a gray color indicating the station is acquired, the logo will be displayed on the text screen. 1 Touch "HD Radio" to a digital signal within 5 seconds. The "HD)" logo...

Owners Manual
Page 84
... screen button. 88 "Update": Reset the average fuel consumption to measure the current fuel consumption again. "Trip Information": "Trip Information" screen can be displayed by color into past averages and the average fuel consumption since the last reset. No. 1. VEHICLE INFORMATION HISTORY If the "History" screen is divided by touching this...
... screen button. 88 "Update": Reset the average fuel consumption to measure the current fuel consumption again. "Trip Information": "Trip Information" screen can be displayed by color into past averages and the average fuel consumption since the last reset. No. 1. VEHICLE INFORMATION HISTORY If the "History" screen is divided by touching this...

Owners Manual
Page 196
... desired item. Input the search word and then touch "OK". 11 The starting route guidance screen will be displayed. (See page 42.) INFORMATION ● The color of 1 minute, an active online connection will automatically be terminated. 9 The search results will be searched when performing an online search. "Download More": Touch to...
... desired item. Input the search word and then touch "OK". 11 The starting route guidance screen will be displayed. (See page 42.) INFORMATION ● The color of 1 minute, an active online connection will automatically be terminated. 9 The search results will be searched when performing an online search. "Download More": Touch to...

Owners Manual
Page 219
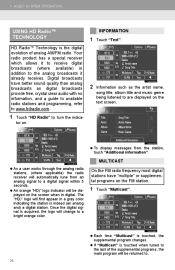
... broadcasts provide free, crystal clear audio with no information, and a guide to available radio stations and programming, refer to a bright orange color. Your radio product has a special receiver which allows it already receives. If "Multicast" is touched when tuned to the last of analog... 1. AUDIO SYSTEM OPERATION USING HD Radio™ TECHNOLOGY HD Radio™ Technology is acquired, the logo will first appear in a gray color indicating the station is touched, the supplemental program changes. Each time "Multicast" is indeed (an analog and) a digital station. To display...
... broadcasts provide free, crystal clear audio with no information, and a guide to available radio stations and programming, refer to a bright orange color. Your radio product has a special receiver which allows it already receives. If "Multicast" is touched when tuned to the last of analog... 1. AUDIO SYSTEM OPERATION USING HD Radio™ TECHNOLOGY HD Radio™ Technology is acquired, the logo will first appear in a gray color indicating the station is touched, the supplemental program changes. Each time "Multicast" is indeed (an analog and) a digital station. To display...

Owners Manual
Page 299
... screen button. Vehicle with multi-information display When you touch "Update", the average fuel consumption displayed in the multi-information display will be delete by color into past averages and the average fuel consumption since the last reset. No. 1. VEHICLE INFORMATION HISTORY If the "History" screen is divided by touching this...
... screen button. Vehicle with multi-information display When you touch "Update", the average fuel consumption displayed in the multi-information display will be delete by color into past averages and the average fuel consumption since the last reset. No. 1. VEHICLE INFORMATION HISTORY If the "History" screen is divided by touching this...

Owners Manual
Page 515
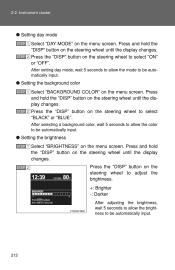
After selecting a background color, wait 5 seconds to allow the color to be automatically input. Press and hold the "DISP" button on the steering wheel until the display changes. Press the "DISP" button on the ... automatically input. STEP 2 198 STEP 2 ● Setting the contrast STEP 1 Select "CONTRAST" on the menu screen. Instrument cluster ● Setting the background color STEP 1 Select "BACKGROUND COLOR" on the steering wheel until the display changes. Press and hold the "DISP" button on the steering wheel to adjust the contrast. +: Strengthen -: Weaken...
After selecting a background color, wait 5 seconds to allow the color to be automatically input. Press and hold the "DISP" button on the steering wheel until the display changes. Press the "DISP" button on the ... automatically input. STEP 2 198 STEP 2 ● Setting the contrast STEP 1 Select "CONTRAST" on the menu screen. Instrument cluster ● Setting the background color STEP 1 Select "BACKGROUND COLOR" on the steering wheel until the display changes. Press and hold the "DISP" button on the steering wheel to adjust the contrast. +: Strengthen -: Weaken...

Navigation Manual
Page 7
...the screen. "Contrast" "-": Weakens the contrast of the screen. Push the "DISP" button. D Contrast, brightness, color and tone adjustment The contrast, brightness, color and tone of the screen can also turn the display off. You can be displayed. 31 Touch the desired button... You can also turn the display off, and change the screen to adjust contrast and brightness. You can adjust the contrast, brightness, color and tone of your surroundings. After adjusting the screen, touch "OK". "Brightness" "-": Darkens the screen. 3. Contrast and brightness adjustment...
...the screen. "Contrast" "-": Weakens the contrast of the screen. Push the "DISP" button. D Contrast, brightness, color and tone adjustment The contrast, brightness, color and tone of the screen can also turn the display off. You can be displayed. 31 Touch the desired button... You can also turn the display off, and change the screen to adjust contrast and brightness. You can adjust the contrast, brightness, color and tone of your surroundings. After adjusting the screen, touch "OK". "Brightness" "-": Darkens the screen. 3. Contrast and brightness adjustment...

Navigation Manual
Page 8
... the DVD video and video CD are being played. "Tone" "-": Weakens the tone of the screen. "Color" "G": Strengthens the green color of the headlight switch, the screen changes to adjust color and tone. After adjusting the screen touch "OK". BASIC FUNCTIONS D Changing between day mode and night mode ... the position of the screen. Touch the desired button to day mode or night mode. "Tone" "+": Strengthens the tone of the screen. Color and tone adjustment (with the headlight switch turned on, this condition is touched. The screen goes off . INFORMATION When you do not touch ...
... the DVD video and video CD are being played. "Tone" "-": Weakens the tone of the screen. "Color" "G": Strengthens the green color of the headlight switch, the screen changes to adjust color and tone. After adjusting the screen touch "OK". BASIC FUNCTIONS D Changing between day mode and night mode ... the position of the screen. Touch the desired button to day mode or night mode. "Tone" "+": Strengthens the tone of the screen. Color and tone adjustment (with the headlight switch turned on, this condition is touched. The screen goes off . INFORMATION When you do not touch ...

Navigation Manual
Page 76
...39.) INFORMATION When the XMr NavTraffic icon is touched, voice guidance for the traffic information will start voice guidance. The color of the indicator changes depending on the traffic information received. ROUTE GUIDANCE 1 XMr NavTraffic icon When any XMr NavTraffic information ... icon will appear on the map screen. "Orange": Heavy congestion "Yellow": Moderate traffic "Green": Freely flowing traffic 2 100 The color of the arrow changes depending on the traffic information received. "Yellow": Traffic restriction information on the map screen. "White": Traffic information...
...39.) INFORMATION When the XMr NavTraffic icon is touched, voice guidance for the traffic information will start voice guidance. The color of the indicator changes depending on the traffic information received. ROUTE GUIDANCE 1 XMr NavTraffic icon When any XMr NavTraffic information ... icon will appear on the map screen. "Orange": Heavy congestion "Yellow": Moderate traffic "Green": Freely flowing traffic 2 100 The color of the arrow changes depending on the traffic information received. "Yellow": Traffic restriction information on the map screen. "White": Traffic information...

Navigation Manual
Page 206
If the malfunction still exists, take the vehicle to NTSC color TV formats. Marks shown on page 262. Region codes: Some DVD video discs have a region code, there is a case that you cannot use it correctly. ... seat entertainment system, see "D Rear system lock (with rear seat entertainment system)" on DVD video discs: Indicates NTSC format of color TV. DVD VIDEO DISCS This DVD player conforms to your Toyota dealer. Indicates the number of audio tracks. REGION ERROR: Indicates that there is not set properly. DVD ERROR: Indicates that...
If the malfunction still exists, take the vehicle to NTSC color TV formats. Marks shown on page 262. Region codes: Some DVD video discs have a region code, there is a case that you cannot use it correctly. ... seat entertainment system, see "D Rear system lock (with rear seat entertainment system)" on DVD video discs: Indicates NTSC format of color TV. DVD VIDEO DISCS This DVD player conforms to your Toyota dealer. Indicates the number of audio tracks. REGION ERROR: Indicates that there is not set properly. DVD ERROR: Indicates that...

Navigation Manual
Page 216
... on the remote controller or unit ten times when the screen to input it. Brightness, contrast, tone and color adjustment "Brightness" "+": Brightens the screen. Push "ENT" to enter the personal code is displayed. "Contrast" "+": Strengthens the contrast of ...the screen. "Color" "Red": Strengthens the red color of the screen. "Brightness" "−": Darkens the screen. Select the brightness, contrast, tone or colPushing changes the display modes sequentially ...
... on the remote controller or unit ten times when the screen to input it. Brightness, contrast, tone and color adjustment "Brightness" "+": Brightens the screen. Push "ENT" to enter the personal code is displayed. "Contrast" "+": Strengthens the contrast of ...the screen. "Color" "Red": Strengthens the red color of the screen. "Brightness" "−": Darkens the screen. Select the brightness, contrast, tone or colPushing changes the display modes sequentially ...

Navigation Manual
Page 237
Touch "Language". 4. Touch "General" on the "Setup" screen. 6 7 8 3. Touch the desired button. Touch "Save". 261 The previous screen will be deleted. (See "D Delete personal data" on page 264.) D Selecting a language You can be displayed. 5. SETUP No. 5 Function Line color can be changed. (See "D Selecting the line color" on page 262.) Keyboard layout can be changed. (See "D Selecting a keyboard layout" on page 263.) Distance unit can be changed. (See "D Unit of measurement" on page 263.) The personal data can change the language. 1. Push the "SETUP" button. 2.
Touch "Language". 4. Touch "General" on the "Setup" screen. 6 7 8 3. Touch the desired button. Touch "Save". 261 The previous screen will be deleted. (See "D Delete personal data" on page 264.) D Selecting a language You can be displayed. 5. SETUP No. 5 Function Line color can be changed. (See "D Selecting the line color" on page 262.) Keyboard layout can be changed. (See "D Selecting a keyboard layout" on page 263.) Distance unit can be changed. (See "D Unit of measurement" on page 263.) The personal data can change the language. 1. Push the "SETUP" button. 2.

Navigation Manual
Page 238
... the "SETUP" button. 2. Touch "Line Color". 3. "Off": Both the front and rear passengers can be changed . 5. Select "On" or "Off" and then touch "Save". Touch "General" on the "Setup" screen. The line color will be locked to prevent rear passengers from ...operating the entertainment system. 1. D Selecting the line color Line color can operate the rear seat entertainment system. Touch the desired color. 4. Touch "Save". 262 Touch "General" on the "Setup...
... the "SETUP" button. 2. Touch "Line Color". 3. "Off": Both the front and rear passengers can be changed . 5. Select "On" or "Off" and then touch "Save". Touch "General" on the "Setup" screen. The line color will be locked to prevent rear passengers from ...operating the entertainment system. 1. D Selecting the line color Line color can operate the rear seat entertainment system. Touch the desired color. 4. Touch "Save". 262 Touch "General" on the "Setup...

Navigation Manual
Page 301
... indicator is set to give maintenance information with the "Information" screen. (See page 27.) When the vehicle needs to be serviced, the touch screen button color will change to orange. 325
... indicator is set to give maintenance information with the "Information" screen. (See page 27.) When the vehicle needs to be serviced, the touch screen button color will change to orange. 325
Navigation Manual
Page 323
... subtitle language ...201 Channel category ...161 City center ...62 City name ...55,60 City to search ...55,60 Clock button ...22,265 Clock settings ...265 Color ...31 Command list ...47 Compass mode ...41 Compass mode screen ...39,41 Connecting a Bluetoothr audio player ...182,322 Connecting a Bluetoothr phone ...129 Connecting a USB memory...
... subtitle language ...201 Channel category ...161 City center ...62 City name ...55,60 City to search ...55,60 Clock button ...22,265 Clock settings ...265 Color ...31 Command list ...47 Compass mode ...41 Compass mode screen ...39,41 Connecting a Bluetoothr audio player ...182,322 Connecting a Bluetoothr phone ...129 Connecting a USB memory...

Navigation Manual
Page 325
... Guidance with street names ...270 Guiding the route ...16 K Keyboard layout ...260 L Language ...260 Last 5 cities ...57,63 Limitations of the navigation system ...332 Line color ...260 List ...29 List All Categories button ...61,64,93,274 Listening to satellite radio ...161 Listening to the radio ...155 List screen operation ...28...
... Guidance with street names ...270 Guiding the route ...16 K Keyboard layout ...260 L Language ...260 Last 5 cities ...57,63 Limitations of the navigation system ...332 Line color ...260 List ...29 List All Categories button ...61,64,93,274 Listening to satellite radio ...161 Listening to the radio ...155 List screen operation ...28...

Navigation Manual
Page 327
... a station ...157 Selecting connection method ...319 Selecting from the categories ...61 Selecting from the last 5 cities ...63 Selecting the desired mode ...218 Selecting the line color ...262 Selecting the search area ...52 Setting and deleting destinations ...84 Setting Bluetoothr audio ...319 Setting home as the destination ...17 Setting route ...86 Setting...
... a station ...157 Selecting connection method ...319 Selecting from the categories ...61 Selecting from the last 5 cities ...63 Selecting the desired mode ...218 Selecting the line color ...262 Selecting the search area ...52 Setting and deleting destinations ...84 Setting Bluetoothr audio ...319 Setting home as the destination ...17 Setting route ...86 Setting...
Owners Manual
Page 187
Press and hold the "DISP" button on the menu screen. After setting day mode, wait 5 seconds to allow the color to be automatically input. After selecting a background color, wait 5 seconds to allow the mode to select "BLACK" or "BLUE". STEP 2 ● Setting the brightness STEP 1 Select "...OFF". 2-2. Press and hold the "DISP" button on the steering wheel until the display changes. STEP 2 ● Setting the background color STEP 1 Select "BACKGROUND COLOR" on the steering wheel until the display changes. Press and hold the "DISP" button on the menu screen.
Press and hold the "DISP" button on the menu screen. After setting day mode, wait 5 seconds to allow the color to be automatically input. After selecting a background color, wait 5 seconds to allow the mode to select "BLACK" or "BLUE". STEP 2 ● Setting the brightness STEP 1 Select "...OFF". 2-2. Press and hold the "DISP" button on the steering wheel until the display changes. STEP 2 ● Setting the background color STEP 1 Select "BACKGROUND COLOR" on the steering wheel until the display changes. Press and hold the "DISP" button on the menu screen.

Navigation Manual
Page 7
... "OK". You can also turn the display screen back on the brightness of the screen. D Contrast, brightness, color and tone adjustment The contrast, brightness, color and tone of the screen can adjust the contrast, brightness, color and tone of your surroundings. The screen goes off , and change the screen to adjust contrast and...
... "OK". You can also turn the display screen back on the brightness of the screen. D Contrast, brightness, color and tone adjustment The contrast, brightness, color and tone of the screen can adjust the contrast, brightness, color and tone of your surroundings. The screen goes off , and change the screen to adjust contrast and...

Navigation Manual
Page 8
... button to day mode or night mode. To turn the display screen back on the position of the headlight switch, the screen changes to adjust color and tone. BASIC FUNCTIONS D Changing between day mode and night mode Depending on , push the "DISP" button again, or push the "DEST" or another... do not touch any button on the adjustment screen for 20 seconds, the previous screen will be displayed. 32 After adjusting the screen touch "OK". Color and tone adjustment (with the hybrid system turned off when "Screen Off" is equipped with the headlight switch on, touch "Day Mode" on the "...
... button to day mode or night mode. To turn the display screen back on the position of the headlight switch, the screen changes to adjust color and tone. BASIC FUNCTIONS D Changing between day mode and night mode Depending on , push the "DISP" button again, or push the "DEST" or another... do not touch any button on the adjustment screen for 20 seconds, the previous screen will be displayed. 32 After adjusting the screen touch "OK". Color and tone adjustment (with the hybrid system turned off when "Screen Off" is equipped with the headlight switch on, touch "Day Mode" on the "...