
Owners Manual
Page 33
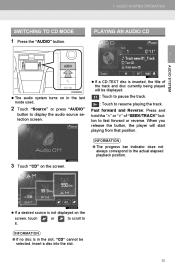
.... : Touch to the actual elapsed playback position. 3 Touch "CD" on the screen, touch it. INFORMATION or to scroll to fast forward or reverse. When you release the button, the player will be selected. AUDIO SYSTEM OPERATION SWITCHING TO CD MODE PLAYING AN AUDIO CD 1 Press the "AUDIO" button. 2 AUDIO SYSTEM If...
.... : Touch to the actual elapsed playback position. 3 Touch "CD" on the screen, touch it. INFORMATION or to scroll to fast forward or reverse. When you release the button, the player will be selected. AUDIO SYSTEM OPERATION SWITCHING TO CD MODE PLAYING AN AUDIO CD 1 Press the "AUDIO" button. 2 AUDIO SYSTEM If...
Owners Manual
Page 35
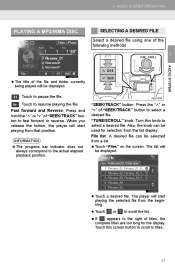
1. Fast forward and Reverse: Press and hold the " " or " " of "SEEK/TRACK" button to fast forward or reverse. When you release the button, the player will be used for the display. INFORMATION "SEEK/TRACK" button: Press the " " or " " of "SEEK/TRACK" button to select a desired file. ...
1. Fast forward and Reverse: Press and hold the " " or " " of "SEEK/TRACK" button to fast forward or reverse. When you release the button, the player will be used for the display. INFORMATION "SEEK/TRACK" button: Press the " " or " " of "SEEK/TRACK" button to select a desired file. ...
Owners Manual
Page 38
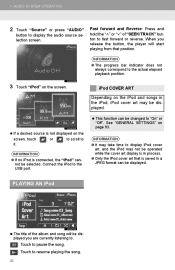
... take time to fast forward or reverse. Fast forward and Reverse: Press and hold the " " or " " of the album and song will be displayed you release the button, the player will start playing from that is saved in a JPEG format can be displayed. INFORMATION or to scroll to the actual elapsed...
... take time to fast forward or reverse. Fast forward and Reverse: Press and hold the " " or " " of the album and song will be displayed you release the button, the player will start playing from that is saved in a JPEG format can be displayed. INFORMATION or to scroll to the actual elapsed...

Owners Manual
Page 42
... is not displayed on the screen. Also, the knob can be displayed. : Touch to pause the file. : Touch to fast forward or reverse. 1. When you release the button, the player will be used for selection from that position. Fast forward and Reverse: Press and hold the " " or " " of the following methods...
... is not displayed on the screen. Also, the knob can be displayed. : Touch to pause the file. : Touch to fast forward or reverse. 1. When you release the button, the player will be used for selection from that position. Fast forward and Reverse: Press and hold the " " or " " of the following methods...
Owners Manual
Page 49
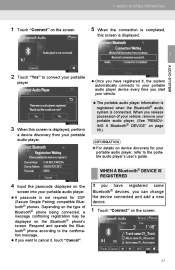
... you have registered some Bluetooth® devices, you want to cancel it , the system automatically connects to your portable audio player device every time you release possession of Bluetooth® phone being connected, a message confirming registration may be displayed on device discovery for SSP (Secure Simple Pairing) compatible Bluetooth® phones...
... you have registered some Bluetooth® devices, you want to cancel it , the system automatically connects to your portable audio player device every time you release possession of Bluetooth® phone being connected, a message confirming registration may be displayed on device discovery for SSP (Secure Simple Pairing) compatible Bluetooth® phones...

Owners Manual
Page 51
... of the Bluetooth® connection. No connection INFORMATION Good Some titles and controls may not be good and the system may not function when you release the button, the player will be displayed depending on the portable audio player that position. INFORMATION ● An antenna for the Bluetooth® connection is...
... of the Bluetooth® connection. No connection INFORMATION Good Some titles and controls may not be good and the system may not function when you release the button, the player will be displayed depending on the portable audio player that position. INFORMATION ● An antenna for the Bluetooth® connection is...
Owners Manual
Page 54
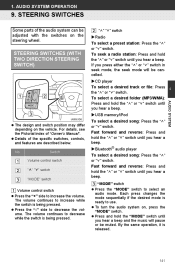
... "MODE" switch until you hear a beep. Switch Volume control switch " " " " switch "MODE" switch Volume control switch Press the "+" side to increase while the switch is released. 56 " " " " switch Radio To select a preset station: Press the " " or " " switch. AUDIO SYSTEM OPERATION 11. STEERING SWITCHES Some parts of the audio system can be...
... "MODE" switch until you hear a beep. Switch Volume control switch " " " " switch "MODE" switch Volume control switch Press the "+" side to increase while the switch is released. 56 " " " " switch Radio To select a preset station: Press the " " or " " switch. AUDIO SYSTEM OPERATION 11. STEERING SWITCHES Some parts of the audio system can be...
Owners Manual
Page 56
Back switch Press the back switch to return to use. Each press changes the mode sequentially if the desired mode is released. Press and hold the "MODE" switch until you hear a beep and the music will pause or be muted. To turn the audio system on, press ...
Back switch Press the back switch to return to use. Each press changes the mode sequentially if the desired mode is released. Press and hold the "MODE" switch until you hear a beep and the music will pause or be muted. To turn the audio system on, press ...
Owners Manual
Page 68
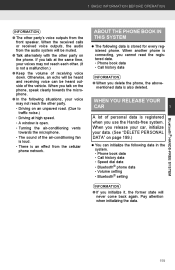
...talk on the phone, speak clearly towards the microphone. • The sound of personal data is an effect from the cellular phone network. WHEN YOU RELEASE YOUR CAR A lot of the air-conditioning fan is loud. • There is registered when you talk at the same time, your data. (...will be heard outside of receiving voice down. Otherwise, an echo will never come back again. Pay attention when initializing the data. 71 When you release your car, initialize your voices may not reach the other party. • Driving on an unpaved road. (Due to traffic noise.) • Driving...
...talk on the phone, speak clearly towards the microphone. • The sound of personal data is an effect from the cellular phone network. WHEN YOU RELEASE YOUR CAR A lot of the air-conditioning fan is loud. • There is registered when you talk at the same time, your data. (...will be heard outside of receiving voice down. Otherwise, an echo will never come back again. Pay attention when initializing the data. 71 When you release your car, initialize your voices may not reach the other party. • Driving on an unpaved road. (Due to traffic noise.) • Driving...

Owners Manual
Page 228
... button is in the last mode used. : Touch to pause the track. : Touch to the actual elapsed playback position. INFORMATION ● If no disc is released, the player will be selected. FAST FORWARD AND REVERSE 1 Press and hold the " " or " " of the track and disc currently being played will start playing...
... button is in the last mode used. : Touch to pause the track. : Touch to the actual elapsed playback position. INFORMATION ● If no disc is released, the player will be selected. FAST FORWARD AND REVERSE 1 Press and hold the " " or " " of the track and disc currently being played will start playing...
Owners Manual
Page 230
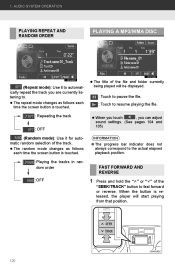
...): Use it for automatic random selection of the track. When you touch , you are currently listening to fast forward or reverse. When the button is released, the player will be displayed. : Touch to pause the file. : Touch to resume playing the file. : Repeating the track : OFF (Random mode): Use it to...
...): Use it for automatic random selection of the track. When you touch , you are currently listening to fast forward or reverse. When the button is released, the player will be displayed. : Touch to pause the file. : Touch to resume playing the file. : Repeating the track : OFF (Random mode): Use it to...
Owners Manual
Page 251
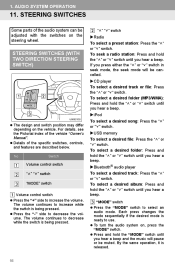
... hear a beep. Each press changes the mode sequentially if the desired mode is being pressed. 141 The volume continues to decrease while the switch is released. USB memory/iPod To select a desired song: Press the " " STEERING SWITCHES (WITH TWO DIRECTION STEERING SWITCH) 4 AUDIO SYSTEM The design and switch position may differ...
... hear a beep. Each press changes the mode sequentially if the desired mode is being pressed. 141 The volume continues to decrease while the switch is released. USB memory/iPod To select a desired song: Press the " " STEERING SWITCHES (WITH TWO DIRECTION STEERING SWITCH) 4 AUDIO SYSTEM The design and switch position may differ...

Owners Manual
Page 253
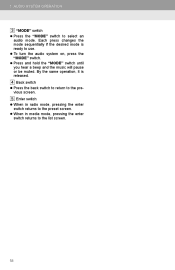
.... By the same operation, it is ready to the list screen. 4 AUDIO SYSTEM 143 Each press changes the mode sequentially if the desired mode is released. To turn the audio system on, press the "MODE/HOLD" switch. When in radio mode, pressing the enter switch returns to the preset screen. Enter...
.... By the same operation, it is ready to the list screen. 4 AUDIO SYSTEM 143 Each press changes the mode sequentially if the desired mode is released. To turn the audio system on, press the "MODE/HOLD" switch. When in radio mode, pressing the enter switch returns to the preset screen. Enter...
Owners Manual
Page 268
...other party's voice outputs from the front speaker. When the received calls or received voice outputs, the audio from the cellular phone network. When you release your car, initialize your data. (See "DELETE PERSONAL DATA" on page 199.) You can be heard and receiving voice can initialize the following data... towards the microphone. • The sound of personal data is stored for every registered phone. If you use the Hands-free system. WHEN YOU RELEASE YOUR CAR A lot of the air-conditioning fan is loud. • There is an effect from the audio system will be heard outside of...
...other party's voice outputs from the front speaker. When the received calls or received voice outputs, the audio from the cellular phone network. When you release your car, initialize your data. (See "DELETE PERSONAL DATA" on page 199.) You can be heard and receiving voice can initialize the following data... towards the microphone. • The sound of personal data is stored for every registered phone. If you use the Hands-free system. WHEN YOU RELEASE YOUR CAR A lot of the air-conditioning fan is loud. • There is an effect from the audio system will be heard outside of...

Owners Manual
Page 360
... locked and then unlocked. 54 VENZA_U (OM73013U) Use the same procedure to "P" or "N", press and hold the door lock switch ( or ) for about 5 seconds then release. Opening, closing and locking the doors STEP 2 Shift the shift lever to cancel the function. 1-2.
... locked and then unlocked. 54 VENZA_U (OM73013U) Use the same procedure to "P" or "N", press and hold the door lock switch ( or ) for about 5 seconds then release. Opening, closing and locking the doors STEP 2 Shift the shift lever to cancel the function. 1-2.
Owners Manual
Page 372
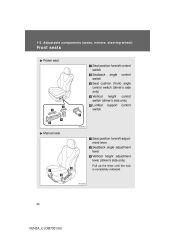
Adjust a ble c om pone nt s (se a t s, m irrors, st e e ring w he e l) Front se at s Power seat Seat position fore/aft control switch Seatback switch angle control Seat cushion (front) angle control switch (driver's side only) Vertical height control switch (driver's side only) Lumbar switch support control Manual seat Seat position fore/aft adjustment lever Seatback angle adjustment lever Vertical height adjustment lever (driver's side only) Pull up the lever until the lock is completely released. 66 VENZA_U (OM73013U) 1 -3 .
Adjust a ble c om pone nt s (se a t s, m irrors, st e e ring w he e l) Front se at s Power seat Seat position fore/aft control switch Seatback switch angle control Seat cushion (front) angle control switch (driver's side only) Vertical height control switch (driver's side only) Lumbar switch support control Manual seat Seat position fore/aft adjustment lever Seatback angle adjustment lever Vertical height adjustment lever (driver's side only) Pull up the lever until the lock is completely released. 66 VENZA_U (OM73013U) 1 -3 .
Owners Manual
Page 375
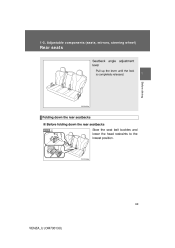
Adjust a ble c om pone nt s (se a t s, m irrors, st e e ring w he e l) Re a r se at s Seatback angle adjustment lever Pull up the lever until the lock is completely released. 1 Before driving Folding down the rear seatbacks 1 -3 .
Adjust a ble c om pone nt s (se a t s, m irrors, st e e ring w he e l) Re a r se at s Seatback angle adjustment lever Pull up the lever until the lock is completely released. 1 Before driving Folding down the rear seatbacks 1 -3 .
Owners Manual
Page 378
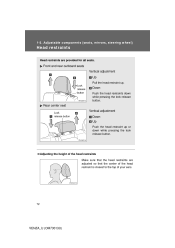
Front and rear outboard seats Vertical adjustment Up Pull the head restraint up or down while pressing the lock release button. Lock release button Down Push the head restraints down while pressing the lock release button. Adjust a ble c om pone nt s (se a t s, m irrors, st e e ring w he e l) H e a d re st ra int s Head restraints are provided for all seats. 1 -3 . Rear center seat Lock release button Vertical adjustment Down Up Push the head restraint up .
Front and rear outboard seats Vertical adjustment Up Pull the head restraint up or down while pressing the lock release button. Lock release button Down Push the head restraints down while pressing the lock release button. Adjust a ble c om pone nt s (se a t s, m irrors, st e e ring w he e l) H e a d re st ra int s Head restraints are provided for all seats. 1 -3 . Rear center seat Lock release button Vertical adjustment Down Up Push the head restraint up .
Owners Manual
Page 402
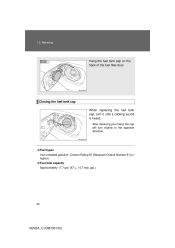
Closing the fuel tank cap When replacing the fuel tank cap, turn slightly to the opposite direction. After releasing your hand, the cap will turn it until a clicking sound is heard. Refueling STEP 3 Hang the fuel tank cap on the back of the fuel filler door. 1-5.
Closing the fuel tank cap When replacing the fuel tank cap, turn slightly to the opposite direction. After releasing your hand, the cap will turn it until a clicking sound is heard. Refueling STEP 3 Hang the fuel tank cap on the back of the fuel filler door. 1-5.

Owners Manual
Page 450
Adjust the head restraint to the lowest position. 144 VENZA_U (OM73013U) 1-7. Outside Center STEP 1 Lower the head restraint to the upmost position. Child restraint systems with a seat belt Press the buckle release button and fully retract the seat belt. Safety information Removing a child restraint installed with a top tether strap STEP 1 Secure the child restraint using a seat belt or lower anchors, and do the following.
Adjust the head restraint to the lowest position. 144 VENZA_U (OM73013U) 1-7. Outside Center STEP 1 Lower the head restraint to the upmost position. Child restraint systems with a seat belt Press the buckle release button and fully retract the seat belt. Safety information Removing a child restraint installed with a top tether strap STEP 1 Secure the child restraint using a seat belt or lower anchors, and do the following.

