

Owners Manual
Page 19
... "Options". 21 The screen button is equipped with Radio Broadcast Data Systems (RBDS). display messages from radio stations that broadcasts RBDS information and the "FM info" indicator is on . To stay tuned to an FM station that utilize RBDS transmitters.
... "Options". 21 The screen button is equipped with Radio Broadcast Data Systems (RBDS). display messages from radio stations that broadcasts RBDS information and the "FM info" indicator is on . To stay tuned to an FM station that utilize RBDS transmitters.

Owners Manual
Page 22
..., the stations will appear on the screen. Each time the button is found. display messages from radio stations that broadcasts RBDS information and the "FM info" indicator is selected, and then scan again.
..., the stations will appear on the screen. Each time the button is found. display messages from radio stations that broadcasts RBDS information and the "FM info" indicator is selected, and then scan again.

Owners Manual
Page 217
... selected, or 5 seconds if "Analog" is equipped with Radio Broadcast Data Systems (RBDS). display messages from radio stations that broadcasts RBDS information and the "FM info" indicator is on . Manual tuning: Search for a stronger signal station. RBDS mode allows text messages to an FM station that utilize RBDS transmitters. Preset tuning...
... selected, or 5 seconds if "Analog" is equipped with Radio Broadcast Data Systems (RBDS). display messages from radio stations that broadcasts RBDS information and the "FM info" indicator is on . Manual tuning: Search for a stronger signal station. RBDS mode allows text messages to an FM station that utilize RBDS transmitters. Preset tuning...

Owners Manual
Page 488
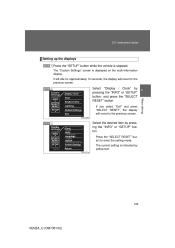
Instrument cluster Switching the display "INFO" button "SELECT RESET" button "SETUP" button 2 When driving Trip information Display items can be switched by pressing the "INFO" button. 2-2.
Instrument cluster Switching the display "INFO" button "SELECT RESET" button "SETUP" button 2 When driving Trip information Display items can be switched by pressing the "INFO" button. 2-2.
Owners Manual
Page 490
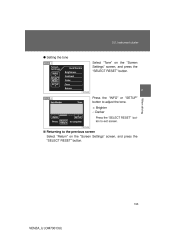
... VENZA_U (OM73013U) The "Custom Settings" screen is stopped. Press the "SELECT RESET" button to the previous screen. The current setting is indicated by pressing the "INFO" or "SETUP" button. If you select "Exit" and press "SELECT RESET", the display will revert to enter the setting mode. Instrument cluster Setting up the... displays STEP 1 Press the "SETUP" button while the vehicle is displayed on the multi-information display. STEP 2 Select "Display / Clock" by pressing the "INFO" or "SETUP" button, and press the "SELECT RESET" button. 2-2.
... VENZA_U (OM73013U) The "Custom Settings" screen is stopped. Press the "SELECT RESET" button to the previous screen. The current setting is indicated by pressing the "INFO" or "SETUP" button. If you select "Exit" and press "SELECT RESET", the display will revert to enter the setting mode. Instrument cluster Setting up the... displays STEP 1 Press the "SETUP" button while the vehicle is displayed on the multi-information display. STEP 2 Select "Display / Clock" by pressing the "INFO" or "SETUP" button, and press the "SELECT RESET" button. 2-2.
Owners Manual
Page 493
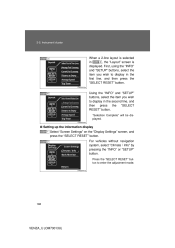
"Selection Complete" will be displayed. 2-2. Instrument cluster STEP 3 When a 2-line layout is displayed. STEP 4 Using the "INFO" and "SETUP" buttons, select the item you wish to display in STEP 2 , the "Layout" screen is selected in the second line, and then press the "SELECT RESET" button. First, using the "INFO" and "SETUP" buttons, select the item you wish to display in the first line, and then press the "SELECT RESET" button.
"Selection Complete" will be displayed. 2-2. Instrument cluster STEP 3 When a 2-line layout is displayed. STEP 4 Using the "INFO" and "SETUP" buttons, select the item you wish to display in STEP 2 , the "Layout" screen is selected in the second line, and then press the "SELECT RESET" button. First, using the "INFO" and "SETUP" buttons, select the item you wish to display in the first line, and then press the "SELECT RESET" button.

Owners Manual
Page 494
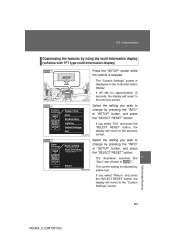
2-2. Instrument cluster ● Setting the brightness STEP 1 Select "Brightness" on the "Screen Settings" screen, and press the "SELECT RESET" button. 189 VENZA_U (OM73013U) When driving ● Setting the contrast STEP 1 Select "Contrast" on the "Screen Settings" screen, and press the "SELECT RESET" button. 2 STEP 2 Press the "INFO" or "SETUP" button to adjust the brightness. +: Brighter -: Darker Press the "SELECT RESET" button to exit screen.
2-2. Instrument cluster ● Setting the brightness STEP 1 Select "Brightness" on the "Screen Settings" screen, and press the "SELECT RESET" button. 189 VENZA_U (OM73013U) When driving ● Setting the contrast STEP 1 Select "Contrast" on the "Screen Settings" screen, and press the "SELECT RESET" button. 2 STEP 2 Press the "INFO" or "SETUP" button to adjust the brightness. +: Brighter -: Darker Press the "SELECT RESET" button to exit screen.
Owners Manual
Page 495
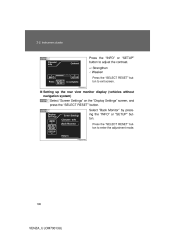
Instrument cluster STEP 2 Press the "INFO" or "SETUP" button to adjust the contrast. +: Strengthen -: Weaken Press the "SELECT RESET" button to exit screen. 2-2.
Instrument cluster STEP 2 Press the "INFO" or "SETUP" button to adjust the contrast. +: Strengthen -: Weaken Press the "SELECT RESET" button to exit screen. 2-2.

Owners Manual
Page 496
2-2. When driving ● Setting the contrast STEP 1 Select "Contrast" on the "Screen Settings" screen, and press the "SELECT RESET" button. 2 STEP 2 Press the "INFO" or "SETUP" button to adjust the brightness. +: Brighter -: Darker Press the "SELECT RESET" button to exit screen. Instrument cluster ● Setting the brightness STEP 1 Select "Brightness" on the "Screen Settings" screen, and press the "SELECT RESET" button. 191 VENZA_U (OM73013U)
2-2. When driving ● Setting the contrast STEP 1 Select "Contrast" on the "Screen Settings" screen, and press the "SELECT RESET" button. 2 STEP 2 Press the "INFO" or "SETUP" button to adjust the brightness. +: Brighter -: Darker Press the "SELECT RESET" button to exit screen. Instrument cluster ● Setting the brightness STEP 1 Select "Brightness" on the "Screen Settings" screen, and press the "SELECT RESET" button. 191 VENZA_U (OM73013U)
Owners Manual
Page 497
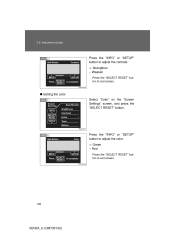
STEP 2 Press the "INFO" or "SETUP" button to adjust the color. +: Green -: Red Press the "SELECT RESET" button to exit screen. ● Setting the color STEP 1 Select "Color" on the "Screen Settings" screen, and press the "SELECT RESET" button. Instrument cluster STEP 2 Press the "INFO" or "SETUP" button to adjust the contrast. +: Strengthen -: Weaken Press the "SELECT RESET" button to exit screen. 192 VENZA_U (OM73013U) 2-2.
STEP 2 Press the "INFO" or "SETUP" button to adjust the color. +: Green -: Red Press the "SELECT RESET" button to exit screen. ● Setting the color STEP 1 Select "Color" on the "Screen Settings" screen, and press the "SELECT RESET" button. Instrument cluster STEP 2 Press the "INFO" or "SETUP" button to adjust the contrast. +: Strengthen -: Weaken Press the "SELECT RESET" button to exit screen. 192 VENZA_U (OM73013U) 2-2.
Owners Manual
Page 498
When driving 2-2. Instrument cluster ● Setting the tone STEP 1 Select "Tone" on the "Screen Settings" screen, and press the "SELECT RESET" button. 2 STEP 2 Press the "INFO" or "SETUP" button to adjust the tone. +: Brighter -: Darker Press the "SELECT RESET" button to exit screen.
When driving 2-2. Instrument cluster ● Setting the tone STEP 1 Select "Tone" on the "Screen Settings" screen, and press the "SELECT RESET" button. 2 STEP 2 Press the "INFO" or "SETUP" button to adjust the tone. +: Brighter -: Darker Press the "SELECT RESET" button to exit screen.
Owners Manual
Page 502
2-2. Instrument cluster Switching the display "INFO-CLOCK" button "RESET-H" button "US/M-M" button 2 When driving Trip information Display items can be switched by pressing the "INFO-CLOCK" button.
2-2. Instrument cluster Switching the display "INFO-CLOCK" button "RESET-H" button "US/M-M" button 2 When driving Trip information Display items can be switched by pressing the "INFO-CLOCK" button.
Owners Manual
Page 961
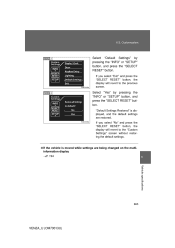
... chosen in STEP 2 . If you wish to the "Custom Settings" screen. 6 Vehicle specifications 661 VENZA_U (OM73013U) The "Custom Settings" screen is indicated by pressing the "INFO" or "SETUP" button, and press the "SELECT RESET" button. The current setting is displayed on the multi-information display. If left idle for approximately 10... display) STEP 1 Press the "SETUP" button while the vehicle is stopped. If you wish to the previous screen. 6-2. Customization Customizing the features by pressing the "INFO" or "SETUP" button, and press the "SELECT RESET" button.
... chosen in STEP 2 . If you wish to the "Custom Settings" screen. 6 Vehicle specifications 661 VENZA_U (OM73013U) The "Custom Settings" screen is indicated by pressing the "INFO" or "SETUP" button, and press the "SELECT RESET" button. The current setting is displayed on the multi-information display. If left idle for approximately 10... display) STEP 1 Press the "SETUP" button while the vehicle is stopped. If you wish to the previous screen. 6-2. Customization Customizing the features by pressing the "INFO" or "SETUP" button, and press the "SELECT RESET" button.

Owners Manual
Page 962
6-2. If you select "Return" and press the "SELECT RESET" button, the display will revert to the previous screen. The illustration assumes that "Auto Locking" was chosen in STEP 3 . The current setting is indicated by pressing the "INFO" or "SETUP" button, and press the "SELECT RESET" button. Customization STEP 4 Choose a desired setting by yellow text. If any settings are changed, the display will revert to the previous screen.
6-2. If you select "Return" and press the "SELECT RESET" button, the display will revert to the previous screen. The illustration assumes that "Auto Locking" was chosen in STEP 3 . The current setting is indicated by pressing the "INFO" or "SETUP" button, and press the "SELECT RESET" button. Customization STEP 4 Choose a desired setting by yellow text. If any settings are changed, the display will revert to the previous screen.
Owners Manual
Page 963
"Default Settings Restored" is displayed, and the default settings are restored. If you select "Exit" and press the "SELECT RESET" button, the display will revert to the previous screen. Customization STEP 2 Select "Default Settings" by pressing the "INFO" or "SETUP" button, and press the "SELECT RESET" button. If you select "No" and press the "SELECT RESET" button, the display will revert to the "Custom Settings" screen without restoring the default settings. STEP 3 Select "Yes" by pressing the "INFO" or "SETUP" button, and press the "SELECT RESET" button. 6-2.
"Default Settings Restored" is displayed, and the default settings are restored. If you select "Exit" and press the "SELECT RESET" button, the display will revert to the previous screen. Customization STEP 2 Select "Default Settings" by pressing the "INFO" or "SETUP" button, and press the "SELECT RESET" button. If you select "No" and press the "SELECT RESET" button, the display will revert to the "Custom Settings" screen without restoring the default settings. STEP 3 Select "Yes" by pressing the "INFO" or "SETUP" button, and press the "SELECT RESET" button. 6-2.

Owners Manual
Page 980
... via t ion list Abbreviat ion/Ac ronym list ABBREVIATIONS 2WD 4WD ABS ACC ALR AUX AWD A/C CRS ECON ECU EDR ELR EPS GAWR GCWR GVWR INFO I/M LATCH LCD LED MMT M+S MTBE 2-Wheel Drive 4-Wheel Drive Anti-lock Brake System Accessory Automatic Locking Retractor Auxiliary All-Wheel Drive Air Conditioning Child Restraint...
... via t ion list Abbreviat ion/Ac ronym list ABBREVIATIONS 2WD 4WD ABS ACC ALR AUX AWD A/C CRS ECON ECU EDR ELR EPS GAWR GCWR GVWR INFO I/M LATCH LCD LED MMT M+S MTBE 2-Wheel Drive 4-Wheel Drive Anti-lock Brake System Accessory Automatic Locking Retractor Auxiliary All-Wheel Drive Air Conditioning Child Restraint...
Navigation Manual
Page 12
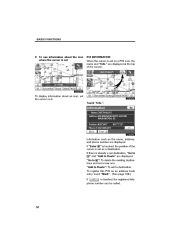
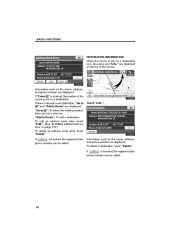
BASIC FUNCTIONS D To see information about an icon, set the cursor on a POI icon, the name and "Info." are displayed at the top of the cursor is set a new one. Information such as an address book entry, touch "Mark". (See page 109.) If ...is touched, the position of the screen. "Add to ": To delete the existing destinations and set as a destination. Touch "Info.". "Go to Route": To add a destination. To display information about the icon where the cursor is set POI INFORMATION When the cursor is already a set...
BASIC FUNCTIONS D To see information about an icon, set the cursor on a POI icon, the name and "Info." are displayed at the top of the cursor is set a new one. Information such as an address book entry, touch "Mark". (See page 109.) If ...is touched, the position of the screen. "Add to ": To delete the existing destinations and set as a destination. Touch "Info.". "Go to Route": To add a destination. To display information about the icon where the cursor is set POI INFORMATION When the cursor is already a set...
Navigation Manual
Page 13
Touch "Info.". 37 Display POI icons" on page 92.) ADDRESS BOOK ENTRY INFORMATION When the cursor is set on the map screen. (See " - BASIC FUNCTIONS INFORMATION The desired Point of the screen. are displayed at the top of Interest can be displayed on an address book entry icon, the name and "Info."
Touch "Info.". 37 Display POI icons" on page 92.) ADDRESS BOOK ENTRY INFORMATION When the cursor is set on the map screen. (See " - BASIC FUNCTIONS INFORMATION The desired Point of the screen. are displayed at the top of Interest can be displayed on an address book entry icon, the name and "Info."
Navigation Manual
Page 14
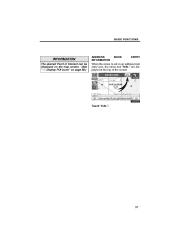
... phone number can be called . To edit an address book entry, touch "Edit". (See "(b) Editing address book entries" on a destination icon, the name and "Info." Touch "Info.". 38 If "Enter " is touched, the position of the screen. "Go to ": To delete the existing destinations and set on page 110.) To delete an...
... phone number can be called . To edit an address book entry, touch "Edit". (See "(b) Editing address book entries" on a destination icon, the name and "Info." Touch "Info.". 38 If "Enter " is touched, the position of the screen. "Go to ": To delete the existing destinations and set on page 110.) To delete an...

Navigation Manual
Page 15
Traffic information is displayed on the upper part of the screen. BASIC FUNCTIONS - Any one of the screen configurations can be selected. 1. Touch "Detail" to display the following buttons. 39 To select the desired screen configuration, touch one of the following screen. bar will appear on the screen. Touch "Info.". Touch this button to display detailed traffic event information. 2. Switching the screens XMr NavTraffic TEXT INFORMATION When you touch the XMr NavTraffic icon on the map, the XMr NavTraffic info.
Traffic information is displayed on the upper part of the screen. BASIC FUNCTIONS - Any one of the screen configurations can be selected. 1. Touch "Detail" to display the following buttons. 39 To select the desired screen configuration, touch one of the following screen. bar will appear on the screen. Touch "Info.". Touch this button to display detailed traffic event information. 2. Switching the screens XMr NavTraffic TEXT INFORMATION When you touch the XMr NavTraffic icon on the map, the XMr NavTraffic info.
