

Owners Manual
Page 2
... on specifications, the vehicle shown in this manual covers all models and all equipment, including options. Accessories, spare parts and modification of your Toyota vehicle. In addition, damage or performance problems resulting from your vehicle. Depending on , your Toyota A wide variety of non-genuine spare parts and accessories for any time without notice...
... on specifications, the vehicle shown in this manual covers all models and all equipment, including options. Accessories, spare parts and modification of your Toyota vehicle. In addition, damage or performance problems resulting from your vehicle. Depending on , your Toyota A wide variety of non-genuine spare parts and accessories for any time without notice...

Owners Manual
Page 4
... . The computers do not record conversations, sound or pictures. ● Data usage Toyota may use the data recorded in these computers to the grade level and options the vehicle is not tied to a specific vehicle or vehicle owner 26 Toyota will not disclose the recorded data to a third party except: • With the...
... . The computers do not record conversations, sound or pictures. ● Data usage Toyota may use the data recorded in these computers to the grade level and options the vehicle is not tied to a specific vehicle or vehicle owner 26 Toyota will not disclose the recorded data to a third party except: • With the...

Owners Manual
Page 563
6-1. tire 592 Specifications Typical DOT and tire identification number (TIN) DOT symbol* Tire Identification (TIN) Number Tire manufacturer's identification mark Tire size code Manufacturer's optional type code (3 or 4 letters) Manufacturing week Manufacturing year *: The DOT symbol certifies that the tire conforms to applicable Federal Motor Vehicle Safety Standards.
6-1. tire 592 Specifications Typical DOT and tire identification number (TIN) DOT symbol* Tire Identification (TIN) Number Tire manufacturer's identification mark Tire size code Manufacturer's optional type code (3 or 4 letters) Manufacturing week Manufacturing year *: The DOT symbol certifies that the tire conforms to applicable Federal Motor Vehicle Safety Standards.
Owners Manual
Page 567
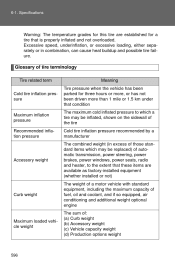
...of those standard items which may be replaced) of : (a) Curb weight (b) Accessory weight (c) Vehicle capacity weight (d) Production options weight Maximum inflation pressure Recommended inflation pressure Accessory weight Curb weight Maximum loaded vehicle weight 596 Specifications Warning: The temperature grades for... standard equipment, including the maximum capacity of fuel, oil and coolant, and if so equipped, air conditioning and additional weight optional engine The sum of automatic transmission, power steering, power brakes, power windows, power seats, radio and heater, to which ...
...of those standard items which may be replaced) of : (a) Curb weight (b) Accessory weight (c) Vehicle capacity weight (d) Production options weight Maximum inflation pressure Recommended inflation pressure Accessory weight Curb weight Maximum loaded vehicle weight 596 Specifications Warning: The temperature grades for... standard equipment, including the maximum capacity of fuel, oil and coolant, and if so equipped, air conditioning and additional weight optional engine The sum of automatic transmission, power steering, power brakes, power windows, power seats, radio and heater, to which ...
Owners Manual
Page 568
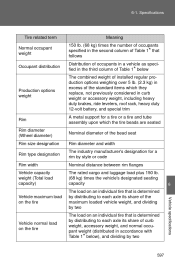
... follows Distribution of occupants in a vehicle as specified in the third column of Table 1* below The combined weight of installed regular production options weighing over 5 lb. (2.3 kg) in excess of the standard items which they replace, not previously considered in curb weight or accessory...share of curb weight, accessory weight, and normal occupant weight (distributed in accordance with Table 1* below), and dividing by two Production options weight Rim Rim diameter (Wheel diameter) Rim size designation Rim type designation Rim width Vehicle capacity weight (Total load capacity) Vehicle ...
... follows Distribution of occupants in a vehicle as specified in the third column of Table 1* below The combined weight of installed regular production options weighing over 5 lb. (2.3 kg) in excess of the standard items which they replace, not previously considered in curb weight or accessory...share of curb weight, accessory weight, and normal occupant weight (distributed in accordance with Table 1* below), and dividing by two Production options weight Rim Rim diameter (Wheel diameter) Rim size designation Rim type designation Rim width Vehicle capacity weight (Total load capacity) Vehicle ...
Navigation Manual
Page 16
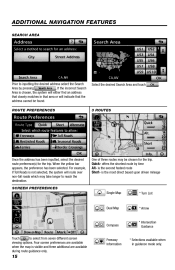
... that closely matches in guidance mode only. 15 SCREEN PREFERENCES One of three routes may take longer to select from seven different screen Touch viewing options. Freeway Information * Selections available when in that the address cannot be chosen for the trip. ADDITIONAL NAVIGATION FEATURES SEARCH AREA Prior to inputting the desired...
... that closely matches in guidance mode only. 15 SCREEN PREFERENCES One of three routes may take longer to select from seven different screen Touch viewing options. Freeway Information * Selections available when in that the address cannot be chosen for the trip. ADDITIONAL NAVIGATION FEATURES SEARCH AREA Prior to inputting the desired...
Navigation Manual
Page 17
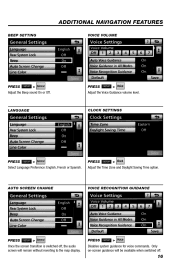
... SETUP > PRESS SETUP > Once the screen transition is switched off . 16 Disables system guidance for voice commands. Adjust the Time Zone and Daylight Saving Time option. ADDITIONAL NAVIGATION FEATURES BEEP SETTING VOICE VOLUME PRESS SETUP > PRESS SETUP > Adjust the Beep sound On or Off. Only on-screen guidance will be available...
... SETUP > PRESS SETUP > Once the screen transition is switched off . 16 Disables system guidance for voice commands. Adjust the Time Zone and Daylight Saving Time option. ADDITIONAL NAVIGATION FEATURES BEEP SETTING VOICE VOLUME PRESS SETUP > PRESS SETUP > Adjust the Beep sound On or Off. Only on-screen guidance will be available...

Navigation Manual
Page 20
... the faceplate followed . step 2 Touch . When the Touch yellow bar appears, the preference has been selected. step 3 19 Select from the Auto Avoid Traffic option. NAVTRAFFIC NAVTRAFFIC PREFERENCES SHOW NAVTRAFFIC INFORMATION step 1 Press by . Touch followed by MAP VOICE on the faceplate followed . Touch , traffic flow is detected...
... the faceplate followed . step 2 Touch . When the Touch yellow bar appears, the preference has been selected. step 3 19 Select from the Auto Avoid Traffic option. NAVTRAFFIC NAVTRAFFIC PREFERENCES SHOW NAVTRAFFIC INFORMATION step 1 Press by . Touch followed by MAP VOICE on the faceplate followed . Touch , traffic flow is detected...

Navigation Manual
Page 21
...fic events within 20 miles along the current route. Select to display Traffic Voice Touch Guidance option on the map. 20 Touch followed by . step 3 Select from the Show Free Flowing Traffic option. Free flowing traffic is illustrated by arrows on page 2. SHOW FREE FLOWING TRAFFIC step 1 Press...
...fic events within 20 miles along the current route. Select to display Traffic Voice Touch Guidance option on the map. 20 Touch followed by . step 3 Select from the Show Free Flowing Traffic option. Free flowing traffic is illustrated by arrows on page 2. SHOW FREE FLOWING TRAFFIC step 1 Press...

Navigation Manual
Page 65
... and the longitude at the top of the selected destination and the route preference. (See "Starting route guidance" on page 72.) 3. Destination search by "Emergency" 1. "Options": To register or edit address book. (See page 108.) The screen changes and displays the map location of the screen. 3. Touch the desired emergency category...
... and the longitude at the top of the selected destination and the route preference. (See "Starting route guidance" on page 72.) 3. Destination search by "Emergency" 1. "Options": To register or edit address book. (See page 108.) The screen changes and displays the map location of the screen. 3. Touch the desired emergency category...
Navigation Manual
Page 159
Satellite tuner technology notice: Toyota's satellite radio tuners are not included in the purchase price of the vehicle and optional digital satellite tuner. The channel(000) alternates the display between the radio ID and the specific radio ID code. 160 Additional activation and service subscription ...
Satellite tuner technology notice: Toyota's satellite radio tuners are not included in the purchase price of the vehicle and optional digital satellite tuner. The channel(000) alternates the display between the radio ID and the specific radio ID code. 160 Additional activation and service subscription ...

Navigation Manual
Page 281
SETUP When another Bluetoothr device is currently connected, this screen is connected You can also register a new Bluetoothr phone in the following way. 1. If you register your phone, Bluetoothr audio will disconnect. Touch "Phone". 3. It will reconnect automatically when you are using. 4. Touch "New Phone". 282 Push the "SETUP" button. 2. Touch "Options". 5. Touch "Manage Phone". When another Bluetoothr device is displayed. It will not be reconnected depending on the phone you finish registration. INFORMATION When you want to disconnect it, touch "Yes".
SETUP When another Bluetoothr device is currently connected, this screen is connected You can also register a new Bluetoothr phone in the following way. 1. If you register your phone, Bluetoothr audio will disconnect. Touch "Phone". 3. It will reconnect automatically when you are using. 4. Touch "New Phone". 282 Push the "SETUP" button. 2. Touch "Options". 5. Touch "Manage Phone". When another Bluetoothr device is displayed. It will not be reconnected depending on the phone you finish registration. INFORMATION When you want to disconnect it, touch "Yes".

Navigation Manual
Page 284
... you touch "Handsfree Power". D Editing the Bluetoothr phone You can change it . 1. You can see "Changing the handsfree power" on the system or edit. Touch "Options". 2.
... you touch "Handsfree Power". D Editing the Bluetoothr phone You can change it . 1. You can see "Changing the handsfree power" on the system or edit. Touch "Options". 2.

Navigation Manual
Page 286
Touch "Options". 3. You can select multiple phones and delete them at the same time. 287 Touch "Remove Phones". 4. Touch "Yes". Select the desired phone or touch "Select All", then touch "Delete". INFORMATION When you delete a Bluetoothr phone, the phonebook data will be deleted at the same time. 2. SETUP D Deleting a Bluetoothr phone 1.
Touch "Options". 3. You can select multiple phones and delete them at the same time. 287 Touch "Remove Phones". 4. Touch "Yes". Select the desired phone or touch "Select All", then touch "Delete". INFORMATION When you delete a Bluetoothr phone, the phonebook data will be deleted at the same time. 2. SETUP D Deleting a Bluetoothr phone 1.

Navigation Manual
Page 288
You can also display the "Contacts" screen in the following pages for each setting. 5. Touch "Manage Contacts". 4. Setting the phonebook "Setting the phonebook" is accessed from the "Contacts" screen. 1. Push the "INFO/PHONE" button. 2. Please refer to the following way. 1. Push the "SETUP" button. 2. Touch "Contacts". 4. Touch "Options". Touch "Manage Contacts". 289 Touch "Phone". 3. Touch "Phone". 3. Touch "Phonebook". SETUP -
You can also display the "Contacts" screen in the following pages for each setting. 5. Touch "Manage Contacts". 4. Setting the phonebook "Setting the phonebook" is accessed from the "Contacts" screen. 1. Push the "INFO/PHONE" button. 2. Please refer to the following way. 1. Push the "SETUP" button. 2. Touch "Contacts". 4. Touch "Options". Touch "Manage Contacts". 289 Touch "Phone". 3. Touch "Phone". 3. Touch "Phonebook". SETUP -

Navigation Manual
Page 293
Push the "INFO/PHONE" button. 2. Select the desired data from the list. 3. Touch "Options". 6. Touch "Contacts". 4. Touch "Phone". 3. When you complete the edit, touch "Save". 5. Touch "Edit Contact". 294 SETUP You can also display the "Edit Contact" screen in the following ways. From "Contact Data" screen 1. Edit the name or the number. (See "D Registering the phonebook data" on page 292.) 5. Touch "Edit" for the desired name or number. 4.
Push the "INFO/PHONE" button. 2. Select the desired data from the list. 3. Touch "Options". 6. Touch "Contacts". 4. Touch "Phone". 3. When you complete the edit, touch "Save". 5. Touch "Edit Contact". 294 SETUP You can also display the "Edit Contact" screen in the following ways. From "Contact Data" screen 1. Edit the name or the number. (See "D Registering the phonebook data" on page 292.) 5. Touch "Edit" for the desired name or number. 4.

Navigation Manual
Page 295
Touch "Options". 6. Touch "Yes". 5. Touch "Delete Contact". 296 Touch "Phone". 3. Select the desired data from the list. 3. SETUP You can also delete it in the following way. 1. Push the "INFO/PHONE" button. 2. Touch "Contacts". 4.
Touch "Options". 6. Touch "Yes". 5. Touch "Delete Contact". 296 Touch "Phone". 3. Select the desired data from the list. 3. SETUP You can also delete it in the following way. 1. Push the "INFO/PHONE" button. 2. Touch "Contacts". 4.

Navigation Manual
Page 297
SETUP You can be registered. 1. Touch "New Speed Dial". 4. Touch "Phone". 3. Up to register. 298 Touch "Options". 2. Touch "Speed Dials". D Registering the speed dial You can register the desired phone number from phonebook. Select the data you want to 18 numbers per phone can also display the "Speed Dials" screen in the following way. 1. Push the "INFO/PHONE" button. 2.
SETUP You can be registered. 1. Touch "New Speed Dial". 4. Touch "Phone". 3. Up to register. 298 Touch "Options". 2. Touch "Speed Dials". D Registering the speed dial You can register the desired phone number from phonebook. Select the data you want to 18 numbers per phone can also display the "Speed Dials" screen in the following way. 1. Push the "INFO/PHONE" button. 2.

Navigation Manual
Page 300
Touch "Phone". 3. Select the desired data from the "SETUP" button. 5. The following operations are the same as the operation when you operate it from the list. 7. SETUP From "Contact Data" screen 1. Touch "Options". 6. This screen is displayed. Touch "Set Speed Dial". 301 Touch "Contacts". 4. Push the "INFO/PHONE" button. 2.
Touch "Phone". 3. Select the desired data from the "SETUP" button. 5. The following operations are the same as the operation when you operate it from the list. 7. SETUP From "Contact Data" screen 1. Touch "Options". 6. This screen is displayed. Touch "Set Speed Dial". 301 Touch "Contacts". 4. Push the "INFO/PHONE" button. 2.

Navigation Manual
Page 305
SETUP You can register a voice tag for up to register. 5. Touch "Manage Voice Tags". 306 Select the data you want to 20 numbers. 1. D Registering the voice tag You can also display "Voice Tags" screen in the following way. 1. Touch "New Voice Tag". 4. Push the "INFO/PHONE" button. 2. Touch "Phone". 3. Touch "Contacts". Touch "Options". 2.
SETUP You can register a voice tag for up to register. 5. Touch "Manage Voice Tags". 306 Select the data you want to 20 numbers. 1. D Registering the voice tag You can also display "Voice Tags" screen in the following way. 1. Touch "New Voice Tag". 4. Push the "INFO/PHONE" button. 2. Touch "Phone". 3. Touch "Contacts". Touch "Options". 2.
