Owners Manual
Page 3
... customizing this feature. HomeLink® is a registered trademark of Johnson Controls, Inc. 3 1 INDEX OVERVIEW Engine maintenance Fuel tank door release and cap Hood release Indicator symbols Instrument cluster Instrument panel Keyless entry1,2 Light control-Instrument panel Smart Key system1,2 Air Conditioning/Heating Audio Auto lock functions1 Automatic ... 25 24 24 25 24 OVERVIEW FEATURES/OPERATIONS FEATURES/OPERATIONS SAFETY AND EMERGENCY FEATURES SAFETY AND EMERGENCY FEATURES 1 2 Visit your Toyota dealer for instructions and more information. Programmable by customer.
... customizing this feature. HomeLink® is a registered trademark of Johnson Controls, Inc. 3 1 INDEX OVERVIEW Engine maintenance Fuel tank door release and cap Hood release Indicator symbols Instrument cluster Instrument panel Keyless entry1,2 Light control-Instrument panel Smart Key system1,2 Air Conditioning/Heating Audio Auto lock functions1 Automatic ... 25 24 24 25 24 OVERVIEW FEATURES/OPERATIONS FEATURES/OPERATIONS SAFETY AND EMERGENCY FEATURES SAFETY AND EMERGENCY FEATURES 1 2 Visit your Toyota dealer for instructions and more information. Programmable by customer.

Owners Manual
Page 10
OVERVIEW Fuel tank door release and cap Turn to open Pull Store NOTE: Tighten until one click is not tightened enough, Check Engine " " indicator may illuminate. If the cap is heard. Light control-Instrument panel Brightness control - + Hood release Pull up latch and raise hood Pull Engage support rod 8
OVERVIEW Fuel tank door release and cap Turn to open Pull Store NOTE: Tighten until one click is not tightened enough, Check Engine " " indicator may illuminate. If the cap is heard. Light control-Instrument panel Brightness control - + Hood release Pull up latch and raise hood Pull Engage support rod 8
Owners Manual
Page 12
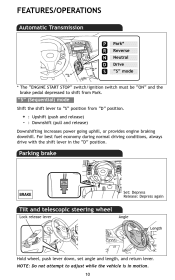
... again Tilt and telescopic steering wheel Lock release lever Angle Length Hold wheel, push lever down, set angle and length, and return lever. NOTE: Do not attempt to adjust while the vehicle is ... Drive "D" "S" * The "ENGINE START STOP" switch/ignition switch must be "ON" and the brake pedal depressed to shift from "D" position. + : Upshift (push and release) - : Downshift (pull and release) Downshifting increases power going uphill, or provides engine braking downhill. For best fuel economy during normal driving conditions, always drive with the shift lever...
... again Tilt and telescopic steering wheel Lock release lever Angle Length Hold wheel, push lever down, set angle and length, and return lever. NOTE: Do not attempt to adjust while the vehicle is ... Drive "D" "S" * The "ENGINE START STOP" switch/ignition switch must be "ON" and the brake pedal depressed to shift from "D" position. + : Upshift (push and release) - : Downshift (pull and release) Downshifting increases power going uphill, or provides engine braking downhill. For best fuel economy during normal driving conditions, always drive with the shift lever...

Owners Manual
Page 14
FEATURES/OPERATIONS Seats-Head restraints Front and rear (excluding center) seats Rear center Height Lock release button Lock release button Seats-Folding rear row seats (1) (2) (3) From inside From outside Pull Pull Left side remote seat release Right side/center rear remote seat release (1) Stow the seat belt buckles. (2) Hook the seat belt to the seat belt hangers. (3) Fold down the seatbacks. 12
FEATURES/OPERATIONS Seats-Head restraints Front and rear (excluding center) seats Rear center Height Lock release button Lock release button Seats-Folding rear row seats (1) (2) (3) From inside From outside Pull Pull Left side remote seat release Right side/center rear remote seat release (1) Stow the seat belt buckles. (2) Hook the seat belt to the seat belt hangers. (3) Fold down the seatbacks. 12

Owners Manual
Page 15
To stop window midway, lightly push the switch in the opposite direction. Open Tilt Tilting operation Close Push once to open position to minimize wind noise. Close SAFETY AND EMERGENCY FEATURES 13 Moonroof (if equipped) Sliding operation Recommended open partway; again to open or close. Windows-Power OVERVIEW Up Window lock switch Down Automatic operation Push the switch completely down or pull it completely up and release to fully open completely. FEATURES/OPERATIONS Window lock switch Deactivates all passenger windows. Driver's window remains operable.
To stop window midway, lightly push the switch in the opposite direction. Open Tilt Tilting operation Close Push once to open position to minimize wind noise. Close SAFETY AND EMERGENCY FEATURES 13 Moonroof (if equipped) Sliding operation Recommended open partway; again to open or close. Windows-Power OVERVIEW Up Window lock switch Down Automatic operation Push the switch completely down or pull it completely up and release to fully open completely. FEATURES/OPERATIONS Window lock switch Deactivates all passenger windows. Driver's window remains operable.

Owners Manual
Page 17
... are on brake pedal while at a complete stop until a beep sounds and slip indicator illuminates. Refer to the Owner's Manual for approximately two seconds after releasing brake pedal. Pull to increase/decrease wipe frequency.
... are on brake pedal while at a complete stop until a beep sounds and slip indicator illuminates. Refer to the Owner's Manual for approximately two seconds after releasing brake pedal. Pull to increase/decrease wipe frequency.

Owners Manual
Page 26
... " " indicator will turn off the light after a few minutes. If the light does not turn off , have the system checked by your Toyota dealer. Correctly adjusting tire inflation will illuminate. This feature is fully extended, then retracted even slightly, it cannot be re-extended beyond that point, ...the Owner's Manual. To find more details. 24 SAFETY AND EMERGENCY FEATURES Door locks Unlock Lock Seat belts Take up , or squeeze lock release to lower Tire Pressure Monitoring (warning) System If tire pressure becomes critically low on hips as possible If belt is used to help hold...
... " " indicator will turn off the light after a few minutes. If the light does not turn off , have the system checked by your Toyota dealer. Correctly adjusting tire inflation will illuminate. This feature is fully extended, then retracted even slightly, it cannot be re-extended beyond that point, ...the Owner's Manual. To find more details. 24 SAFETY AND EMERGENCY FEATURES Door locks Unlock Lock Seat belts Take up , or squeeze lock release to lower Tire Pressure Monitoring (warning) System If tire pressure becomes critically low on hips as possible If belt is used to help hold...

Owners Manual
Page 59
... locked and then unlocked. 52 VENZA_U (OM73012U) Use the same procedure to "P" or "N", press and hold the door lock switch ( or ) for about 5 seconds then release. 1-2. Function Shift lever position Door lock switch position Shift position linked door locking function Shift position linked door unlocking function Speed linked door locking function...
... locked and then unlocked. 52 VENZA_U (OM73012U) Use the same procedure to "P" or "N", press and hold the door lock switch ( or ) for about 5 seconds then release. 1-2. Function Shift lever position Door lock switch position Shift position linked door locking function Shift position linked door unlocking function Speed linked door locking function...

Owners Manual
Page 71
Adjust a ble c om pone nt s (se a t s, m irrors, st e e ring w he e l) Front se at s Power seat Seat position fore/aft control switch Seatback switch angle control Seat cushion (front) angle control switch (driver's side only) Vertical height control switch (driver's side only) Lumbar switch support control Manual seat Seat position fore/aft adjustment lever Seatback angle adjustment lever Vertical height adjustment lever (driver's side only) Pull up the lever until the lock is completely released. 64 VENZA_U (OM73012U) 1 -3 .
Adjust a ble c om pone nt s (se a t s, m irrors, st e e ring w he e l) Front se at s Power seat Seat position fore/aft control switch Seatback switch angle control Seat cushion (front) angle control switch (driver's side only) Vertical height control switch (driver's side only) Lumbar switch support control Manual seat Seat position fore/aft adjustment lever Seatback angle adjustment lever Vertical height adjustment lever (driver's side only) Pull up the lever until the lock is completely released. 64 VENZA_U (OM73012U) 1 -3 .

Owners Manual
Page 74
Adjust a ble c om pone nt s (se a t s, m irrors, st e e ring w he e l) Re a r se at s Seatback angle adjustment lever Pull up the lever until the lock is completely released. 1 Before driving Folding down the rear seatbacks 1 -3 .
Adjust a ble c om pone nt s (se a t s, m irrors, st e e ring w he e l) Re a r se at s Seatback angle adjustment lever Pull up the lever until the lock is completely released. 1 Before driving Folding down the rear seatbacks 1 -3 .

Owners Manual
Page 77
Lock release button Down Push the head restraints down while pressing the lock release button. Rear center seat Lock release button Vertical adjustment Down Up Push the head restraint up . Adjust a ble c om pone nt s (se a t s, m irrors, st e e ring w he e l) H e a d re st ra int s Head restraints are provided for all seats. 1 -3 . Front and rear outboard seats Vertical adjustment Up Pull the head restraint up or down while pressing the lock release button.
Lock release button Down Push the head restraints down while pressing the lock release button. Rear center seat Lock release button Vertical adjustment Down Up Push the head restraint up . Adjust a ble c om pone nt s (se a t s, m irrors, st e e ring w he e l) H e a d re st ra int s Head restraints are provided for all seats. 1 -3 . Front and rear outboard seats Vertical adjustment Up Pull the head restraint up or down while pressing the lock release button.

Owners Manual
Page 101
Refueling STEP 3 Hang the fuel tank cap on the back of the fuel filler door. Closing the fuel tank cap When replacing the fuel tank cap, turn slightly to the opposite direction. After releasing your hand, the cap will turn it until a clicking sound is heard. 1-5.
Refueling STEP 3 Hang the fuel tank cap on the back of the fuel filler door. Closing the fuel tank cap When replacing the fuel tank cap, turn slightly to the opposite direction. After releasing your hand, the cap will turn it until a clicking sound is heard. 1-5.

Owners Manual
Page 149
Safety information Removing a child restraint installed with a top tether strap STEP 1 Secure the child restraint using a seat belt or lower anchors, and do the following. Child restraint systems with a seat belt Press the buckle release button and fully retract the seat belt. Outside Center STEP 1 Lower the head restraint to the upmost position. Adjust the head restraint to the lowest position. 142 VENZA_U (OM73012U) 1-7.
Safety information Removing a child restraint installed with a top tether strap STEP 1 Secure the child restraint using a seat belt or lower anchors, and do the following. Child restraint systems with a seat belt Press the buckle release button and fully retract the seat belt. Outside Center STEP 1 Lower the head restraint to the upmost position. Adjust the head restraint to the lowest position. 142 VENZA_U (OM73012U) 1-7.

Owners Manual
Page 155
Release the parking brake. 2-1. Vehicles without smart key system: Turn the engine switch to "D". Gently depress the accelerator pedal. Driving procedures STEP 4 Vehicles with smart key system: Turn the "ENGINE START STOP" switch off and stop the engine. STEP 5 Lock the door, making sure that you have the key on your person. 2 When driving Starting on a steep incline STEP 1 STEP 2 STEP 3 Firmly set the parking brake and shift the shift lever to the "LOCK" position and stop the engine.
Release the parking brake. 2-1. Vehicles without smart key system: Turn the engine switch to "D". Gently depress the accelerator pedal. Driving procedures STEP 4 Vehicles with smart key system: Turn the "ENGINE START STOP" switch off and stop the engine. STEP 5 Lock the door, making sure that you have the key on your person. 2 When driving Starting on a steep incline STEP 1 STEP 2 STEP 3 Firmly set the parking brake and shift the shift lever to the "LOCK" position and stop the engine.

Owners Manual
Page 177
When driving The left hand signal will flash until you release the lever. 2 Move and hold the lever partway to signal a lane change . Driving proc e dure s Tur n signa l leve r Right turn Left turn Move and hold the lever partway to signal a lane change . The right hand signal will flash until you release the lever. 2 -1 .
When driving The left hand signal will flash until you release the lever. 2 Move and hold the lever partway to signal a lane change . Driving proc e dure s Tur n signa l leve r Right turn Left turn Move and hold the lever partway to signal a lane change . The right hand signal will flash until you release the lever. 2 -1 .

Owners Manual
Page 178
2 -1 . Canada *: Fully depress the parking brake pedal with your left foot while depressing the brake pedal with your right foot. Driving proc e dure s Pa rk ing bra ke Sets the parking brake* (Depressing the pedal again releases the parking brake.) U.S.A.
2 -1 . Canada *: Fully depress the parking brake pedal with your left foot while depressing the brake pedal with your right foot. Driving proc e dure s Pa rk ing bra ke Sets the parking brake* (Depressing the pedal again releases the parking brake.) U.S.A.

Owners Manual
Page 205
You can flash the high beams with Automatic High Beam: When the light switch is in position, the Automatic High Beam system will be activated. (→P. 202) Pull the lever back to the center position to turn the high beams off. 2 When driving Pull the lever toward you to turn them off . 2-3. Operating the lights and wipers Turning on the high beam headlights With the headlights on, push the lever forward to turn on the high beams. Vehicles with the headlights on the high beams. Release the lever to turn on or off .
You can flash the high beams with Automatic High Beam: When the light switch is in position, the Automatic High Beam system will be activated. (→P. 202) Pull the lever back to the center position to turn the high beams off. 2 When driving Pull the lever toward you to turn them off . 2-3. Operating the lights and wipers Turning on the high beam headlights With the headlights on, push the lever forward to turn on the high beams. Vehicles with the headlights on the high beams. Release the lever to turn on or off .

Owners Manual
Page 260
... into "P" and turn off the engine. Stop and apply the brakes. Apply the parking brake firmly, and put the transmission in place, release the brakes slowly until the blocks absorb the load. Be sure to keep them applied. When the wheel blocks are in "P". Apply the ...parking brake firmly. STEP 2 STEP 3 STEP 4 254 VENZA_U (OM73012U) Release the parking brake and brake pedal, and slowly pull or back away from the wheel blocks. Shift into "3", "2", "1" range of "S", or "R" position (if reversing...
... into "P" and turn off the engine. Stop and apply the brakes. Apply the parking brake firmly, and put the transmission in place, release the brakes slowly until the blocks absorb the load. Be sure to keep them applied. When the wheel blocks are in "P". Apply the ...parking brake firmly. STEP 2 STEP 3 STEP 4 254 VENZA_U (OM73012U) Release the parking brake and brake pedal, and slowly pull or back away from the wheel blocks. Shift into "3", "2", "1" range of "S", or "R" position (if reversing...

Owners Manual
Page 361
... the slot with the label side up until a click is loaded. Using the rear seat entertainment system Opening and closing the display Press the lock release button to an easily viewable angle (between 90° and 125°). The "DISC" indicator light turns on while the disc is heard. The player...
... the slot with the label side up until a click is loaded. Using the rear seat entertainment system Opening and closing the display Press the lock release button to an easily viewable angle (between 90° and 125°). The "DISC" indicator light turns on while the disc is heard. The player...

Owners Manual
Page 440
3-7. Lift the armrest to release the lock. Slide the armrest fully rearward. Rear Pull up the lever to open . Using the storage features Console boxes Console boxes Front Press the tab and slide to open . 436 VENZA_U (OM73012U)
3-7. Lift the armrest to release the lock. Slide the armrest fully rearward. Rear Pull up the lever to open . Using the storage features Console boxes Console boxes Front Press the tab and slide to open . 436 VENZA_U (OM73012U)

