
Owners Manual
Page 24
... "SETUP" button for the "Custom Settings" screen. (2) Select "Clock" on the Display Settings screen, and press the "SELECT RESET" button. (3) Press the "INFO" button to adjust the hours and the "SETUP" button to adjust the minutes. (4) Press the "SELECT RESET" button to complete the setting. * On vehicles equipped... with back-up camera 22 LCD type (1) Press and hold the "INFO-CLOCK" button until part of the display begins to flash. (2) Press and hold the "RESET-H" button to adjust the hours and the "US/M-M" ...
... "SETUP" button for the "Custom Settings" screen. (2) Select "Clock" on the Display Settings screen, and press the "SELECT RESET" button. (3) Press the "INFO" button to adjust the hours and the "SETUP" button to adjust the minutes. (4) Press the "SELECT RESET" button to complete the setting. * On vehicles equipped... with back-up camera 22 LCD type (1) Press and hold the "INFO-CLOCK" button until part of the display begins to flash. (2) Press and hold the "RESET-H" button to adjust the hours and the "US/M-M" ...

Owners Manual
Page 187
2-2. Instrument cluster Switching the display "INFO" button "SELECT RESET" button "SETUP" button 2 When driving Trip information Display items can be switched by pressing the "INFO" button.
2-2. Instrument cluster Switching the display "INFO" button "SELECT RESET" button "SETUP" button 2 When driving Trip information Display items can be switched by pressing the "INFO" button.

Owners Manual
Page 189
..." by yellow text. 183 VENZA_U (OM73012U) Press the "SELECT RESET" button to the previous screen. 2 When driving STEP 3 Select the desired item by pressing the "INFO" or "SETUP" button. The "Custom Settings" screen is stopped. 2-2. If you select "Exit" and press "SELECT RESET", the display will revert to the previous screen... the displays STEP 1 Press the "SETUP" button while the vehicle is displayed on the multi-information display. The current setting is indicated by pressing the "INFO" or "SETUP" button, and press the "SELECT RESET" button.
..." by yellow text. 183 VENZA_U (OM73012U) Press the "SELECT RESET" button to the previous screen. 2 When driving STEP 3 Select the desired item by pressing the "INFO" or "SETUP" button. The "Custom Settings" screen is stopped. 2-2. If you select "Exit" and press "SELECT RESET", the display will revert to the previous screen... the displays STEP 1 Press the "SETUP" button while the vehicle is displayed on the multi-information display. The current setting is indicated by pressing the "INFO" or "SETUP" button, and press the "SELECT RESET" button.

Owners Manual
Page 192
Using the "INFO" and "SETUP" buttons, select the item you wish to display in the first line, and then press the "SELECT RESET" button. First, using the "INFO" and "SETUP" buttons, select the item you wish to display in the second line, and then press the "SELECT RESET" button. STEP 4 Instrument cluster STEP 3 When a 2-line layout is selected in STEP 2 , the "Layout" screen is displayed. "Selection Complete" will be displayed. 2-2.
Using the "INFO" and "SETUP" buttons, select the item you wish to display in the first line, and then press the "SELECT RESET" button. First, using the "INFO" and "SETUP" buttons, select the item you wish to display in the second line, and then press the "SELECT RESET" button. STEP 4 Instrument cluster STEP 3 When a 2-line layout is selected in STEP 2 , the "Layout" screen is displayed. "Selection Complete" will be displayed. 2-2.

Owners Manual
Page 193
2-2. When driving ● Setting the contrast STEP 1 Select "Contrast" on the "Screen Settings" screen, and press the "SELECT RESET" button. 2 STEP 2 Press the "INFO" or "SETUP" button to adjust the brightness. +: Brighter -: Darker Press the "SELECT RESET" button to exit screen. Instrument cluster ● Setting the brightness STEP 1 Select "Brightness" on the "Screen Settings" screen, and press the "SELECT RESET" button. 187 VENZA_U (OM73012U)
2-2. When driving ● Setting the contrast STEP 1 Select "Contrast" on the "Screen Settings" screen, and press the "SELECT RESET" button. 2 STEP 2 Press the "INFO" or "SETUP" button to adjust the brightness. +: Brighter -: Darker Press the "SELECT RESET" button to exit screen. Instrument cluster ● Setting the brightness STEP 1 Select "Brightness" on the "Screen Settings" screen, and press the "SELECT RESET" button. 187 VENZA_U (OM73012U)

Owners Manual
Page 194
Instrument cluster STEP 2 Press the "INFO" or "SETUP" button to adjust the contrast. +: Strengthen -: Weaken Press the "SELECT RESET" button to exit screen. 2-2.
Instrument cluster STEP 2 Press the "INFO" or "SETUP" button to adjust the contrast. +: Strengthen -: Weaken Press the "SELECT RESET" button to exit screen. 2-2.

Owners Manual
Page 195
When driving ● Setting the contrast STEP 1 Select "Contrast" on the "Screen Settings" screen, and press the "SELECT RESET" button. 2 STEP 2 Press the "INFO" or "SETUP" button to adjust the brightness. +: Brighter -: Darker Press the "SELECT RESET" button to exit screen. 2-2. Instrument cluster ● Setting the brightness STEP 1 Select "Brightness" on the "Screen Settings" screen, and press the "SELECT RESET" button. 189 VENZA_U (OM73012U)
When driving ● Setting the contrast STEP 1 Select "Contrast" on the "Screen Settings" screen, and press the "SELECT RESET" button. 2 STEP 2 Press the "INFO" or "SETUP" button to adjust the brightness. +: Brighter -: Darker Press the "SELECT RESET" button to exit screen. 2-2. Instrument cluster ● Setting the brightness STEP 1 Select "Brightness" on the "Screen Settings" screen, and press the "SELECT RESET" button. 189 VENZA_U (OM73012U)

Owners Manual
Page 196
Instrument cluster STEP 2 Press the "INFO" or "SETUP" button to adjust the contrast. +: Strengthen -: Weaken Press the "SELECT RESET" button to exit screen. 190 VENZA_U (OM73012U) 2-2. STEP 2 Press the "INFO" or "SETUP" button to adjust the color. +: Green -: Red Press the "SELECT RESET" button to exit screen. ● Setting the color STEP 1 Select "Color" on the "Screen Settings" screen, and press the "SELECT RESET" button.
Instrument cluster STEP 2 Press the "INFO" or "SETUP" button to adjust the contrast. +: Strengthen -: Weaken Press the "SELECT RESET" button to exit screen. 190 VENZA_U (OM73012U) 2-2. STEP 2 Press the "INFO" or "SETUP" button to adjust the color. +: Green -: Red Press the "SELECT RESET" button to exit screen. ● Setting the color STEP 1 Select "Color" on the "Screen Settings" screen, and press the "SELECT RESET" button.

Owners Manual
Page 197
When driving Instrument cluster ● Setting the tone STEP 1 Select "Tone" on the "Screen Settings" screen, and press the "SELECT RESET" button. 2 STEP 2 Press the "INFO" or "SETUP" button to adjust the tone. +: Brighter -: Darker Press the "SELECT RESET" button to exit screen. 2-2.
When driving Instrument cluster ● Setting the tone STEP 1 Select "Tone" on the "Screen Settings" screen, and press the "SELECT RESET" button. 2 STEP 2 Press the "INFO" or "SETUP" button to adjust the tone. +: Brighter -: Darker Press the "SELECT RESET" button to exit screen. 2-2.

Owners Manual
Page 201
2-2. Instrument cluster Switching the display "INFO-CLOCK" button "RESET-H" button "US/M-M" button 2 When driving Trip information Display items can be switched by pressing the "INFO-CLOCK" button.
2-2. Instrument cluster Switching the display "INFO-CLOCK" button "RESET-H" button "US/M-M" button 2 When driving Trip information Display items can be switched by pressing the "INFO-CLOCK" button.

Owners Manual
Page 645
... assumes that "Door" was chosen in STEP 2 . If you wish to the "Custom Settings" screen. 644 VENZA_U (OM73012U) Customization Customizing the features by pressing the "INFO" or "SETUP" button, and press the "SELECT RESET" button. The "Custom Settings" screen is stopped. STEP 3 Select the setting you select "Return" and press the... "SELECT RESET" button, the display will revert to change by yellow text. The current setting is indicated by pressing the "INFO" or "SETUP" button, and press the "SELECT RESET" button. 6-2.
... assumes that "Door" was chosen in STEP 2 . If you wish to the "Custom Settings" screen. 644 VENZA_U (OM73012U) Customization Customizing the features by pressing the "INFO" or "SETUP" button, and press the "SELECT RESET" button. The "Custom Settings" screen is stopped. STEP 3 Select the setting you select "Return" and press the... "SELECT RESET" button, the display will revert to change by yellow text. The current setting is indicated by pressing the "INFO" or "SETUP" button, and press the "SELECT RESET" button. 6-2.

Owners Manual
Page 646
If any settings are changed, the display will revert to the previous screen. The current setting is indicated by pressing the "INFO" or "SETUP" button, and press the "SELECT RESET" button. Customization STEP 4 Choose a desired setting by yellow text. 6-2. If you select "Return" and press the "SELECT RESET" button, the display will revert to the previous screen. The illustration assumes that "Auto Locking" was chosen in STEP 3 .
If any settings are changed, the display will revert to the previous screen. The current setting is indicated by pressing the "INFO" or "SETUP" button, and press the "SELECT RESET" button. Customization STEP 4 Choose a desired setting by yellow text. 6-2. If you select "Return" and press the "SELECT RESET" button, the display will revert to the previous screen. The illustration assumes that "Auto Locking" was chosen in STEP 3 .

Owners Manual
Page 647
6-2. Customization STEP 2 Select "Default Settings" by pressing the "INFO" or "SETUP" button, and press the "SELECT RESET" button. If you select "No" and press the "SELECT RESET" button, the display will revert to the "Custom Settings" screen without restoring the default settings. "Default Settings Restored" is displayed, and the default settings are restored. If you select "Exit" and press the "SELECT RESET" button, the display will revert to the previous screen. STEP 3 Select "Yes" by pressing the "INFO" or "SETUP" button, and press the "SELECT RESET" button.
6-2. Customization STEP 2 Select "Default Settings" by pressing the "INFO" or "SETUP" button, and press the "SELECT RESET" button. If you select "No" and press the "SELECT RESET" button, the display will revert to the "Custom Settings" screen without restoring the default settings. "Default Settings Restored" is displayed, and the default settings are restored. If you select "Exit" and press the "SELECT RESET" button, the display will revert to the previous screen. STEP 3 Select "Yes" by pressing the "INFO" or "SETUP" button, and press the "SELECT RESET" button.
Owners Manual
Page 665
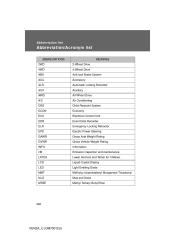
Abbre via t ion list Abbreviat ion/Ac ronym list ABBREVIATIONS 2WD 4WD ABS ACC ALR AUX AWD A/C CRS ECON ECU EDR ELR EPS GAWR GVWR INFO I/M LATCH LCD LED MMT M+S MTBE 2-Wheel Drive 4-Wheel Drive Anti-lock Brake System Accessory Automatic Locking Retractor Auxiliary All-Wheel Drive Air Conditioning Child Restraint ...
Abbre via t ion list Abbreviat ion/Ac ronym list ABBREVIATIONS 2WD 4WD ABS ACC ALR AUX AWD A/C CRS ECON ECU EDR ELR EPS GAWR GVWR INFO I/M LATCH LCD LED MMT M+S MTBE 2-Wheel Drive 4-Wheel Drive Anti-lock Brake System Accessory Automatic Locking Retractor Auxiliary All-Wheel Drive Air Conditioning Child Restraint ...

Navigation Manual
Page 3
... MODE Icon Touch to magnify or reduce the map scale. SETUP Button Adjust Preferences for: General Settings, Clock, Voice, Navigation, Phone, Audio, and Vehicle Maintenance. INFO/PHONE Button Access Phone, Map Data, and Calendar. CURRENT VEHICLE POSITION Mark Indicates the current position of several methods. ZOOM IN/ZOOM OUT Icons Touch...
... MODE Icon Touch to magnify or reduce the map scale. SETUP Button Adjust Preferences for: General Settings, Clock, Voice, Navigation, Phone, Audio, and Vehicle Maintenance. INFO/PHONE Button Access Phone, Map Data, and Calendar. CURRENT VEHICLE POSITION Mark Indicates the current position of several methods. ZOOM IN/ZOOM OUT Icons Touch...

Navigation Manual
Page 13
... transfer your phone book, you have difficulty pairing your phone, or are unable to www.Toyota.Letstalk.com for pairing procedures. step followed by visiting www.Toyota.Letstalk.com. step 3 Input the passkey listed on the phone is ON and is entered in your...phone when in discoverable mode. Quick Tip - Please refer to 4 Bluetooth cell phones can be used at a time. 12 step 1 Press the INFO PHONE panel button . Verify the Bluetooth cell phone has been approved by 2 Touch . Quick Tip - Verify that the pairing process was successful. Please...
... transfer your phone book, you have difficulty pairing your phone, or are unable to www.Toyota.Letstalk.com for pairing procedures. step followed by visiting www.Toyota.Letstalk.com. step 3 Input the passkey listed on the phone is ON and is entered in your...phone when in discoverable mode. Quick Tip - Please refer to 4 Bluetooth cell phones can be used at a time. 12 step 1 Press the INFO PHONE panel button . Verify the Bluetooth cell phone has been approved by 2 Touch . Quick Tip - Verify that the pairing process was successful. Please...

Navigation Manual
Page 70
DESTINATION SEARCH Starting route guidance 5. Scroll the map to Route Info 72 To delete the destination(s), touch "Yes". Ιφ "Yes No 1. "Adjust Location INFORMATION Set destinations can also be deleted by touching "Route". (See " - Touch "Go to Go to " ανδ "Add to Route Go to Add to the desired point. Deleting destinations" on page 85.) When an arrow facing the desired point is touched, the map scrolls in that direction 2.
DESTINATION SEARCH Starting route guidance 5. Scroll the map to Route Info 72 To delete the destination(s), touch "Yes". Ιφ "Yes No 1. "Adjust Location INFORMATION Set destinations can also be deleted by touching "Route". (See " - Touch "Go to Go to " ανδ "Add to Route Go to Add to the desired point. Deleting destinations" on page 85.) When an arrow facing the desired point is touched, the map scrolls in that direction 2.

Navigation Manual
Page 72
To select the desired route from 3 routes, touch "3 Routes". 2 3 4 5 Time necessary for the entire trip Distance of the entire trip Toll road Freeway Ferry 2. DESTINATION SEARCH 3 ROUTES SELECTION 1 1. Touch "Quick", "Alt." or "Short" to select the desired route. "Quick Alt Short Info 3 74
To select the desired route from 3 routes, touch "3 Routes". 2 3 4 5 Time necessary for the entire trip Distance of the entire trip Toll road Freeway Ferry 2. DESTINATION SEARCH 3 ROUTES SELECTION 1 1. Touch "Quick", "Alt." or "Short" to select the desired route. "Quick Alt Short Info 3 74
