
Owners Manual
Page 2
...a summary of printing. Pay special attention to the ground. It contains brief descriptions of fundamental operations so you many years of Sequoia operations. 2010 Sequoia This Quick Reference Guide is current at any time without notice. (1) Remove the cover. (2) Assemble the jack handle. (3) Insert...main equipment quickly and easily. Seatbelts-Shoulder belt anchor Squeeze lock release to lower Push up OVERVIEW Doors-Child safety locks Rear door Moving the lever to "LOCK" will have a better understanding of Toyota Motor Sales, U.S.A., Inc. A word about safe vehicle operations This...
...a summary of printing. Pay special attention to the ground. It contains brief descriptions of fundamental operations so you many years of Sequoia operations. 2010 Sequoia This Quick Reference Guide is current at any time without notice. (1) Remove the cover. (2) Assemble the jack handle. (3) Insert...main equipment quickly and easily. Seatbelts-Shoulder belt anchor Squeeze lock release to lower Push up OVERVIEW Doors-Child safety locks Rear door Moving the lever to "LOCK" will have a better understanding of Toyota Motor Sales, U.S.A., Inc. A word about safe vehicle operations This...
Owners Manual
Page 3
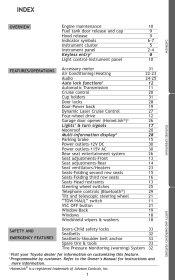
... to the Owner's Manual for information on customizing this feature. Programmable by customer. INDEX OVERVIEW Engine maintenance Fuel tank door release and cap Hood release Indicator symbols Instrument cluster Instrument panel Keyless entry1 Light control-Instrument panel Accessory meter Air Conditioning/Heating Audio Auto lock functions1 Automatic... 21 11 21 19 SAFETY AND EMERGENCY FEATURES 18 18 33 32 33 33 32 SAFETY AND EMERGENCY FEATURES 1 2 Visit your Toyota dealer for instructions and more information. HomeLink® is a registered trademark of Johnson Controls, Inc. 3 1
... to the Owner's Manual for information on customizing this feature. Programmable by customer. INDEX OVERVIEW Engine maintenance Fuel tank door release and cap Hood release Indicator symbols Instrument cluster Instrument panel Keyless entry1 Light control-Instrument panel Accessory meter Air Conditioning/Heating Audio Auto lock functions1 Automatic... 21 11 21 19 SAFETY AND EMERGENCY FEATURES 18 18 33 32 33 33 32 SAFETY AND EMERGENCY FEATURES 1 2 Visit your Toyota dealer for instructions and more information. HomeLink® is a registered trademark of Johnson Controls, Inc. 3 1

Owners Manual
Page 5
Details on the center panel area on next page OVERVIEW FEATURES/OPERATIONS Instrument panel light control Tilt and telescopic steering control switch1 Tilt and telescopic steering lock release lever1 Power back door main switch1 Roll Sensing of Curtain shield Airbag OFF switch Headlight cleaner1 "REVERSE TILT" (side mirrors) switch1 Power back door button1 Power rearview mirror controls 1 2 SAFETY AND EMERGENCY FEATURES If equipped Vehicles with navigation system: for details, refer to the "Navigation System Owner's Manual." 3
Details on the center panel area on next page OVERVIEW FEATURES/OPERATIONS Instrument panel light control Tilt and telescopic steering control switch1 Tilt and telescopic steering lock release lever1 Power back door main switch1 Roll Sensing of Curtain shield Airbag OFF switch Headlight cleaner1 "REVERSE TILT" (side mirrors) switch1 Power back door button1 Power rearview mirror controls 1 2 SAFETY AND EMERGENCY FEATURES If equipped Vehicles with navigation system: for details, refer to the "Navigation System Owner's Manual." 3

Owners Manual
Page 11
If the cap is heard. Fuel tank door release and cap OVERVIEW Turn Pull Store NOTE: Tighten until one click is not tightened enough, Check Engine " " indicator may illuminate. FEATURES/OPERATIONS Hood release Pull SAFETY AND EMERGENCY FEATURES Pull up latch and raise hood 9
If the cap is heard. Fuel tank door release and cap OVERVIEW Turn Pull Store NOTE: Tighten until one click is not tightened enough, Check Engine " " indicator may illuminate. FEATURES/OPERATIONS Hood release Pull SAFETY AND EMERGENCY FEATURES Pull up latch and raise hood 9
Owners Manual
Page 13
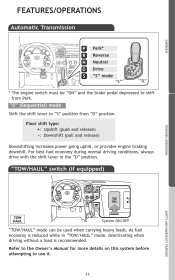
Floor shift type: +: Upshift (push and release) -: Downshift (pull and release) Downshifting increases power going uphill, or provides engine braking downhill. FEATURES/OPERATIONS Automatic Transmission OVERVIEW Park* Reverse Neutral Drive "S" mode "S" "D" * The engine switch must be ...
Floor shift type: +: Upshift (push and release) -: Downshift (pull and release) Downshifting increases power going uphill, or provides engine braking downhill. FEATURES/OPERATIONS Automatic Transmission OVERVIEW Park* Reverse Neutral Drive "S" mode "S" "D" * The engine switch must be ...
Owners Manual
Page 15
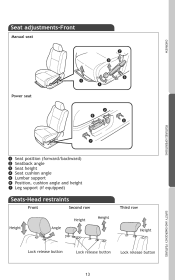
Seat adjustments-Front Manual seat OVERVIEW Power seat FEATURES/OPERATIONS Seat position (forward/backward) Seatback angle Seat height Seat cushion angle Lumbar support Position, cushion angle and height Leg support (if equipped) Seats-Head restraints Front Second row Third row SAFETY AND EMERGENCY FEATURES Height Height Angle Height Height Lock release button Lock release button Lock release button 13
Seat adjustments-Front Manual seat OVERVIEW Power seat FEATURES/OPERATIONS Seat position (forward/backward) Seatback angle Seat height Seat cushion angle Lumbar support Position, cushion angle and height Leg support (if equipped) Seats-Head restraints Front Second row Third row SAFETY AND EMERGENCY FEATURES Height Height Angle Height Height Lock release button Lock release button Lock release button 13

Owners Manual
Page 16
FEATURES/OPERATIONS Seat adjustments-Rear Second row Separate seat Bench seat Third row Manual seat Power seat Seat position (forward/backward) Seatback angle Seatback lock release and slide Seatback folding/returning Refer to the Owner's Manual for more details. 14
FEATURES/OPERATIONS Seat adjustments-Rear Second row Separate seat Bench seat Third row Manual seat Power seat Seat position (forward/backward) Seatback angle Seatback lock release and slide Seatback folding/returning Refer to the Owner's Manual for more details. 14
Owners Manual
Page 17
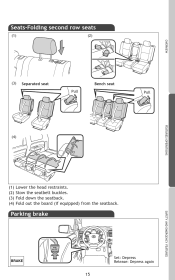
SAFETY AND EMERGENCY FEATURES Parking brake Set: Depress Release: Depress again 15 Stow the seatbelt buckles. Fold out the board (if equipped) from the seatback. Fold down the seatback. Seats-Folding second row seats (1) (2) OVERVIEW (3) Separated seat Bench seat Pull Pull FEATURES/OPERATIONS (4) (1) (2) (3) (4) Lower the head restraints.
SAFETY AND EMERGENCY FEATURES Parking brake Set: Depress Release: Depress again 15 Stow the seatbelt buckles. Fold out the board (if equipped) from the seatback. Fold down the seatback. Seats-Folding second row seats (1) (2) OVERVIEW (3) Separated seat Bench seat Pull Pull FEATURES/OPERATIONS (4) (1) (2) (3) (4) Lower the head restraints.
Owners Manual
Page 18
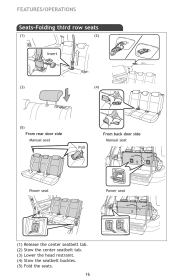
Fold the seats. 16 Lower the head restraint. Stow the seatbelt buckles. Stow the center seatbelt tab. FEATURES/OPERATIONS Seats-Folding third row seats (1) (2) Insert (3) (4) (5) From rear door side From back door side Manual seat Pull Manual seat Power seat Power seat (1) (2) (3) (4) (5) Release the center seatbelt tab.
Fold the seats. 16 Lower the head restraint. Stow the seatbelt buckles. Stow the center seatbelt tab. FEATURES/OPERATIONS Seats-Folding third row seats (1) (2) Insert (3) (4) (5) From rear door side From back door side Manual seat Pull Manual seat Power seat Power seat (1) (2) (3) (4) (5) Release the center seatbelt tab.
Owners Manual
Page 20
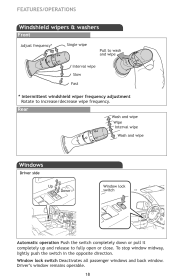
... wipe Wash and wipe Windows Driver side Up Down Window lock switch Automatic operation Push the switch completely down or pull it completely up and release to increase/decrease wipe frequency. To stop window midway, lightly push the switch in the opposite direction. FEATURES/OPERATIONS Windshield wipers & washers Front Adjust frequency...
... wipe Wash and wipe Windows Driver side Up Down Window lock switch Automatic operation Push the switch completely down or pull it completely up and release to increase/decrease wipe frequency. To stop window midway, lightly push the switch in the opposite direction. FEATURES/OPERATIONS Windshield wipers & washers Front Adjust frequency...

Owners Manual
Page 21
... Door-Power back (if equipped) Instrument panel Back door (close . To stop window midway, lightly push the switch in or pull it completely out and release to the Owner's Manual for more details. 19 Operating from inside OVERVIEW Open Close Automatic operation Push the switch completely in the opposite direction.
... Door-Power back (if equipped) Instrument panel Back door (close . To stop window midway, lightly push the switch in or pull it completely out and release to the Owner's Manual for more details. 19 Operating from inside OVERVIEW Open Close Automatic operation Push the switch completely in the opposite direction.

Owners Manual
Page 23
... return lever. Note: Do not attempt to Section 2-4 of the Owner's Manual for more information. 21 Tilt and telescopic steering wheel Manual OVERVIEW Angle Lock release lever Length Hold wheel, push lever down, set angle and length.
... return lever. Note: Do not attempt to Section 2-4 of the Owner's Manual for more information. 21 Tilt and telescopic steering wheel Manual OVERVIEW Angle Lock release lever Length Hold wheel, push lever down, set angle and length.
Owners Manual
Page 52
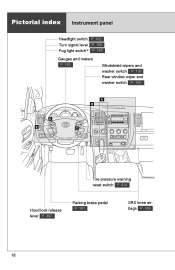
Pictorial index Instrument panel Headlight switch P. 182 Turn signal lever P. 160 Fog light switch∗ P. 185 Gauges and meters P. 163 Windshield wipers and washer switch P. 186 Rear window wiper and washer switch P. 188 Tire pressure warning reset switch P. 514 Parking brake pedal Hood lock release lever P. 497 P. 161 SRS knee airbags P. 108 18
Pictorial index Instrument panel Headlight switch P. 182 Turn signal lever P. 160 Fog light switch∗ P. 185 Gauges and meters P. 163 Windshield wipers and washer switch P. 186 Rear window wiper and washer switch P. 188 Tire pressure warning reset switch P. 514 Parking brake pedal Hood lock release lever P. 497 P. 161 SRS knee airbags P. 108 18

Owners Manual
Page 57
Personal/interior light main switch P. 418 Tilt and telescopic steering control switch∗ P. 79 Outside rear view mirror switches P. 83 Instrument panel light control dial P. 167 Power back door switch∗ P. 43 REVERSE TILT switch∗ P. 84 Headlight cleaner switch∗ P. 189 RSCA OFF switch P. 120 Tilt and telescopic steering lock release lever∗ P. 78 Power back door main switch∗ P. 44 ∗: If equipped 23
Personal/interior light main switch P. 418 Tilt and telescopic steering control switch∗ P. 79 Outside rear view mirror switches P. 83 Instrument panel light control dial P. 167 Power back door switch∗ P. 43 REVERSE TILT switch∗ P. 84 Headlight cleaner switch∗ P. 189 RSCA OFF switch P. 120 Tilt and telescopic steering lock release lever∗ P. 78 Power back door main switch∗ P. 44 ∗: If equipped 23

Owners Manual
Page 73
... lever to cancel the function. Use the same procedure to P or N, press and hold the driver's door lock switch ( or ) for approximately 5 seconds and then release. The shift lever and switch positions corresponding to the desired function to be set are locked and then unlocked. 1-2.
... lever to cancel the function. Use the same procedure to P or N, press and hold the driver's door lock switch ( or ) for approximately 5 seconds and then release. The shift lever and switch positions corresponding to the desired function to be set are locked and then unlocked. 1-2.

Owners Manual
Page 97
Front seats Vertical adjustment Up Pull the head restraints up . Lock release button Angle adjustment (if equipped) Second seats Vertical adjustment Up Pull the head restraints up . Adjustable components (seats, mirrors, steering wheel) Head restraints Head restraints are provided for all seats. Down Push the head restraint down while pushing the lock release button. Down Push the head restraint down while pushing the lock release button. Lock release button 64 1-3.
Front seats Vertical adjustment Up Pull the head restraints up . Lock release button Angle adjustment (if equipped) Second seats Vertical adjustment Up Pull the head restraints up . Adjustable components (seats, mirrors, steering wheel) Head restraints Head restraints are provided for all seats. Down Push the head restraint down while pushing the lock release button. Down Push the head restraint down while pushing the lock release button. Lock release button 64 1-3.
Owners Manual
Page 98
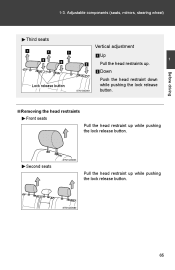
Adjustable components (seats, mirrors, steering wheel) Third seats Vertical adjustment Up Pull the head restraints up. 1 Down Lock release button Before driving Push the head restraint down while pushing the lock release button. 1-3.
Adjustable components (seats, mirrors, steering wheel) Third seats Vertical adjustment Up Pull the head restraints up. 1 Down Lock release button Before driving Push the head restraint down while pushing the lock release button. 1-3.

Owners Manual
Page 99
Adjustable components (seats, mirrors, steering wheel) Third seats Pull the head restraint up while pushing the lock release button. 1-3.
Adjustable components (seats, mirrors, steering wheel) Third seats Pull the head restraint up while pushing the lock release button. 1-3.
Owners Manual
Page 102
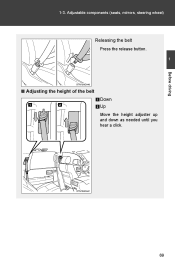
1-3. Adjustable components (seats, mirrors, steering wheel) Releasing the belt Press the release button. 1 Before driving
1-3. Adjustable components (seats, mirrors, steering wheel) Releasing the belt Press the release button. 1 Before driving

Owners Manual
Page 130
The cap will turn it until you hear a click. Refueling Hang the fuel tank cap on the back of the fuel filler door. 1 Before driving Closing the fuel tank cap When installing the fuel tank cap, turn slightly to the opposite direction when released. 1-5.
The cap will turn it until you hear a click. Refueling Hang the fuel tank cap on the back of the fuel filler door. 1 Before driving Closing the fuel tank cap When installing the fuel tank cap, turn slightly to the opposite direction when released. 1-5.


