

Owners Manual
Page 23
... Adjusting and operating features such as door locks, mirrors, and steering column. 2 When driving Driving, stopping and safe-driving information. 3 Interior features Air conditioning and audio systems, as well as other interior features for a comfortable driving experience. 4 Maintenance and care Cleaning and protecting your vehicle, performing do-ityourself maintenance, and maintenance information...
... Adjusting and operating features such as door locks, mirrors, and steering column. 2 When driving Driving, stopping and safe-driving information. 3 Interior features Air conditioning and audio systems, as well as other interior features for a comfortable driving experience. 4 Maintenance and care Cleaning and protecting your vehicle, performing do-ityourself maintenance, and maintenance information...

Owners Manual
Page 40
Retrieve the electronic key from the vehicle and lock the doors again. Interior alarm beeps repeatedly Turn the "ENGINE START STOP" switch OFF and close the trunk lid. 1 Exterior alarm sounds once for 2 seconds Before driving Exterior alarm ... and lock the doors again. Close the driver's door. 31 1-2. Shift the shift lever to the following table. Exterior alarm sounds once for 10 seconds Interior alarm sounds continuously Close all doors are locked Tried to exit the vehicle while the shift lever is in P with the electronic key and lock...
Retrieve the electronic key from the vehicle and lock the doors again. Interior alarm beeps repeatedly Turn the "ENGINE START STOP" switch OFF and close the trunk lid. 1 Exterior alarm sounds once for 2 seconds Before driving Exterior alarm ... and lock the doors again. Close the driver's door. 31 1-2. Shift the shift lever to the following table. Exterior alarm sounds once for 10 seconds Interior alarm sounds continuously Close all doors are locked Tried to exit the vehicle while the shift lever is in P with the electronic key and lock...
Owners Manual
Page 41
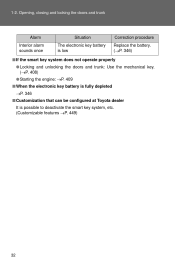
Opening, closing and locking the doors and trunk Alarm Interior alarm sounds once Situation The electronic key battery is low Correction procedure Replace the battery. (→P. 346) 1-2.
Opening, closing and locking the doors and trunk Alarm Interior alarm sounds once Situation The electronic key battery is low Correction procedure Replace the battery. (→P. 346) 1-2.
Owners Manual
Page 92
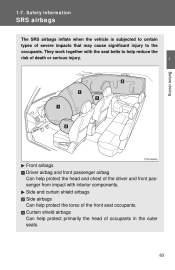
... seats. 83 Side and curtain shield airbags Side airbags Can help protect the head and chest of the front seat occupants. They work together with interior components.
... seats. 83 Side and curtain shield airbags Side airbags Can help protect the head and chest of the front seat occupants. They work together with interior components.

Owners Manual
Page 197
It is not possible to return to outside air mode. Interior features Right and left side outlets Direct air flow to the left or right, up or down . Turn the knob right to close the vent. ...
It is not possible to return to outside air mode. Interior features Right and left side outlets Direct air flow to the left or right, up or down . Turn the knob right to close the vent. ...

Owners Manual
Page 201
3-1. Using the air conditioning system and defogger Air conditioning system Air outlet selection dial Fan speed control dial Temperature control dial 3 Interior features Air intake mode switch Air conditioning ON/OFF switch Adjusting the settings
3-1. Using the air conditioning system and defogger Air conditioning system Air outlet selection dial Fan speed control dial Temperature control dial 3 Interior features Air intake mode switch Air conditioning ON/OFF switch Adjusting the settings

Owners Manual
Page 203
It is not possible to return to recirculated air mode when the switch is automatically switched to the windshield and side windows. The air intake is on . 3-1. Using the air conditioning system and defogger Mainly air flows to the feet. : Some models Air flows to outside air mode. The air intake is on . 3 Interior features : Some models Air flows to outside air mode. It is not possible to return to recirculated air mode when the switch is automatically switched to the feet and the windshield defogger operates.
It is not possible to return to recirculated air mode when the switch is automatically switched to the windshield and side windows. The air intake is on . 3-1. Using the air conditioning system and defogger Mainly air flows to the feet. : Some models Air flows to outside air mode. The air intake is on . 3 Interior features : Some models Air flows to outside air mode. It is not possible to return to recirculated air mode when the switch is automatically switched to the feet and the windshield defogger operates.

Owners Manual
Page 207
Vehicles with automatic air conditioning system On/off The defoggers will automatically turn off after approximately 15 minutes. U sing t he a ir c ondit ioning syst e m a nd de fogge r Rear w indow and outside rear view mirror defoggers Clear the rear window using the defogger. 3 -1 . Vehicles with manual air conditioning system On/off 3 Interior features The defoggers will automatically turn off after approximately 15 minutes.
Vehicles with automatic air conditioning system On/off The defoggers will automatically turn off after approximately 15 minutes. U sing t he a ir c ondit ioning syst e m a nd de fogge r Rear w indow and outside rear view mirror defoggers Clear the rear window using the defogger. 3 -1 . Vehicles with manual air conditioning system On/off 3 Interior features The defoggers will automatically turn off after approximately 15 minutes.

Owners Manual
Page 211
... dio Power Volume Changing the channel Adjusting the frequency (AM, FM mode) or channel (SAT mode) 3 Scanning for receivable stations Seeking the frequency Station selector Interior features AM⋅SAT/FM mode buttons Displaying radio text messages Setting station presets (excluding XM® Satellite Radio) or pressing "∧" STEP 1 Search for...
... dio Power Volume Changing the channel Adjusting the frequency (AM, FM mode) or channel (SAT mode) 3 Scanning for receivable stations Seeking the frequency Station selector Interior features AM⋅SAT/FM mode buttons Displaying radio text messages Setting station presets (excluding XM® Satellite Radio) or pressing "∧" STEP 1 Search for...

Owners Manual
Page 217
U sing t he a udio syst e m U sing t he CD pla ye r Power Volume CD eject CD load (type B only) Displaying text messages Selecting a track Searching playback Fast-forwarding a track Playback Reversing a track 3 Random playback Repeat play Selecting a CD Interior features Loading CDs 3 -2 .
U sing t he a udio syst e m U sing t he CD pla ye r Power Volume CD eject CD load (type B only) Displaying text messages Selecting a track Searching playback Fast-forwarding a track Playback Reversing a track 3 Random playback Repeat play Selecting a CD Interior features Loading CDs 3 -2 .

Owners Manual
Page 229
... As the audio system is compatible with multi-sessions, it possible to play correctly, and their file names and folder names may not be played. 3 Interior features 223 The system is compatible with ID3 tags. ● MP3 and WMA playback When a disc containing MP3 or WMA files is played. Once the...
... As the audio system is compatible with multi-sessions, it possible to play correctly, and their file names and folder names may not be played. 3 Interior features 223 The system is compatible with ID3 tags. ● MP3 and WMA playback When a disc containing MP3 or WMA files is played. Once the...

Owners Manual
Page 231
U sing t he a udio syst e m Opt im a l use of t he a udio syst e m Displays the current mode Changes the following settings • Sound quality and volume balance (→P. 226) The sound quality and balance setting can be changed to produce the best sound. • Volume and tone quality level (Automatic Sound Levelizer) (→P. 227) 3 Interior features Using the AUDIO CONTROL function 3 -2 .
U sing t he a udio syst e m Opt im a l use of t he a udio syst e m Displays the current mode Changes the following settings • Sound quality and volume balance (→P. 226) The sound quality and balance setting can be changed to produce the best sound. • Volume and tone quality level (Automatic Sound Levelizer) (→P. 227) 3 Interior features Using the AUDIO CONTROL function 3 -2 .

Owners Manual
Page 235
down until you The audio system can be turned off . 3 -2 . Volume Radio: Select radio stations CD: Select tracks, files (MP3 and WMA) and discs Power on/off, select audio source 3 Turning on the steering wheel. U sing t he a udio syst e m U sing t he st e e ring w he e l a udio sw it che s ∗ Some audio features can be controlled using the switches on the power Interior features Press when the audio system is turned off by holding hear a beep. ∗: If equipped 229
down until you The audio system can be turned off . 3 -2 . Volume Radio: Select radio stations CD: Select tracks, files (MP3 and WMA) and discs Power on/off, select audio source 3 Turning on the steering wheel. U sing t he a udio syst e m U sing t he st e e ring w he e l a udio sw it che s ∗ Some audio features can be controlled using the switches on the power Interior features Press when the audio system is turned off by holding hear a beep. ∗: If equipped 229

Owners Manual
Page 237
3-2. until you hear a beep. 3 Press and hold Selecting a disc (type A with a CD changer and type B) STEP 1 STEP 2 Press to select the desired track/file. Press and hold Interior features CAUTION to select the CD mode. until you hear a beep. Using the audio system Selecting a track/file STEP 1 STEP 2 Press Press to select the CD mode. Selecting a folder (type A) STEP 1 STEP 2 Press to select the CD mode.
3-2. until you hear a beep. 3 Press and hold Selecting a disc (type A with a CD changer and type B) STEP 1 STEP 2 Press to select the desired track/file. Press and hold Interior features CAUTION to select the CD mode. until you hear a beep. Using the audio system Selecting a track/file STEP 1 STEP 2 Press Press to select the CD mode. Selecting a folder (type A) STEP 1 STEP 2 Press to select the CD mode.

Owners Manual
Page 245
... the following methods. 3 a. Press the talk switch and say a name to the manual that comes with no cellular phone registered. A passkey is heard. Refer to Interior features b. STEP 3 Select "Confirm" by using be registered. , and say a name to register a cellular phone in the system. STEP 2 Register a phone name by using a voice...
... the following methods. 3 a. Press the talk switch and say a name to the manual that comes with no cellular phone registered. A passkey is heard. Refer to Interior features b. STEP 3 Select "Confirm" by using be registered. , and say a name to register a cellular phone in the system. STEP 2 Register a phone name by using a voice...

Owners Manual
Page 247
... passkey Setting voice guidance volume Initialization 3 Security Phonebook Lock Phonebook Unlock Pair Phone Change Name Setup Phone Setup Delete List phones Select phone Set Passkey Interior features System Setup Guidance Volume (Guidance Vol) Initialize 241 3-3.
... passkey Setting voice guidance volume Initialization 3 Security Phonebook Lock Phonebook Unlock Pair Phone Change Name Setup Phone Setup Delete List phones Select phone Set Passkey Interior features System Setup Guidance Volume (Guidance Vol) Initialize 241 3-3.

Owners Manual
Page 251
... switch and say "Dial by one of the following methods: a. Press the talk switch and say "Dial". 3 c. Press the talk switch and say "List names". Interior features Press the off -hook switch. Press the off -hook switch. STEP 3 When receiving a phone call Press the talk switch while the desired name is...
... switch and say "Dial by one of the following methods: a. Press the talk switch and say "Dial". 3 c. Press the talk switch and say "List names". Interior features Press the off -hook switch. Press the off -hook switch. STEP 3 When receiving a phone call Press the talk switch while the desired name is...

Owners Manual
Page 255
... the desired phone name, and select "Confirm" by using a voice command or . b. While the desired phone name is being read aloud, press the talk switch. 3 Interior features Pattern B STEP 2 Select the cellular phone to be used by using a voice command or . Select the desired phone name by using . 3-3. Changing a registered name...
... the desired phone name, and select "Confirm" by using a voice command or . b. While the desired phone name is being read aloud, press the talk switch. 3 Interior features Pattern B STEP 2 Select the cellular phone to be used by using a voice command or . Select the desired phone name by using . 3-3. Changing a registered name...

Owners Manual
Page 257
Press the talk switch and say "List phones". Pattern B STEP 2 3 Interior features Select the desired cellular phone to be deleted by using a voice command or . 3-3. b. Pattern A STEP 2 Select the cellular phone to be deleted by either ...
Press the talk switch and say "List phones". Pattern B STEP 2 3 Interior features Select the desired cellular phone to be deleted by using a voice command or . 3-3. b. Pattern A STEP 2 Select the cellular phone to be deleted by either ...

Owners Manual
Page 261
STEP 2 Select "Confirm" by using Change the voice guidance volume. Using the hands-free phone system (for cellular phone) Setting voice guidance volume STEP 1 STEP 2 Select "Guidance Vol" by using . counterclockwise. 3-3. To increase the volume: Turn clockwise. To decrease the volume: Turn . Initialization 3 Interior features STEP 1 Select "Initialize" and then "Confirm" by using . 255
STEP 2 Select "Confirm" by using Change the voice guidance volume. Using the hands-free phone system (for cellular phone) Setting voice guidance volume STEP 1 STEP 2 Select "Guidance Vol" by using . counterclockwise. 3-3. To increase the volume: Turn clockwise. To decrease the volume: Turn . Initialization 3 Interior features STEP 1 Select "Initialize" and then "Confirm" by using . 255


