

Owners Manual
Page 2
...the Owner's Manual that secures the spare tire. Toyota reserves the right to make changes at the time of printing. It contains brief descriptions of fundamental operations so you will have a better understanding of your new Corolla. A word about safe vehicle operations This Quick Reference...Manual and supplementary manuals so you can locate and use the vehicle's main equipment quickly and easily. 2010 Corolla This Quick Reference Guide is not a full description of Corolla operations. The Quick Reference Guide is current at any time without notice. (3) SAFETY AND EMERGENCY FEATURES...
...the Owner's Manual that secures the spare tire. Toyota reserves the right to make changes at the time of printing. It contains brief descriptions of fundamental operations so you will have a better understanding of your new Corolla. A word about safe vehicle operations This Quick Reference...Manual and supplementary manuals so you can locate and use the vehicle's main equipment quickly and easily. 2010 Corolla This Quick Reference Guide is not a full description of Corolla operations. The Quick Reference Guide is current at any time without notice. (3) SAFETY AND EMERGENCY FEATURES...

Owners Manual
Page 9
SAFETY AND EMERGENCY FEATURES 7 Please refer to the "Owner's Warranty Information Booklet," "Scheduled Maintenance Guide" or "Owner's Manual Supplement." Hood release OVERVIEW Pull Pull up latch and raise hood Engine maintenance 4 cylinder (2AZ-FE) engine 4 cylinder (2ZR-FE) engine FEATURES/OPERATIONS Engine coolant reservoir Engine oil filler cap Engine oil level dipstick Windshield washer fluid tank Note: Regularly scheduled maintenance, including oil changes, will help extend the life of your vehicle and maintain performance.
SAFETY AND EMERGENCY FEATURES 7 Please refer to the "Owner's Warranty Information Booklet," "Scheduled Maintenance Guide" or "Owner's Manual Supplement." Hood release OVERVIEW Pull Pull up latch and raise hood Engine maintenance 4 cylinder (2AZ-FE) engine 4 cylinder (2ZR-FE) engine FEATURES/OPERATIONS Engine coolant reservoir Engine oil filler cap Engine oil level dipstick Windshield washer fluid tank Note: Regularly scheduled maintenance, including oil changes, will help extend the life of your vehicle and maintain performance.
Owners Manual
Page 13
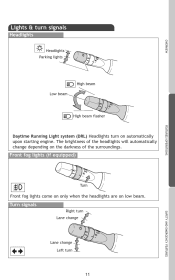
The brightness of the surroundings. Lights & turn signals Headlights OVERVIEW Headlights Parking lights High beam Low beam High beam flasher FEATURES/OPERATIONS Daytime Running Light system (DRL) Headlights turn on the darkness of the headlights will automatically change Left turn 11 Turn signals Right turn Lane change SAFETY AND EMERGENCY FEATURES Lane change depending on automatically upon starting engine. Front fog lights (if equipped) Turn Front fog lights come on only when the headlights are on low beam.
The brightness of the surroundings. Lights & turn signals Headlights OVERVIEW Headlights Parking lights High beam Low beam High beam flasher FEATURES/OPERATIONS Daytime Running Light system (DRL) Headlights turn on the darkness of the headlights will automatically change Left turn 11 Turn signals Right turn Lane change SAFETY AND EMERGENCY FEATURES Lane change depending on automatically upon starting engine. Front fog lights (if equipped) Turn Front fog lights come on only when the headlights are on low beam.
Owners Manual
Page 16
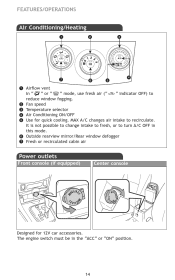
Outside rearview mirror/Rear window defogger Fresh or recirculated cabin air Power outlets Front console (if equipped) Center console Designed for quick cooling. MAX A/C changes air intake to reduce window fogging. The engine switch must be in this mode. It is not possible to change intake to fresh, or to turn A/C OFF in the "ACC" or "ON" position. 14 FEATURES/OPERATIONS Air Conditioning/Heating Airflow vent In " " or " " mode, use fresh air (" " indicator OFF) to recirculate. Fan speed Temperature selector Air Conditioning ON/OFF Use for 12V car accessories.
Outside rearview mirror/Rear window defogger Fresh or recirculated cabin air Power outlets Front console (if equipped) Center console Designed for quick cooling. MAX A/C changes air intake to reduce window fogging. The engine switch must be in this mode. It is not possible to change intake to fresh, or to turn A/C OFF in the "ACC" or "ON" position. 14 FEATURES/OPERATIONS Air Conditioning/Heating Airflow vent In " " or " " mode, use fresh air (" " indicator OFF) to recirculate. Fan speed Temperature selector Air Conditioning ON/OFF Use for 12V car accessories.

Owners Manual
Page 17
... speed may also be resumed once vehicle speed exceeds 25 mph. Multi-information display Display button SAFETY AND EMERGENCY FEATURES Push the display button to change information in the following: (1) Clock (2) Outside temperature (3) Current gas mileage (4) Average gas mileage* (5) Miles left on remaining fuel (6) Average vehicle speed from engine start* (7) Running...
... speed may also be resumed once vehicle speed exceeds 25 mph. Multi-information display Display button SAFETY AND EMERGENCY FEATURES Push the display button to change information in the following: (1) Clock (2) Outside temperature (3) Current gas mileage (4) Average gas mileage* (5) Miles left on remaining fuel (6) Average vehicle speed from engine start* (7) Running...

Owners Manual
Page 22
... blinks three times. If the system has not been initialized recently, setting the tire pressures to factory specifications should turn the ignition switch to temperature changes or changes in tire pressure from the outside. 20 After adjusting tire pressures, or after tires have been rotated or replaced, turn off the light. Let... air leakage. Trunk-Internal release Pull up Doors-Child safety locks Rear door Moving the lever to "LOCK" will allow the door to your local Toyota dealer.
... blinks three times. If the system has not been initialized recently, setting the tire pressures to factory specifications should turn the ignition switch to temperature changes or changes in tire pressure from the outside. 20 After adjusting tire pressures, or after tires have been rotated or replaced, turn off the light. Let... air leakage. Trunk-Internal release Pull up Doors-Child safety locks Rear door Moving the lever to "LOCK" will allow the door to your local Toyota dealer.
Owners Manual
Page 24
.... All specifications provided in terms of equipment. In addition, damage or performance problems resulting from the modification may differ from your Toyota vehicle. You should not be sure to make changes at the time of printing. Installation of a mobile two-way radio system As the installation of a mobile two-way radio system...
.... All specifications provided in terms of equipment. In addition, damage or performance problems resulting from the modification may differ from your Toyota vehicle. You should not be sure to make changes at the time of printing. Installation of a mobile two-way radio system As the installation of a mobile two-way radio system...

Owners Manual
Page 134
2 -1 . Driving proc e dure s Engine (ignition) sw itch (vehicles w ith smart key system) Performing the following operations when carrying the electronic key on your person starts the engine or changes "ENGINE START STOP" switch modes.
2 -1 . Driving proc e dure s Engine (ignition) sw itch (vehicles w ith smart key system) Performing the following operations when carrying the electronic key on your person starts the engine or changes "ENGINE START STOP" switch modes.

Owners Manual
Page 145
2-1. Driving procedures Changing shift ranges in S mode is automatically set to 4 or 5. 5-speed models: When the shift range is "4" or lower, holding the shift lever toward "+" sets the shift range to the S position and operate the shift lever. Upshifting Downshifting 2 When driving The initial shift range in S mode (multi-mode type) Shift the shift lever to "5".
2-1. Driving procedures Changing shift ranges in S mode is automatically set to 4 or 5. 5-speed models: When the shift range is "4" or lower, holding the shift lever toward "+" sets the shift range to the S position and operate the shift lever. Upshifting Downshifting 2 When driving The initial shift range in S mode (multi-mode type) Shift the shift lever to "5".

Owners Manual
Page 148
2 -1 . The right hand signal will flash until you release the lever. Move and hold the lever partway to signal a lane change . The left hand signal will flash until you release the lever. Driving proc e dure s Tur n signa l leve r Right turn Left turn Move and hold the lever partway to signal a lane change .
2 -1 . The right hand signal will flash until you release the lever. Move and hold the lever partway to signal a lane change . The left hand signal will flash until you release the lever. Driving proc e dure s Tur n signa l leve r Right turn Left turn Move and hold the lever partway to signal a lane change .

Owners Manual
Page 188
... especially true on wet or slippery surfaces. ● Avoid jerky starts or sudden acceleration. ● Avoid jerky steering and sharp turns, and slow down before changing lanes. 180 Compensate by large trucks or buses, which may skid, resulting in jackknifing and loss of your vehicle and trailer to reversing without a trailer...
... especially true on wet or slippery surfaces. ● Avoid jerky starts or sudden acceleration. ● Avoid jerky steering and sharp turns, and slow down before changing lanes. 180 Compensate by large trucks or buses, which may skid, resulting in jackknifing and loss of your vehicle and trailer to reversing without a trailer...

Owners Manual
Page 194
... the temperature and "∨" to operate. Temperature control Automatic mode Air conditioning ON/OFF switch Windshield defogger Air intake mode switch OFF Temperature setting display Changes the air outlets used Air outlet display Fan speed Fan speed display Using the automatic mode Press . U sing t he a ir c ondit ioning syst e m a nd de...
... the temperature and "∨" to operate. Temperature control Automatic mode Air conditioning ON/OFF switch Windshield defogger Air intake mode switch OFF Temperature setting display Changes the air outlets used Air outlet display Fan speed Fan speed display Using the automatic mode Press . U sing t he a ir c ondit ioning syst e m a nd de...

Owners Manual
Page 211
U sing t he a udio syst e m U sing t he ra dio Power Volume Changing the channel Adjusting the frequency (AM, FM mode) or channel (SAT mode) 3 Scanning for receivable stations Seeking the frequency Station selector Interior features AM⋅...
U sing t he a udio syst e m U sing t he ra dio Power Volume Changing the channel Adjusting the frequency (AM, FM mode) or channel (SAT mode) 3 Scanning for receivable stations Seeking the frequency Station selector Interior features AM⋅...

Owners Manual
Page 216
The channel you selected is no longer available. If it does not change automatically, select another channel. Wait for about 2 seconds until the radio returns to the previous channel or "CH001". Using the audio system --- Contact the XM® Listener Care Center at 1-800-967-2346 (U.S.A.) or 1-877438-9677 (Canada). 3-2.
The channel you selected is no longer available. If it does not change automatically, select another channel. Wait for about 2 seconds until the radio returns to the previous channel or "CH001". Using the audio system --- Contact the XM® Listener Care Center at 1-800-967-2346 (U.S.A.) or 1-877438-9677 (Canada). 3-2.

Owners Manual
Page 231
U sing t he a udio syst e m Opt im a l use of t he a udio syst e m Displays the current mode Changes the following settings • Sound quality and volume balance (→P. 226) The sound quality and balance setting can be changed to produce the best sound. • Volume and tone quality level (Automatic Sound Levelizer) (→P. 227) 3 Interior features Using the AUDIO CONTROL function 3 -2 .
U sing t he a udio syst e m Opt im a l use of t he a udio syst e m Displays the current mode Changes the following settings • Sound quality and volume balance (→P. 226) The sound quality and balance setting can be changed to produce the best sound. • Volume and tone quality level (Automatic Sound Levelizer) (→P. 227) 3 Interior features Using the AUDIO CONTROL function 3 -2 .

Owners Manual
Page 236
... hold the switch to decrease the Press and hold the switch until you hear a beep. 230 Using the audio system Changing the audio source Press when the audio system is pressed. Selecting a radio station STEP 1 STEP 2 Press Press to select... a preset station. 3-2. The audio source changes as follows each time is turned on volume. Adjusting the volume Press "+" on . Type A: FM1→FM2→CD... Radio requires XM® tuner and service. to select the radio mode. Contact your Toyota dealer.
... hold the switch to decrease the Press and hold the switch until you hear a beep. 230 Using the audio system Changing the audio source Press when the audio system is pressed. Selecting a radio station STEP 1 STEP 2 Press Press to select... a preset station. 3-2. The audio source changes as follows each time is turned on volume. Adjusting the volume Press "+" on . Type A: FM1→FM2→CD... Radio requires XM® tuner and service. to select the radio mode. Contact your Toyota dealer.

Owners Manual
Page 240
... very low levels of RF energy that it deemed to operate the equipment. CAUTION Using the hands-free phone system (for cellular phone) FCC WARNING: Changes or modifications in construction not expressly approved by the party responsible for uncontrolled equipment and meets the FCC radio frequency (RF) Exposure Guidelines in conjunction...
... very low levels of RF energy that it deemed to operate the equipment. CAUTION Using the hands-free phone system (for cellular phone) FCC WARNING: Changes or modifications in construction not expressly approved by the party responsible for uncontrolled equipment and meets the FCC radio frequency (RF) Exposure Guidelines in conjunction...

Owners Manual
Page 247
...a PIN code Locking the phone book Unlocking the phone book Registering the cellular phone to be used Changing a registered name of a cellular phone Deleting a registered cellular phone Listing the registered cellular phones Selecting a cellular phone to be ...used Changing the passkey Setting voice guidance volume Initialization 3 Security Phonebook Lock Phonebook Unlock Pair Phone Change Name Setup Phone Setup Delete List phones Select phone Set Passkey Interior features System Setup ...
...a PIN code Locking the phone book Unlocking the phone book Registering the cellular phone to be used Changing a registered name of a cellular phone Deleting a registered cellular phone Listing the registered cellular phones Selecting a cellular phone to be ...used Changing the passkey Setting voice guidance volume Initialization 3 Security Phonebook Lock Phonebook Unlock Pair Phone Change Name Setup Phone Setup Delete List phones Select phone Set Passkey Interior features System Setup ...

Owners Manual
Page 255
... command or . While the desired phone name is being read aloud, press the talk switch. 3 Interior features Pattern B STEP 2 Select the cellular phone to be changed by either of the following methods, and select "Confirm" by using . b. Press the talk switch and say "List phones". Pattern A STEP 2 Select the cellular phone... the name of the desired cellular phone is being read aloud, press the talk switch. Select the desired phone name by using a voice command or : a. Changing a registered name STEP 1 STEP 2 Select "Change Name" by using a voice command or .
... command or . While the desired phone name is being read aloud, press the talk switch. 3 Interior features Pattern B STEP 2 Select the cellular phone to be changed by either of the following methods, and select "Confirm" by using . b. Press the talk switch and say "List phones". Pattern A STEP 2 Select the cellular phone... the name of the desired cellular phone is being read aloud, press the talk switch. Select the desired phone name by using a voice command or : a. Changing a registered name STEP 1 STEP 2 Select "Change Name" by using a voice command or .

Owners Manual
Page 256
... Phones" by using a voice command or causes the list of a cellular phone is complete, the system returns to be available Selecting a cellularphone: "Select Phone" Changing a registered name: "Change Name" Deleting a cellular phone: "Delete" 250 3-3. Using the hands-free phone system (for cellular phone) STEP 3 Press the talk switch or select "Record Name...
... Phones" by using a voice command or causes the list of a cellular phone is complete, the system returns to be available Selecting a cellularphone: "Select Phone" Changing a registered name: "Change Name" Deleting a cellular phone: "Delete" 250 3-3. Using the hands-free phone system (for cellular phone) STEP 3 Press the talk switch or select "Record Name...


