Navigation Manual
Page 2
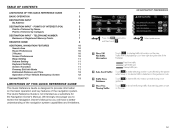
... Registered Memory Points REGISTER HOME ADDITIONAL NAVIGATION FEATURES Search Area Route Preferences 3 Routes Screen Preferences Beep Setting Volume Setting Keyboard Setting Screen Transition Freeway Exit Info Mode Estimated Distance and Time Operation of the navigation system capabilities and limitations. Traf c ow is detected on the map. 1 14 We strongly encourage you...
... Registered Memory Points REGISTER HOME ADDITIONAL NAVIGATION FEATURES Search Area Route Preferences 3 Routes Screen Preferences Beep Setting Volume Setting Keyboard Setting Screen Transition Freeway Exit Info Mode Estimated Distance and Time Operation of the navigation system capabilities and limitations. Traf c ow is detected on the map. 1 14 We strongly encourage you...
Navigation Manual
Page 3
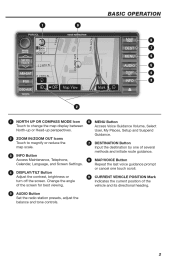
... MAP VOICE WMA DEST MENU TUNE SEEK TRACK AUDIO DISP TILT AM• SAT FM DISC• AUX TOYOTA INFO £ NORTH UP OR COMPASS MODE Icon Touch to magnify or reduce the map scale. INFO Button Access Maintenance, Telephone, Calendar, Language, and Screen Settings. DESTINATION Button Input the destination by one touch...
... MAP VOICE WMA DEST MENU TUNE SEEK TRACK AUDIO DISP TILT AM• SAT FM DISC• AUX TOYOTA INFO £ NORTH UP OR COMPASS MODE Icon Touch to magnify or reduce the map scale. INFO Button Access Maintenance, Telephone, Calendar, Language, and Screen Settings. DESTINATION Button Input the destination by one touch...
Navigation Manual
Page 12
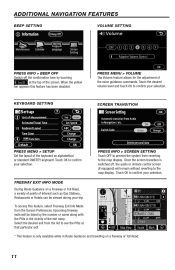
...display. Upcoming freeway exits will remain without reverting to confirm your selection. When the yellow bar appears this feature, select Freeway Exit Info Mode from the list to confirm your selection. PRESS MENU > VOLUME The Volume feature allows for the adjustment of the voice ...guidance commands. PRESS INFO > SCREEN SETTING Touch OFF to prevent the system from reverting to confirm your trip. Once the screen transition is only available while...
...display. Upcoming freeway exits will remain without reverting to confirm your selection. When the yellow bar appears this feature, select Freeway Exit Info Mode from the list to confirm your selection. PRESS MENU > VOLUME The Volume feature allows for the adjustment of the voice ...guidance commands. PRESS INFO > SCREEN SETTING Touch OFF to prevent the system from reverting to confirm your trip. Once the screen transition is only available while...
Navigation Manual
Page 27
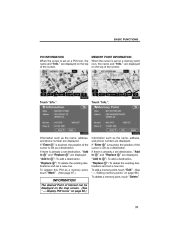
are displayed on the top of the screen. Touch "Info.". If there is already a set destination, "Add to ": To add a destination. If "Enter " is touched, the position of the screen. "Replace ": To delete the existing ... such as a destination. BASIC FUNCTIONS POI INFORMATION When the cursor is set on a memory point icon, the name and "Info." INFORMATION The desired Point of the cursor is set a new one . Touch "Info.". "Replace ": To delete the existing destinations and set as the name, address, and phone number are displayed. If "Enter...
are displayed on the top of the screen. Touch "Info.". If there is already a set destination, "Add to ": To add a destination. If "Enter " is touched, the position of the screen. "Replace ": To delete the existing ... such as a destination. BASIC FUNCTIONS POI INFORMATION When the cursor is set on a memory point icon, the name and "Info." INFORMATION The desired Point of the cursor is set a new one . Touch "Info.". "Replace ": To delete the existing destinations and set as the name, address, and phone number are displayed. If "Enter...
Navigation Manual
Page 28
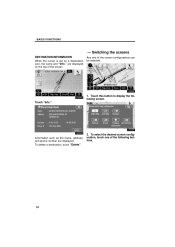
Any one of the following screen. To delete a destination, touch "Delete". 2. Touch this button to display the following buttons. 34 To select the desired screen configuration, touch one of the screen. Touch "Info.". Information such as the name, address, and phone number are displayed on a destination icon, the name and "Info." Switching the screens DESTINATION INFORMATION When the cursor is set on the top of the screen configurations can be selected . 1. BASIC FUNCTIONS - are displayed.
Any one of the following screen. To delete a destination, touch "Delete". 2. Touch this button to display the following buttons. 34 To select the desired screen configuration, touch one of the screen. Touch "Info.". Information such as the name, address, and phone number are displayed on a destination icon, the name and "Info." Switching the screens DESTINATION INFORMATION When the cursor is set on the top of the screen configurations can be selected . 1. BASIC FUNCTIONS - are displayed.
Navigation Manual
Page 30
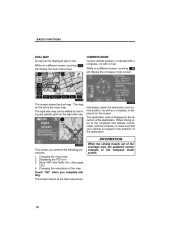
... driving refer to the longitude and latitude coordinates, and the compass, to make sure that your vehicle is displayed on the screen. Show XMr NavTraffic Info. (See page 120.) 4. While on a different screen, touching will display the compass mode screen. Changing the map scale 2. Changing the orientation of the destination. While...
... driving refer to the longitude and latitude coordinates, and the compass, to make sure that your vehicle is displayed on the screen. Show XMr NavTraffic Info. (See page 120.) 4. While on a different screen, touching will display the compass mode screen. Changing the map scale 2. Changing the orientation of the destination. While...
Navigation Manual
Page 32
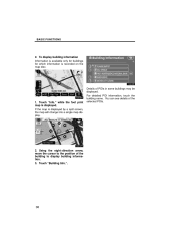
...in some buildings may be displayed. If the map is recorded on the map disc. 1. Details of the selected POIs. 2. Touch "Building Info.". 38 BASIC FUNCTIONS D To display building information Information is available only for buildings for which information is displayed by a split screen, the ...map will change into a single map display. while the foot print map is displayed. Touch "Info." Using the eight−direction arrow, move the cursor to the position of the building to display building information. 3. For detailed POI information...
...in some buildings may be displayed. If the map is recorded on the map disc. 1. Details of the selected POIs. 2. Touch "Building Info.". 38 BASIC FUNCTIONS D To display building information Information is available only for buildings for which information is displayed by a split screen, the ...map will change into a single map display. while the foot print map is displayed. Touch "Info." Using the eight−direction arrow, move the cursor to the position of the building to display building information. 3. For detailed POI information...

Navigation Manual
Page 59
... displayed. To start guidance, touch "Guide". Releasing the finger from three possible routes. (See page 67.) "Route": To change the route preference. (See page 66.) "Info.": If this button is touched, the map scrolls in that direction. The system starts route search and displays recommended routes. Current position Destination point 3 Type...
... displayed. To start guidance, touch "Guide". Releasing the finger from three possible routes. (See page 67.) "Route": To change the route preference. (See page 66.) "Info.": If this button is touched, the map scrolls in that direction. The system starts route search and displays recommended routes. Current position Destination point 3 Type...

Navigation Manual
Page 61
... select the desired route from three routes, touch "3 Routes". 2. "Short": A route by a purple line. This route is indicated by which you travel by a green line. "Info.": To display the following information about each of GPS signals, it is dimmed, the route cannot avoid including a freeway in the shortest distance. Upon reception...
... select the desired route from three routes, touch "3 Routes". 2. "Short": A route by a purple line. This route is indicated by which you travel by a green line. "Info.": To display the following information about each of GPS signals, it is dimmed, the route cannot avoid including a freeway in the shortest distance. Upon reception...
Navigation Manual
Page 119
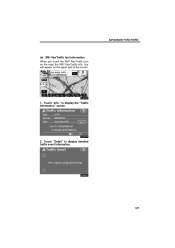
to display detailed traffic event information. 125 ADVANCED FUNCTIONS (e) XMr NavTraffic text information When you touch the XMr NavTraffic icon on the upper part of the screen. 1. bar will appear on the map, the XMr NavTraffic info. Touch "Detail" to display the "Traffic Information" screen. 2. Touch "Info."
to display detailed traffic event information. 125 ADVANCED FUNCTIONS (e) XMr NavTraffic text information When you touch the XMr NavTraffic icon on the upper part of the screen. 1. bar will appear on the map, the XMr NavTraffic info. Touch "Detail" to display the "Traffic Information" screen. 2. Touch "Info."

Navigation Manual
Page 122
Push the "INFO" button. 2. For details of each touch screen button, see "INFORMATION ITEMS" on . (See page 24.) If "OFF" is selected, the "Information" screen is disabled. "Set ...
Push the "INFO" button. 2. For details of each touch screen button, see "INFORMATION ITEMS" on . (See page 24.) If "OFF" is selected, the "Information" screen is disabled. "Set ...
Navigation Manual
Page 124
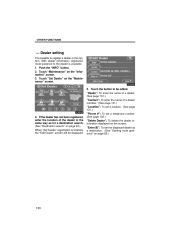
... the displayed dealer as for a destination search. (See "Destination search" on the screen. With dealer information registered, route guidance to be displayed. 130 Push the "INFO" button. 2. Touch "Set Dealer" on the "Information" screen. 3. OTHER FUNCTIONS -
... the displayed dealer as for a destination search. (See "Destination search" on the screen. With dealer information registered, route guidance to be displayed. 130 Push the "INFO" button. 2. Touch "Set Dealer" on the "Information" screen. 3. OTHER FUNCTIONS -
Navigation Manual
Page 126
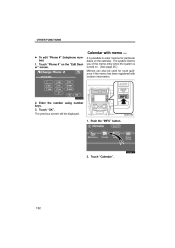
It is turned on. (See page 25.) Memos can also be displayed. 1. The previous screen will be used for particular dates on the "Edit Dealer" screen. D To edit "Phone #" (telephone number) 1. Touch "OK". Touch "Calendar". 132 Enter the number using number keys. 3. Touch "Phone #" on the calendar. OTHER FUNCTIONS Calendar with location information. 2. The system informs you of the memo entry when the system is possible to enter memos for route guidance if the memo has been registered with memo - Push the "INFO" button. 2.
It is turned on. (See page 25.) Memos can also be displayed. 1. The previous screen will be used for particular dates on the "Edit Dealer" screen. D To edit "Phone #" (telephone number) 1. Touch "OK". Touch "Calendar". 132 Enter the number using number keys. 3. Touch "Phone #" on the calendar. OTHER FUNCTIONS Calendar with location information. 2. The system informs you of the memo entry when the system is possible to enter memos for route guidance if the memo has been registered with memo - Push the "INFO" button. 2.
Navigation Manual
Page 128
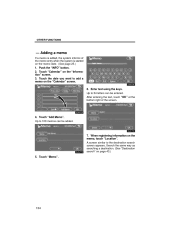
... on the memo date. (See page 25.) 1. Touch "Add Memo". OTHER FUNCTIONS - Up to add a memo on the "Calendar" screen. 6. Touch "Memo". 134 Push the "INFO" button. 2. Enter text using the keys. Touch the date you want to 100 memos can be added. 7. Adding a memo If a memo is added, the system...
... on the memo date. (See page 25.) 1. Touch "Add Memo". OTHER FUNCTIONS - Up to add a memo on the "Calendar" screen. 6. Touch "Memo". 134 Push the "INFO" button. 2. Enter text using the keys. Touch the date you want to 100 memos can be added. 7. Adding a memo If a memo is added, the system...

Navigation Manual
Page 129
.... 2. Touch the desired search condition to display a memo list by setting a condition. 1. Push the "INFO" button. 2. Touch "List" on the "Information" screen. 3. Touch the item to be edited. 1. Editing a memo The registered memo can be edited. Touch "Calendar" on page ...
.... 2. Touch the desired search condition to display a memo list by setting a condition. 1. Push the "INFO" button. 2. Touch "List" on the "Information" screen. 3. Touch the item to be edited. 1. Editing a memo The registered memo can be edited. Touch "Calendar" on page ...

Navigation Manual
Page 132
Push the "INFO" button. To display the screen in the system even with the headlight switch on, touch "Day Mode" on the position of the headlight switch, the screen changes to the day mode or night mode. 1. If the screen is set in the day mode with the headlight switch turned on, this condition is memorized in the day mode even with the engine turned off. 2. Touch "Screen Setting". 138 OTHER FUNCTIONS Screen setting D Changing between day mode and night mode Depending on the adjustment screen for brightness and contrast control.
Push the "INFO" button. To display the screen in the system even with the headlight switch on, touch "Day Mode" on the position of the headlight switch, the screen changes to the day mode or night mode. 1. If the screen is set in the day mode with the headlight switch turned on, this condition is memorized in the day mode even with the engine turned off. 2. Touch "Screen Setting". 138 OTHER FUNCTIONS Screen setting D Changing between day mode and night mode Depending on the adjustment screen for brightness and contrast control.

Navigation Manual
Page 135
"Beep Off" is highlighted. Touch "Beep Off". Touch "Language". 141 Push the "INFO" button. 1. OTHER FUNCTIONS Beep setting You can be changed. 1. Push the "INFO" button. 2. Selecting a language The language of the touch screen buttons, pop−up messages and the voice guidance can set a beep sound off. To switch the beep sound on, touch "Beep Off" again. 2.
"Beep Off" is highlighted. Touch "Beep Off". Touch "Language". 141 Push the "INFO" button. 1. OTHER FUNCTIONS Beep setting You can be changed. 1. Push the "INFO" button. 2. Selecting a language The language of the touch screen buttons, pop−up messages and the voice guidance can set a beep sound off. To switch the beep sound on, touch "Beep Off" again. 2.
Navigation Manual
Page 192
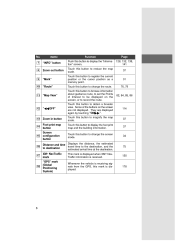
... by touching "ON"" ". Touch this button to change the route. Touch this button to display the foot print map and the building information. No. 7 8 Name "INFO" button Zoom out button "Mark" "Route" "Map View" Function Push this button to reduce the map scale. They are not displayed. Touch this button to...
... by touching "ON"" ". Touch this button to change the route. Touch this button to display the foot print map and the building information. No. 7 8 Name "INFO" button Zoom out button "Mark" "Route" "Map View" Function Push this button to reduce the map scale. They are not displayed. Touch this button to...

Warranty, Maitenance, Services Guide
Page 28
Get the inside track on: n Info about your Toyota n n Car Care Tips Savings See more at www. ToyotaOwnersOnline .com 00505-SMG09-COR | First Printing | 11/07
Get the inside track on: n Info about your Toyota n n Car Care Tips Savings See more at www. ToyotaOwnersOnline .com 00505-SMG09-COR | First Printing | 11/07
